background image

24

Special Effect Features

3, 4

JOG

         KEY

1

POWER

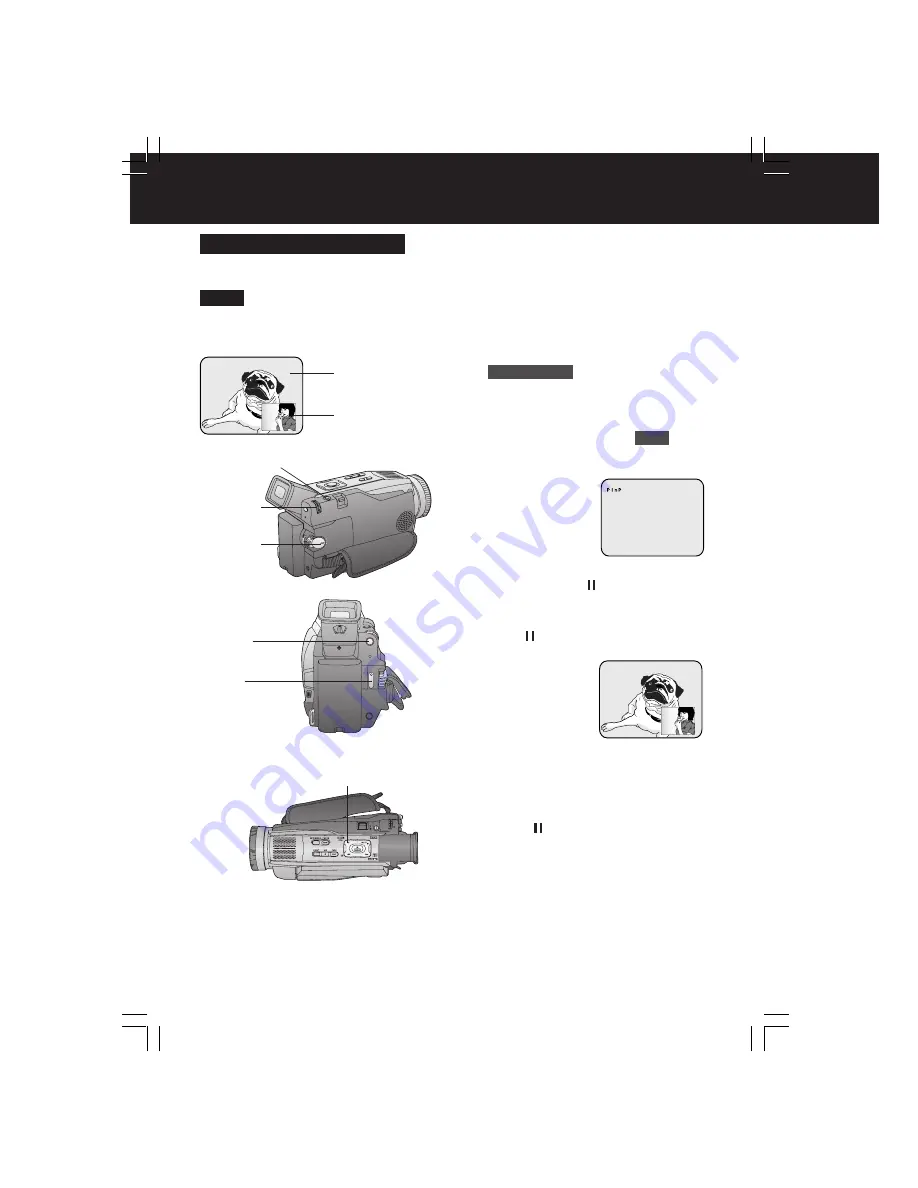
Picture in Picture (PinP)

You can display a PinP (still image) screen
on the Main Picture.

• PinP position is fixed at the bottom right

of the screen.

Note

1

Set POWER to CAMERA.

2

Press MENU 

to display the menu

screen.

3

Rotate JOG KEY repeatedly 

to select

 D.FUNCTION

 , then 

press JOG KEY

to display the CAMERA FUNCTION
menu screen.

4

Press JOG KEY 

to select 

PinP 

.

Press MENU twice

 to exit this menu.

• “PinP” will appear in the EVF or the

LCD monitor.

5

Aim at the scene you wish to place as
PinP, then

 press   (CAMERA STILL)

to freeze the image.

6

Press   (CAMERA STILL) again

 to

place the frozen image as PinP.

7

Press REC/PAUSE

 to record a scene

with PinP image.

Press PHOTOSHOT

 to record a

scene with PinP image in PhotoShot
mode.

Press   (CAMERA STILL) again

 to

remove PinP image.

Main Picture

Picture in Picture
(PinP still image)

5, 6, 7

CAMERA STILL

PHOTOSHOT

7

REC/

   PAUSE

2

MENU

DV102-K.p21-24.p65

02/06/06, 13:13

24

Summary of Contents for Digital Palmcorder PV-DV102-K

Page 1: ... this product please read these instructions thoroughly LSQT0565A Model No PV DV102 K Digital Video Camcorder Operating Instructions Mini R For assistance please call 1 800 561 5505 or visit us at www panasonic ca DV102 K p 1 4 p65 02 06 06 13 12 1 ...

Page 2: ...e of this unit has been included Therefore it should be read carefully in order to avoid any problems CAUTION RISK OF ELECTRIC SHOCK DO NOT OPEN CAUTION TO REDUCE THE RISK OF ELECTRIC SHOCK DO NOT REMOVE COVER OR BACK NO USER SERVICEABLE PARTS INSIDE REFER SERVICING TO QUALIFIED SERVICE PERSONNEL The above markings are located on the appliance bottom cover Your Mini Palmcorder is designed to recor...

Page 3: ...be retained for future reference 3 Heed Warnings All warnings on the unit and in the operating instructions should be adhered to 4 Follow Instructions All operating and maintenance instructions should be followed 5 Cleaning Unplug this video unit from the wall outlet before cleaning Do not use liquid or aerosol cleaners Use a dry cloth for cleaning 6 Attachments Do not use attachments not recommen...

Page 4: ... or other hazards 21 Safety Check Upon completion of any service or repairs to this video unit ask the service technician to perform safety checks to determine that the video unit is in safe operating order USE LOCATION TO AVOID SHOCK HAZARD Your Palmcorder and power supply should not be exposed to rain or moisture Do not connect the power supply or operate your Palmcorder if it gets wet Your Palm...

Page 5: ...cording 16 Digital PhotoShot Mode 18 Zoom 19 Special Effect Features 21 Advanced Settings 25 Palmcorder Accessory System 49 Notes On Operations 50 Specifications 51 Before Requesting Service 52 On Screen Displays OSD 54 Warranty 55 MENU OSD 56 Electronic Viewfinder LCD Monitor Indications 60 Index of Controls 63 Index Back Cover Playback Your Recordings 29 Special Effect Features 31 Digital Featur...

Page 6: ...11 K with AC Cable and DC Cable 1 pc Shoulder Strap LSFC0012 1 pc Battery Pack CGR D08 CGR D08R 1 pc Lens Cap LSYF0521 with Lens Cap Strap LSGQ0066 1 pc A V Cable LSJA0280 Microsoft and Windows are registered trademarks of Microsoft in the United States and other countries Intel Pentium is a registered trademark i LINK is a trademark IBM is a registered trademark of IBM Company Unpack your Palmcor...

Page 7: ...ithout turning the Palmcorder on To remove the cassette Slide TAPE EJECT to open the Cassette Compartment Cover and pull the cassette tape straight out 1LCD OPEN Cassette Compartment Cover 2TAPE EJECT 4PUSH CLOSE Before you begin Connect the Palmcorder to a power source pp 12 13 1 2 3 OR 1 Loosen the strap from the Buckle and create a loop 2 Pull the strap firmly through the Buckle to shorten or l...

Page 8: ...5 33 44 Stop Set pp 14 15 29 44 Slow Frame Advance Forward pp 32 33 Slow Frame Advance Backward pp 32 33 Index Search Forward pp 33 34 Index Search Backward pp 33 34 Speaker Volume p 30 1 Hold down LIGHT for more than 0 7 seconds to turn ON or OFF will appear on the screen To brighten the natural colours in a scene Using the Built in Light Caution This light becomes hot during operation Make sure ...

Page 9: ...ntrol the desired Palmcorder For VCR 2 Press these buttons at the same time For VCR 1 Press these buttons at the same time Remote Controlling Two Palmcorders Note 1 Set POWER to VCR or CAMERA The POWER Lamp lights red Be sure POWER is fully turned to VCR or CAMERA position 2 Press MENU to display the VCR or CAMERA mode menu screen 3 Rotate JOG KEY to select SET UP in the CAMERA mode menu screen or...

Page 10: ...ssette Compartment Cover Before you begin Charge the Battery p 12 2Set POWER to VCR or CAMERA 1 2 These Palmcorders are equipped with the Easy Cassette Eject System so it is easy to insert or remove tapes even when on a tripod p 7 4 Insert a cassette record tab up window side facing out Make sure the record tab is closed p 6 5 Press PUSH CLOSE mark to close the Cassette Compartment Cover DV102 K p...

Page 11: ...CAMERA 3 Press LCD OPEN to unlock the LCD monitor Swing it fully open and adjust the angle To Watch Playback in the LCD Liquid Crystal Display When the LCD monitor is fully open the Viewfinder automatically turns OFF 2 Press LCD OPEN to unlock the LCD monitor Swing it fully open and adjust the angle 3 Press REW to rewind the tape 4 Press PLAY to start playback 5 Press STOP to stop playback Before ...

Page 12: ...the CHARGE Lamp Charge the Battery within an ambient temperature range of 10 C 50 F and 30 C 86 F If charging is done in extreme low or high temperatures Battery charge time increases CHARGE Lamp flashes when The Battery is being charged but charging is taking longer than normal Charging is not possible Remove the Battery once wait a short time then re attach it for charging Note 1 Insert the Batt...

Page 13: ...gh temperatures Batterychargetimeincreases Safety precautions Do not place the Battery near or dispose of in fire Do not directly connect short circuit the positive and negative terminals Never attempt to disassemble or reassemble the Battery To avoid damage to the Battery Do not drop or jar the Battery Use the Battery with specified models only If the Battery is used in extremely high temperature...

Page 14: ...ns Press JOG KEY repeatedly to move back to an item and correct A built in Battery maintains clock operation If the Palmcorder is not connected to a power source for a few months the built in battery may discharge and CLOCK BATTERY indication appears p 54 EXAMPLE When DATE TIME setting is completed press MENU three times to start the clock and exit 2002 YEAR Push PUSH Rotate PUSH JAN FEB MONTH MON...

Page 15: ...select PROG AE or CINEMA 3 REC MODE CAMERA REC MODE menu is displayed To select REC SPEED AUDIO REC INDEX SHUTTER SELF REC WIND CUT or ZOOM MIC 4 SET UP CAMERA SET UP menu is displayed To select REMOTE or BEEP 5 DISPLAY SETTING DISPLAY SETTING menu is displayed To select DISPLAY C RESET DATE TIME or CLOCK SET 6 LCD EVF SETTING LCD EVF SETTING menu is displayed To select LCD BRIGHTNESS LCD COLOR or...

Page 16: ...ide TAPE EJECT EVF To conserve power After 5 minutes the Record Pause mode will automatically change to Standby mode To resume recording set POWER to OFF and then ON again When the Palmcorder is aimed at excessively bright objects or bright lights a vertical bar may appear in the picture This is a normal characteristic of the CCD pick up device Try to avoid this whenever possible SimpleRecording B...

Page 17: ... or COLOR below 3 Start recording Using the LCD monitor will reduce battery operating time Close the LCD monitor completely when not in use Using the LCD Monitor 1LCD OPEN Note 180 90 90 Camera Recording To adjust the LCD EVF BRIGHTNESS or COLOR 1 Press MENU to display the main menu screen 2 Rotate JOG KEY to select LCD EVF SETTING from the main menu screen Menu OSD pp 57 59 3 Press JOG KEY to dis...

Page 18: ...re to make an interesting slide show etc p 41 1Set POWER to CAMERA 2Press PHOTOSHOT in Record Pause mode PHOTO will appear in the EVF or the LCD monitor If SHUTTER on the menu screen is set to ON a sound effect similar to the shutter of a film camera will be heard when PHOTOSHOT is pressed When PHOTOSHOT is pressed the playback image takes approx 7 seconds to process After that the Camera mode scr...

Page 19: ...neFunction 1 Set POWER to CAMERA 2 Press MENU to display the CAMERA mode menu screen 3 Rotate JOG KEY to select REC MODE then press JOG KEY to display the CAMERA REC MODE menu screen 4 Rotate JOG KEY to select ZOOM MIC in the CAMERA REC MODE menu Menu OSD p 57 5 Press JOG KEY to select ON Press MENU twice to exit Z MIC will appear on the screen The Zoom Microphone Function may not work effectively...

Page 20: ... 1While in RECORD mode press STILL and hold for 2 seconds to capture a still picture The captured still picture will be recorded together with sound 2Press STILL once again to release the still picture The camera will resume recording real time pictures Rotate the LCD monitor 180 degrees so it faces the same direction as the lens to record yourself 1 Set POWER to CAMERA 2 Press MENU to display the...

Page 21: ...ible with a wide screen TV equipped with an S2 picture terminal Backlight 2 3BACK LIGHT The Indicator will not appear in the EVF or LCD monitor when OFF is selected in the DISPLAY menu Note Use when recording a subject that is darker than the surrounding scene in a shadowed area or when the light source is behind your subject 3 4 JOG KEY 5REC PAUSE 1POWER EVF LCD 2MENU 1 Set POWER to CAMERA 2 Pres...

Page 22: ... whitish It is not possible to select the SPORTS mode or PORTRAIT mode together with the MagicPix mode in the Digital function camera menu Program AE 3MENU The Auto Exposure feature can be used to make quality recordings in a variety of scene situations Note 1 Set POWER to CAMERA 2 Hold down AUTO MANUAL for more than 0 7 seconds so that the MNL indication appears in the EVF or the LCD monitor 3 Pr...

Page 23: ... 2 Press REC PAUSE to start recording 3 Release FADE and the picture will gradually fade in Fade Out Use to create a soft ending or together with fade in for a soft transition from one scene to the next ADuring recording hold down FADE until the picture fades out BPress REC PAUSE to pause the recording You can make smoother scene transitions for a more professional look DV102 K p21 24 p65 02 06 06...

Page 24: ...een 4 Press JOG KEY to select PinP Press MENU twice to exit this menu PinP will appear in the EVF or the LCD monitor 5 Aim at the scene you wish to place as PinP then press CAMERA STILL to freeze the image 6 Press CAMERA STILL again to place the frozen image as PinP 7 Press REC PAUSE to record a scene with PinP image Press PHOTOSHOT to record a scene with PinP image in PhotoShot mode Press CAMERA ...

Page 25: ... balance in most lighting conditions When the source illumination is a halogen lamp When shooting outdoors on a sunny day The White Balance setting that was previously set manually For manual White Balance adjustment A Rotate JOG KEY to select B Point the Palmcorder at a white object full screen and hold JOG KEY down until indication stops flashing If indication flashes when the Palmcorder is turn...

Page 26: ...the EVF or the LCD monitor 4 Press and hold POWER ZOOM T side Telephoto until the lens is at maximum zoom in 5 Turn M FOCUS DIAL until the picture is in focus It may be necessary to back away from the subject to focus the image properly 6 Press POWER ZOOM to W or T as desired The subject will remain in focus over the entire zooming range It may be necessary to back away from the subject to focus t...

Page 27: ...edly to display the shutter speed 4 Rotate JOG KEY to choose one of the following shutter speeds Hold down AUTO MANUAL for more than 0 7 seconds to cancel the setting For proper colour reproduction it is recommended that you use this feature outdoors For indoor High Speed Shutter recording additional halogen or tungsten light should be provided Fluorescent light will degrade the picture quality Th...

Page 28: ...to cancel the setting The value to which dB is attached indicates a gain value If this value is too large the quality of the image deteriorates Depending on ZOOM magnification the iris value may not be displayed correctly If you are using Program AE mode you cannot adjust the iris If the iris is adjusted manually the above modes will be cancelled Note 3 4 JOG KEY 1POWER Iris Setting WIND CUT You c...

Page 29: ...LCD monitor to playback your recording Note PHONE Jack Before you begin Connect the Palmcorder to a power source pp 12 13 Insert a recorded cassette When a tape recorded in LP mode on another digital video camera is played back on this unit the picture may appear mosaic Using the LCD monitor reduces battery operating time You can place the Palmcorder on a table etc for viewing Rotate the LCD Monit...

Page 30: ...t PLAY MODE then press JOG KEY to display the VCR PLAY MODE menu screen 4 Rotate JOG KEY to select B SEARCH in the VCR PLAY MODE menu Menu OSD p 58 5 Press JOG KEY to select ON BLANK will appear on the screen 3 4 5 JOG KEY 1POWER Blank Search You can go directly to a blank portion of tape and start recording exactly where you left off RepeatPlayback Adjusting the Volume 2MENU EVF LCD EVF LCD 1 Rot...

Page 31: ...h for an instant or mosaic This is normal during this mode Note Note 1Press PAUSE during playback 2Press PLAY or PAUSE to release To protect the tape and video heads your Palmcorder s operating modes will revert as follows STILL STOP after 3 minutes AHold down FAST FORWARD SEARCH during fast forward BHold down REWIND SEARCH during rewind The picture will appear for as long as the button is held do...

Page 32: ...rch at a speed other than 1X mosaic like patterns will appear in the picture During the Variable Speed Search sound is muted Variable Speed Search Note 1PLAY 2 3 JOG KEY Note 1 Forward Slow Press SLOW F ADV during play Reverse Slow Press SLOW F ADV during play 2 Press PLAY to release During reverse slow motion playback time code indication may not change regularly Palmcorder will automatically STO...

Page 33: ... used In the Photo Scene Index Search mode the shutter sound effect may not be able to be heard even when SHUTTER is set to ON Photo Index Search may fail to detect a recorded PhotoShot image if the image is 3 seconds or less 1 Press MENU to display the VCR mode menu screen 2 Rotate JOG KEY to select PLAY MODE and press JOG KEY to display the VCR PLAY MODE menu screen 3 Rotate JOG KEY to select IN...

Page 34: ...hange in the scene number is quite slow Do not press INDEX SEARCH rapidly and continuously During Reverse Index Search mode playback will not begin when a tape rewinds all the way to the beginning Search for a particular scene by using the electronic index marks placed at the beginning of each recording 1 Press MENU to display the VCR mode menu screen 2 Rotate JOG KEY to select PLAY MODE then pres...

Page 35: ...ress PLAY to start playback Press STOP to stop playback Strobe Speeds Strobe Speeds FAST NORM SLOW 9 screen capture time Every 0 3 seconds Every 0 6 seconds Every 1 0 seconds A Multi Image Playback screen cannot be output from the DV terminal or Digital Still Image terminal A Multi screen will have slightly lower image quality Note In Strobe Multi Mode you can select the rate at which a succession...

Page 36: ...ating instructions for further information 3Start playback or begin a recording Make sure the Palmcorder and TV are turned off while connecting Please connect the A V Cable securely Remote Control Only You can display the various EVF and LCD indications on your TV by pressing DISPLAY ON TV on the remote control Press again to remove the indications Note TV with AUDIO VIDEO IN Jacks View Recording ...

Page 37: ...ss JOG KEY to select D ZOOM1 or D ZOOM2 D ZOOM1 from 10X to 25X D ZOOM2 from 10X to 700X OFF Turn off D ZOOM Press MENU twice to exit 5 Press REC PAUSE to start recording and press POWER ZOOM to zoom in or zoom out The magnification level is always displayed in the EVF or the LCD monitor when DISPLAY is set to ON Menu OSD pp 57 59 6 Repeat steps 2 4 to select OFF to cancel this feature Other Digit...

Page 38: ...ncel this feature 5PLAY Colour recording of video or still images onto the Mini DV tape in low lighting pp 40 56 MagicPix Images 1 Set POWER to CAMERA 2 Press MENU to display the menu screen 3 Rotate JOG KEY to select D FUNCTION and then press JOG KEY to display the CAMERA FUNCTION menu screen 4 Rotate JOG KEY to select D FUNCTION and then press JOG KEY repeatedly to select MAGICPIX Press MENU twi...

Page 39: ...t can be used in both the Recording and Playback VCR modes CAMERA mode VCR mode Other Digital Functions are turned off automatically when the EIS and Digital Zoom are selected A Set POWER to VCR B Press PLAY to start playback C Press EIS to stabilize the picture D Press EIS again to cancel Be sure that D E I S is turned off when not needed Note When using D E I S in VCR mode the image size is slig...

Page 40: ...il when in motion STRETCH The picture is expanded horizontally MAGICPIX Not available during playback Colour recording of video or still images onto the Mini DV Tape in low lighting p 38 Only Manual Focus is available WIPE Successive scenes are separated in a way which simulates the drawing of a curtain MIX The current scene is mixed in with the following scene during scene changes PinP PinP Still...

Page 41: ...to step 4 2PLAY 2PAUSE Before you begin Turn on the Palmcorder Insert a pre recorded tape to be dubbed Built in Microphone The AUDIO REC setting in CAMERA MENU mode should be as follows Select 12 bit if you do not want the original sound to be completely replaced during an audio dub If you dub over a tape which has both 12 bit and 16 bit audio recordings on it keep in mind that the original 16 bit...

Page 42: ...k the sound will be stereo regardless of the AUDIO OUT setting If you recorded in LP mode you cannot use the A DUB feature Note You can set an automatic Dubbing stop point APress MENU to display the VCR menu screen BRotate JOG KEY to select DISPLAY SETTING and then press JOG KEY to display the DISPLAY SETTING menu CRotate JOG KEY to select DISPLAY and then press JOG KEY to set to MEMORY DPress MEN...

Page 43: ...Monitor with your TV 1Insert a pre recorded tape into the source playing Palmcorder and a blank tape with record tab in place into the target VCR Recorder 2Press PLAY on the Palmcorder When the tape reaches the point from which you want to start dubbing press PAUSE 3Place the VCR into REC PAUSE mode See VCR manual 4Simultaneously press PAUSE on both units to begin copying 5Press STOP on both units...

Page 44: ... starting point of the dub 5 Simultaneously press PAUSE on both units to begin dubbing 6 Press STOP on the recording unit and then press STOP on the playing unit to end dubbing When two Palmcorders are used for dubbing it is recommended that the Remote Control VCR1 or VCR2 setting be used to avoid improper operation CAUTION Unauthorized exchanging and or copying of copyrighted recordings may be co...

Page 45: ...e A video clip can be transferred directly to your PC Personal Computer via a DV Interface Cable i LINK not supplied using products and software from a number of video editing software companies Using products from video editing software companies allows you to capture and edit video clips using the DV Interface i LINK During Palmcorder playback do not disconnect the DV Interface Cable i LINK or t...

Page 46: ... Connecting Cable for Windows optional PC Connection Unit PV DRS2 p 49 An image recorded on the DV Tape can be transferred to your PC Personal Computer Connection 1 Turn off your PC 2 Connect the Palmcorder to your PC Windows using the PC connecting cable optional PC Connection Unit PV DRS2 p 49 Before connecting the Palmcorder to the PC make sure the PC power is off to ensure that images are tran...

Page 47: ...etter 5 Follow the instructions as they appear on the PC screen until the installation is complete Setup window will disappear when the installation is complete 1 Click on Start Programs Panasonic Palmcorder then PHOTOVU LINK 2 PHOTOVU LINK is opened COM Port and Baudrate are automatically selected Refer to Help for information about application operations and other Error messages Note Before you ...

Page 48: ... or STILL mode 4Click on File then Save As Save transferred image to PC Note If while transferring the image to your PC the displayed picture appears abnormal close PHOTOVU LINK and turn Camcorder POWER off Run PHOTOVU LINK again and turn Palmcorder Power back on Now transfer again Photo Search may fail to detect a recorded PhotoShot image if the image is 3 seconds or less Transfer Button Operatio...

Page 49: ...RC9 K PV DRS2 PV DCC11 K Description AC Adaptor with AC Cable and DC Cable 800mAH 1 h 30 min Battery Pack 1600mAH 3 h Battery Pack 2800mAH 5 h Battery Pack 5300mAH 9 h Battery Pack DV Interface Cable i LINK 4 pin to 4 pin IR Remote Control PC Connection Unit RS 232C Serial Kit Car Battery Cord Figure DV102 K P49 50 p65 02 06 06 13 14 49 ...

Page 50: ...lash bulb Blue lamp for photography Fluorescent lamp White Normal flash bulb Fluorescent lamp Off white Tungsten lamp for photography Halogen lamp Iodine lamp Tungsten lamp Acetylene lamp Kerosene lamp Candlelight KELVIN COLOUR TEMPERATURE Fair weather blue sky Slightly cloudy sky Cloudy or rainy sky Sunlight in clear weather at midday Average sunlight in clear weather Sunlight 2 hours after sunri...

Page 51: ...olour filter Charge Coupled Device CCD Lens 10 1 zoom lens F1 1 8 with auto iris control Focal length 3 6 mm 36 mm Power zoom function Lens filter diameter 43 mm Viewfinder 5 3 mm 0 21 inch Liquid Crystal Electronic Viewfinder LCD Monitor 63 5 mm 2 5 inch Liquid Crystal Display Minimum Illumination Required 5 lx F1 1 8 0 5 footcandles Operating Temperature 32 F 104 F 0 C 40 C Operating Humidity 10...

Page 52: ... Excessive use of the head cleaning cassette could shorten video head life Use this cassette only when a head clogging symptoms occur Refer servicing to qualified service personnel CloggedVideoHead When you go from function to function PLAY FF REW etc please note that the unit will not accept a new function operation until the previous operation is complete The POWER Button and all function button...

Page 53: ... or CAMERA pp 16 29 Check the Dew Indicator p 54 Make sure the Battery is fully charged p 12 Make sure all necessary cables are connected correctly and firmly p 13 Make sure the Lens Cap is removed p 16 Make sure the Power Source is connected pp 12 13 Insert the cassette record tab up window side facing out p 10 Make sure the Power source is connected pp 12 13 Check the Dew Indicator p 54 Make sur...

Page 54: ...DUB is attempted on a pre recorded LP tape CANNOT REC LP MODE will appear for 5 seconds If excessive moisture condenses in the unit WARNING will flash DEW DETECTED will appear and the Palmcorder will automatically turn OFF in 15 seconds In this case wait until the indicator no longer flashes when your Palmcorder is turned ON again When a battery recharge is necessary WARNING will flash LOW BATTERY...

Page 55: ...om the performance nor does it cover any product which is used commercially Dry cell batteries are also excluded from coverage under this warranty This warranty is extended to the original end user purchaser only A purchase receipt or other proof of date of original purchase is required before warranty service is performed THIS EXPRESS LIMITED WARRANTY IS IN LIEU OF ALL OTHER WARRANTIES EXPRESS OR...

Page 56: ...index signal is recorded when recording is restarted after the date has changed since the last recording 2 HOUR An index signal is recorded when recording is restarted after a lapse of more than 2 hours SHUTTER p 18 When set to ON still pictures taken in the PhotoShot mode are recorded with a visual shutter effect and click sound SELF REC p 20 NORMAL During self recording the picture on the LCD Mo...

Page 57: ... occur To cancel the beep set to OFF Palmcorder will beep Once when you start recording Twice when you stop recording Repeatedly when warning of unusual conditions p 54 DISPLAY p 61 To select the desired type of display and counter indication displayed on the LCD Monitor or in the viewfinder C RESET p 61 Setting to ON resets the counter to zero DATE TIME p 60 The date and time can be set and displ...

Page 58: ... original sound and the dubbed sound are played back together REMOTE p 9 VCR1 To receive signals from the Remote Control set to VCR1 VCR2 To receive signals from the Remote Control set to VCR2 OFF To prevent reception of signals from the Remote Control B SEARCH Blank Search p 30 Select ON to go directly to a blank portion of the tape VCR Mode Menu Screen 6 8 7 9 1 2 7 6 9 MENU OSD 5 D FUNCTION p 4...

Page 59: ...lay and counter indication displayed on the LCD Monitor or in the viewfinder C RESET p 61 Setting to ON resets the counter to zero DATE TIME p 60 The date and time can be set and displayed on the screen CLOCK SET p 14 When set to ON the date and time can be set on the screen LCD EVF SETTING p 17 Setting to ON displays the menu for adjusting the LCD brightness colour level and the EVF brightness 11...

Page 60: ...or MONO is selected in VCR menu Volume Display p 30 The volume bar appears when the volume of the built in speaker is being adjusted AY DVM30EA AY DVM60EA FULL EMPTY R0 30 R0 00 R1 00 R0 00 a b c d e Electronic Viewfinder LCD Monitor Indications CAMERA VCR Mode a b c d e f f g h h g Date and Time Indication Menu OSD pp 57 59 As shown below the date and time indication changes each time DATE TIME i...

Page 61: ...0s00f The Palmcorder calculates and displays exactly where you are on any tape in terms of hours minutes seconds and frames 30 frames 1 second This display cannot be reset LinearTime Counter Memory Counter Time Code j k IMPORTANT NOTE Display must be set to ON for MF AE W BALANCE or BACK LIGHT indications to be displayed on the EVF or LCD Panel when selected C RESET does not work when DISPLAY is s...

Page 62: ...ion p 26 White Balance Indication p 25 Shutter Mode Indication p 27 Iris Indication p 28 o q p r s t m n Z MIC Indication Menu OSD p 57 This display appears when ZOOM MIC is set to ON Light Indication p 8 This display appears when LIGHT is set to ON WIND CUT Indication Menu OSD p 57 This display appears when WIND CUT is set to ON Progressive Indication Menu OSD p 56 This display appears when PROGR...

Page 63: ... 30 PC Connector p 46 DC IN Terminal p 13 Shoulder Strap Attachment Ring p 7 Hand Strap p 7 Side View Rear View Remote Sensor p 8 Cassette Compartment Cover p 7 DV Input Output i LINK Connector pp 44 45 TAPE EJECT pp 7 10 BATT RELEASE pp 12 13 Built in Twin Capsule 2 Way Microphone System Shoulder Strap Attachment Ring p 7 Index of Controls Built in Light p 8 DV102 K p63 66 p65 02 06 06 13 16 63 ...

Page 64: ... 11 29 RECORDING CHECK p 20 STOP pp 11 29 PLAY pp 11 29 MULTI p 35 FF p 31 BACK LIGHT p 21 PAUSE pp 31 43 44 CAMERA STILL p 24 Back View Vision Adjustment Control pp 11 16 REC PAUSE pp 11 16 POWER Lamp p 16 MENU pp 14 15 A V Output Connector p 36 PHONE p 29 Tripod Receptacle Underside View FOCUS p 26 AUTO MANUAL pp 25 28 EIS p 39 DV102 K p63 66 p65 02 06 06 13 16 64 ...

Page 65: ...er plug adaptor VJSS0070 in an area which has special AC outlets Index of Controls AC Adaptor COUNTER TC pp 8 61 RESET pp 8 42 REWIND SEARCH pp 8 31 MENU pp 8 15 42 VIDEO REC pp 8 44 POWER ZOOM pp 8 19 SPKR VOL pp 8 30 REC PAUSE pp 8 16 PHOTOSHOT pp 8 18 DATE TIME pp 8 60 DISPLAY ON TV pp 8 36 FAST FORWARD SEARCH pp 8 31 REVERSE INDEX SEARCH pp 8 33 34 REVERSE SLOW F ADV pp 8 32 33 STOP pp 8 29 44...

Page 66: ...Memory Stop Editing 42 MENU OSD 56 59 O On Screen Displays OSD 54 P PC Connection 45 46 PHOTOVU LINK 47 48 Picture in Picture PinP 24 Playback using the LCD Monitor 29 Precautions 4 Program AE 22 Progressive PhotoShot Mode 18 Q Quick Guide 10 11 R Rapid Visual Search 31 Recording Check 20 Recording Still Pictures 20 Remote Control 6 8 9 49 65 Remote Controlling Two Palmcorders 9 Repeat Playback 30...

Page 67: ...l avant d utiliser l appareil Conserver ce manuel LSQT0565A Modèle PV DV102 K Caméscopenumérique Manuel d utilisation Mini Pour de l aide composez le 1 800 561 5505 ou visitez notre site Internet à www panasonic ca DV102 KF p 1 4 p65 02 06 06 13 19 1 ...

Page 68: ... à l entretien de ce dernier Il faut donc le lire attentivement afin d éviter toute difficulté AVIS Risque de chocs électriques Ne pas ouvrir Attention Afin de prévenir des risques de chocs électriques ne pas retirer les vis Toute réparation devrait être confiée à un personnel qualifié Les informations ci dessus se trouvent sur le dessous de l appareil Votre Mini caméscope est conçu pour faire l e...

Page 69: ...s instructions Toutes les instructions de fonctionnement et d entretien doivent être suivies 5 Nettoyage Débrancher l appareil avant de le nettoyer Ne pas utiliser de nettoyant liquide ou en aérosol N utiliser qu un chiffon sec 6 Accessoires Ne pas utiliser d accessoires qui ne sont pas recommandés par le fabricant car cela pourrait être dangereux 7 Eau et humidité Ne pas utiliser cet appareil vid...

Page 70: ...té Utilisation et emplacement Pour éviter les chocs électriques Le caméscope et son bloc d alimentation ne doivent pas être exposés à la pluie ou à une humidité excessive Ne pas brancher le bloc d alimentation ou faire fonctionner le caméscope s ils sont mouillés Le caméscope a été conçu pour être utilisé à l extérieur dans toutes les conditions météorologiques mais il serait probablement endommag...

Page 71: ...es avancés 25 Accessoires 49 Remarques concernant le fonctionnement 50 Données techniques 51 Guide de dépannage 52 Affichages à l écran 54 Garantie 55 Menu à l écran 56 Indications dans le viseur électronique Écran à cristaux liquides 60 Index des commandes 63 Index Dernière page Lecture 29 Caractéristiques d effets spéciaux 31 Caractéristiques numériques 37 Caractéristiques d édition 41 Connexion...

Page 72: ...capuchon LSGQ0066 1 fil audio vidéo LSJA0280 Microsoft et Windows sont des marques déposées de Microsoft aux États Unis et dans d autres pays Intel Pentium est une marque déposée i LINK est une marque de commerce IBM est une marque déposée de IBM Company Déballage 1 Pour empêcher un effacement accidentel faire glisser la languette vers la gauche ouverte 2 Pour enregistrer à nouveau faire glisser l...

Page 73: ...ement de la cassette 2TAPE EJECT 4PUSH CLOSE Préparatifs Brancher le caméscope à une source d alimentation Pages 12 et 13 1 2 3 OU 1 Tirer un bout de la bandoulière hors de la boucle 2 Tirer fermement sur la bandoulière à travers la boucle pour l allonger ou la raccourcir 1 Réglage de la longueur de la bandoulière Ajuster la longueur de la poignée à la grandeur de la main tel qu illustré Fixation ...

Page 74: ...glage Pages 14 15 29 et 44 Ralenti image par image avant Pages 32 et 33 Ralenti image par image arrière Pages 32 et 33 Repérage par index avant Pages 33 et 34 Repérage par index arrière Pages 33 et 34 Volume sur le haut parleur Page 30 1 Appuyer pendant plus de 0 7 seconde sur la touche LIGHT pour allumer ou éteindre la lampe Le symbole s affiche à l écran Pour accentuer la richesse chromatique d ...

Page 75: ...ment sur ces touches VCR 1 Appuyer simultanément sur ces touches Commande à distance de deuxcaméscopes Nota 1 Mettre l interrupteur à VCR ou CAMERA Le témoin POWER s allume en rouge S assurer que l interrupteur POWER est à la position VCR ou CAMERA 2 Appuyer sur MENU pour appeler l affichage du menu caméra CAMERA ou magnétoscope VCR 3 Tourner la molette de sélection pour sélectionner SET UP sur le...

Page 76: ...aratifs Recharger le bloc batterie Page 12 2Mettre l interrupteur à la position VCR ou CAMERA 1 2 Ces caméscopes sont équipés d un système d éjection de la cassette pour faciliter l insertion et le retrait de cassettes même lors de l utilisation d un trépied Page 7 4 Insérer une cassette languette de protection sur le dessus et fenêtre vers l extérieur S assurer que la languette de protection est ...

Page 77: ...l interrupteur à la position CAMERA 3 Appuyer sur LCD OPEN pour déverrouiller l écran Le faire pivoter et en ajuster l angle Lecture à l écran à cristaux liquides Lorsque l écran à cristaux liquides est complètement ouvert le viseur est automatiquement mis hors marche 2 Appuyer sur LCD OPEN pour déverrouiller l écran Le faire pivoter et en ajuster l angle 3 Appuyer sur Rebobinage pour rebobiner la...

Page 78: ...que le témoin de charge clignote Recharger la batterie à une température ambiante entre 10 o C et 30 o C Dans des conditions de température extrême trop basse ou trop élevée la recharge sera lente Le témoin de charge clignote dans les conditions suivantes La recharge se fait plus lentement qu à la normale La recharge ne se fait pas Retirer la batterie attendre un peu puis la remettre en place Nota...

Page 79: ...rême trop basse ou trop élevée la recharge sera lente Mesures de sécurité Ne pas jeter le bloc batterie au feu Ne pas relier directement les bornes positives et négatives Ne pas tenter de démonter ou de remonter le bloc batterie Pour éviter les dommages Ne pas laisser tomber le bloc batterie et ne pas le soumettre à des chocs N utiliser le bloc batterie qu avec des appareils pour lesquels il a été...

Page 80: ... Réglage de l horloge Pour effectuer des corrections Appuyer à répétition sur la molette de sélection pour revenir en arrière sur un paramètre et faire les corrections qui s imposent L horloge est alimentée par une pile incorporée Si le caméscope n est pas branché à une source d alimentation pendant plusieurs mois la pile peut se décharger et l indication CLOCK BATTERY apparaît Page 54 EXEMPLE Apr...

Page 81: ... Mode de lecture Le menu VCR PLAY MODE s affiche Il comporte les rubriques INDEX AUDIO REMOTE ou B SEARCH 4 MULTI SETTING Mode de multi Le menu MULTI SETTING s affiche pour la sélection de SPEED 5 DISPLAY SETTING Affichage Le menu DISPLAY SETTING s affiche pour la sélection des paramètres DISPLAY C RESET DATE TIME ou CLOCK SET 6 LCD EVF SETTING Réglage de l écran viseur Le menu LCD EVF SETTING s a...

Page 82: ...T Viseur Protection du bloc batterie Après 5 minutes le mode pause à l enregistrement passe automatiquement en mode attente Pour poursuivre l enregistrement couper puis rétablir le contact Lorsque le caméscope est orienté vers des objets excessivement lumineux une barre verticale peut apparaître sur l image Ceci est une caractéristique normale du capteur d image CCD Autant que possible éviter d or...

Page 83: ...c batterie Après usage s assurer de bien refermer l écran Utilisation de l écran à cristauxliquides 1LCD OPEN Nota 180 90 90 Enregistrement Pour régler la brillance ou la couleur de l affichage 1 Appuyer sur MENU pour appeler l affichage du menu principal 2 Tourner la molette de sélection pour sélectionner la rubrique des paramètres de l affichage LCD EVF SETTING du menu principal Menu à l écran p...

Page 84: ... à la fonction de doublage audio en vue de réaliser des diaporamas etc Page 41 1 Mettre l interrupteur à CAMERA 2 Appuyer sur PHOTOSHOT dans le mode enregistrement pause L indication PHOTO s affiche dans le viseur ou à l écran Si la rubrique SHUTTER obturateur du menu a été réglée à ON un effet sonore similaire au clic de l obturateur d un appareil photo est entendu sur pression de la touche PHOTO...

Page 85: ...mode caméra 3 Tourner la molette de sélection pour sélectionner la rubrique des paramètres de l affichage REC MODE puis appuyer sur la molette de sélection pour afficher le menu CAMERA REC MODE 4 Tourner la molette de sélection pour sélectionner ZOOM MIC sur le menu CAMERA REC MODE Menu à l écran page 57 5 Appuyer sur la molette de sélection pour valider la fonction ON Appuyer deux fois sur MENU p...

Page 86: ... enregistrée avec le son 2Pour annuler la fonction d enregistrement d images fixes appuyer à nouveau sur STILL L appareil retourne en mode d enregistrement vidéo avec son Faire pivoter l écran sur 180 degrés de manière qu il soit orienté dans la même direction que l objectif pour procéder à un auto enregistrement 1 Mettre l interrupteur à CAMERA 2 Appuyer sur MENU pour appeler l affichage du menu ...

Page 87: ...des images compatibles avec un téléviseur à grand écran muni d un connecteur d image S2 Éclairage en contre jour 2 3BACK LIGHT L indication n apparaît pas au viseur ou à l écran si la rubrique DISPLAY a été désactivée OFF Nota Cette touche doit être utilisée lors d une prise de vue sur un sujet plus sombre que l arrière plan et qui se trouve à l ombre ou devant une source intense de lumière 3 4 Mo...

Page 88: ...t être utilisés Réglage automatique de l exposition 3MENU La fonction de réglage automatique de l exposition permet de réaliser des enregistrements de la plus haute qualité dans une diversité de situations de tournage Nota 1 Mettre l interrupteur à CAMERA 2 Appuyer sur AUTO MANUAL pendant plus de 0 7 seconde jusqu à ce que l indication MNL s affiche dans le viseur ou à l écran à cristaux liquides ...

Page 89: ...registrement 3 Relâcher la touche FADE pour effectuer le fondu d entrée audio et vidéo Fondu de sortie Utiliser cet effet pour une fin en douceur ou encore de pair avec un fondu d entrée pour assurer une transition harmonieuse entre deux scènes ADans le cours de l enregistrement maintenir une pression sur FADE jusqu à ce que l image et le son disparaissent BAppuyer ensuite sur la touche d enregist...

Page 90: ... sur MENU pour quitter le menu L indication PinP s affiche dans le viseur ou à l écran à cristaux liquides 5 Orienter le caméscope sur la scène voulue pour l image sur image puis appuyer sur CAMERA STILL pour produire un arrêt sur image 6 Appuyer à nouveau sur CAMERA STILL pour superposer l image fixe à l image principale 7 Appuyer sur la touche d enregistrement pause pour enregistrer une scène av...

Page 91: ...aintient un équilibre chromatique optimal pour la plupart des conditions d éclairage Lorsque la source d éclairage est une lampe halogène Lors de prises de vues extérieures au soleil L équilibre du blanc qui a été sélectionné manuellement précédemment Réglage manuel de l équilibre du blanc A Tourner la molette de sélection pour sélectionner B Orienter le caméscope sur un objet blanc plein écran et...

Page 92: ...e au point manuelle de manière à obtenir l image la plus précise possible Il pourrait être nécessaire de s éloigner quelque peu du sujet pour effectuer la mise au point 6 Appuyer sur le commutateur de focale variable sur l extrémité W ou T selon les besoins La mise au point demeure réglée sur toute la distance focale de l objectif Il sera peut être nécessaire de s éloigner du sujet afin d obtenir ...

Page 93: ...er la molette de sélection pour sélectionner l une des vitesses d obturation Appuyer sur AUTO MANUAL pendant plus de 0 7 seconde pour annuler le réglage Il est recommandé d utiliser cette fonction à l extérieur pour obtenir une meilleure reproduction des couleurs Pour les prises de vue à l intérieur il peut être nécessaire d augmenter l éclairage à l aide d une lampe halogène ou au tungstène L écl...

Page 94: ...nde la qualité de l image est diminuée Selon le grossissement du ZOOM la valeur du diaphragme peut ne pas être affichée correctement Si le mode réglage automatique de l exposition est utilisé le diaphragme ne peut pas être réglé Si le diaphragme est réglé manuellement les modes ci dessus sont annulés Nota 3 4 Molette de sélection JOG KEY 1Interrupteur Réglage du diaphragme Pare vent Il est possibl...

Page 95: ...cran à cristaux liquides Nota Prise PHONE Préparatifs Brancher le caméscope à une source d alimentation Pages 12 et 13 Insérer une cassette enregistrée dans l appareil Lors de la lecture d une bande enregistrée en mode longue durée sur un autre caméscope numérique l image peut apparaître sous forme de mosaïque L utilisation de l écran réduit l autonomie offerte par le bloc batterie Il est possible...

Page 96: ... PLAY MODE 4 Tourner la molette de sélection pour sélectionner B SEARCH sur le menu VCR PLAY MODE Menu à l écran page 58 5 Appuyer sur la molette de sélection pour valider la fonction ON L indication BLANK s affiche à l écran 3 4 5 Molette de sélection JOG KEY 1Interrupteur Recherche de passages Il est possible d aller directement au début d une portion vierge de la bande et de poursuivre l enregi...

Page 97: ...osaïque pendant quelques secondes Nota 1Pendant la lecture appuyer sur PAUSE 2Pour poursuivre la lecture appuyer sur PLAY ou PAUSE Afin de protéger la bande et les têtes vidéo le mode de fonctionnement du caméscope est commuté comme suit ARRÊT SUR IMAGE ARRÊT après 3 minutes AMaintenir enfoncée la touche Avance accélérée Repérage pendant l avance accélérée BMaintenir enfoncée la touche Rebobinage ...

Page 98: ... type mosaïque apparaissent dans l image Le son est mis en sourdine pendant une recherche à vitesse variable Recherche à vitesse variable Nota 1PLAY 2 3 Molette de sélection JOG KEY 1 Ralenti avant Appuyer sur SLOW F ADV pendant la lecture Ralenti arrière Appuyer sur SLOW F ADV pendant la lecture 2 Pour quitter le mode ralenti appuyer sur PLAY Pendant le ralenti arrière l indication du code de tem...

Page 99: ...to séquence l effet de bruit de l obturateur pourrait ne pas être audible même lorsque le paramètre SHUTTER est activé La recherche indexée de photos peut ne pas détecter une photo si la scène est d une durée de 3 secondes ou moins 1 Appuyer sur MENU pour appeler l affichage du menu du mode magnétoscope 2 Tourner la molette de sélection pour sélectionner la rubrique des paramètres de l affichage P...

Page 100: ...rage arrière par index la lecture ne sera pas amorcée si la bande est rebobinée jusqu au début Il est possible de repérer une séquence particulière en utilisant des index électroniques inscrits au début de chaque séquence enregistrée 1 Appuyer sur MENU pour appeler l affichage du menu magnétoscope VCR 2 Tourner la molette de sélection pour sélectionner la rubrique des paramètres de l affichage PLA...

Page 101: ...la lecture Appuyer sur STOP pour interrompre la lecture Cadences de saisie intervalles Réglage FAST NORM SLOW Cadence de saisie succes sion de 9 images Toutes les 0 3 secondes Toutes les 0 6 secondes Toutes les 1 0 secondes Ni la prise DV ni la prise d image fixe numérique ne peut être utilisée pour la sortie d un écran multi image La qualité de l image d un écran multi image est quelque peu infér...

Page 102: ...er la lecture ou l enregistrement Avant de faire les raccordements s assurer que le contact est coupé tant sur le caméscope que sur le téléviseur S assurer d insérer les fils audio vidéo à fond lors du raccordement au téléviseur Avec télécommande seulement Il est possible de faire afficher à l écran du téléviseur les diverses indications apparaissant au viseur et à l écran à cristaux liquides Pour...

Page 103: ... ou D ZOOM2 D ZOOM1 de 10X à 25X D ZOOM2 de 10X à 700X OFF Mise hors circuit de la fonction Appuyer deux fois sur MENU pour quitter le menu 5 Appuyer sur la touche d enregistrement pause pour amorcer l enregistrement puis appuyer sur le commutateur de focale variable pour faire un zoom avant ou arrière Le facteur d agrandissement est toujours affiché dans le viseur ou à l écran lorsque l affichage...

Page 104: ...téristique 5PLAY Enregistrement couleur d images vidéo ou fixes sur la bande Mini DV sous faible éclairage Pages 40 et 56 ImagesMagicPix 1 Mettre l interrupteur à CAMERA 2 Appuyer sur MENU pour afficher le menu 3 Tourner la molette de sélection pour sélectionner D FUNCTION sur le menu en mode caméra puis appuyer sur la molette pour appeler le menu de fonction caméra 4 Tourner la molette de sélecti...

Page 105: ...e et enregistrement magnétoscope Modecaméra Modemagnétoscope Autres effets et fonctions numériques sont automatiquement désactivés lorsque les fonctions EIS et zoom numérique sont sélectionnées A Mettre l interrupteur à VCR B Appuyer sur PLAY pour amorcer la lecture C Appuyer sur EIS pour stabiliser l image D Appuyer à nouveau sur EIS pour désactiver la fonction de stabilisation S assurer que le s...

Page 106: ...errière une traînée de son image STRETCH Étirement L image est étirée dans le sens de la largeur MAGICPIX Non disponible pendant la lecture Enregistrement couleur d images vidéo ou fixes sur la bande Mini DV sous faible éclairage Page 38 Seule la mise au point manuelle est possible WIPE Transition volet La transition entre les scènes se fait de manière qui ressemble à l action de volets MIX Mixage...

Page 107: ...an à cristaux liquides Passer à l étape 4 2PLAY 2PAUSE Préparatifs Établir le contact sur le caméscope Insérer une cassette préenregistrée qui doit être doublée dans le caméscope Microphone incorporé Le réglage de la rubrique AUDIO REC du menu de la caméra devrait être comme suit Sélectionner 12 bits pour ne pas effacer totalement la piste sonore d origine Si le doublage se fait sur une bande comp...

Page 108: ...u réglage de la sortie audio AUDIO OUT Si l enregistrement a été fait en vitesse de défilement longue durée LP il n est pas possibled effectuerundoublage Nota Il est possible de fixer un point d arrêt automatique au montage AUDIO Les sélections suivantes ne sont disponibles que pour des enregistrements audio 12 bits piste sonore en mode SP seulement 4 5PAUSE DRESET AMENU ST 1 ST 2 MIX Sélectionner...

Page 109: ...Pour surveiller la duplication sur le téléviseur 1Insérer une cassette préenregistrée dans le caméscope lecture et une cassette vierge munie de sa languette intacte dans le magnétoscope enregistrement 2Appuyer sur PLAY du caméscope et à l endroit où la duplication doit commencer appuyer sur PAUSE 3Mettre le magnétoscope en mode enregistrement pause Se reporter au manuel d utilisation du magnétosco...

Page 110: ...méscopes pour amorcer la duplication 6 Appuyer sur STOP sur l appareil d enregistrement puis appuyer sur STOP de l appareil source pour mettre fin à la duplication Si deux caméscopes sont utilisés pour la duplication et qu ils sont commandés à distance par la même télécommande régler l un des caméscopes à VCR1 et l autre à VCR2 afin de prévenir tout problème de fonctionnement Appareil source lectu...

Page 111: ...d édition Il est possible de transférer un clip vidéo directement à un PC via un câble d interface DV i LINK vendu séparément au moyen de produits et logiciels conçus pour l édition vidéo offerts par de nombreuses compagnies L utilisation de ces produits et logiciels permet de capturer et d éditer un clip vidéo au moyen de l interface DV i LINK Pendant la lecture sur le caméscope ne pas déconnecte...

Page 112: ...ws vendu séparément unité de connexion de PC PV DRS2 page 49 Une image enregistrée peut être transférée directement à un PC Raccordement 1 Mettre l ordinateur hors marche 2 Brancher le caméscope numérique à l ordinateur au moyen du câble de raccordement vendu séparément unité de connexion de PC PV DRS2 page 49 Avant de brancher le caméscope à l ordinateur s assurer que l ordinateur est hors marche...

Page 113: ...ns qui s affichent à l écran de l ordinateur jusqu à ce que l installation soit terminée L installation terminée la fenêtre d installation disparaît 1 Cliquer sur Start Démarrer Programs Programmes Panasonic Palmcorder puis sur PHOTOVU LINK 2 PHOTOVU LINK s ouvre Le port COM et le débit en bauds sont automatiquement sélectionnés Consulter l Aide en ligne pour des renseignements sur les opérations ...

Page 114: ...rçu 4 Enregistrer l image transférée sur l ordinateur Cliquer sur File Fichier puis sur Save As Enregistrer sous Nota Si lors du transfert de l image sur un PC l image affichée paraît anormale fermer le logiciel PHOTOVU LINK et couper le contact sur le caméscope redémarrer ensuite le même logiciel puis rétablir le contact La recherche indexée de photos peut ne pas détecter une photo si la scène es...

Page 115: ...n Adaptateur secteur avec cordons c a et c c Bloc batterie 800mAH 1 h 30 min Bloc batterie 1600mAH 3 h Bloc batterie 2800mAH 5 h Bloc batterie 5300mAH 9 h Câble d interface DV i LINK 4 broches à 4 broches Télécommande infrarouge Unité de connexion Trousse de série RS 232C Fil pour batterie de voiture Illustration DV102 KF P49 50 p65 02 06 06 13 22 49 ...

Page 116: ...mpe éclair de caméra Lumière bleue pour photographie Lampe fluorescente blanc Lampe éclair normale Lampefluorescente blancneutre Lampe au tungstène pour photographie Lampe halogène Lampe à iode Lampe au tungstène Lampe acétylène Lampe au kérosène Chandelle Température des couleurs en degrés Kelvin Temps clair ciel bleu Ciel partiellement couvert Ciel nuageux ou pluvieux Ciel clair à midi Soleil mo...

Page 117: ...harge CCD avec filtre de couleur intégré Objectif À focale variable 10 1 F1 1 8 avec diaphragme automatique Longueur de focale 3 6 mm à 36 mm Focale variable motorisée Diamètre des filtres 43 mm Viseur Viseur électronique à cristaux liquides de 5 3 mm 0 21 po Écran à cristaux liquides Affichage à cristaux liquides de 63 5 mm 2 5 po Éclairement minimal 5 lux F1 1 8 0 5 candéla pied Température de f...

Page 118: ...tes N utiliser une cassette de nettoyage seulement quand surviennent des symptômes d encrassement des têtes Têtesvidéoencrassées Lors de la commutation d un mode de fonctionnement à un autre lecture enregistrement rebobinage etc la nouvelle fonction n est activée qu après que la fonction précédente ait été complètement désactivée L interrupteur et toutes les touches de fonction lecture avance accé...

Page 119: ...c batterie est complètement rechargé p 12 S assurer que tous les raccordements ont été correctement effectués p 13 Vérifier que le capuchon de l objectif a été enlevé p 16 S assurer que la source d alimentation est raccordée p 12 et 13 Insérer une cassette languette de protection sur le dessus et fenêtre vers l extérieur p 10 S assurer que la source d alimentation est raccordée p 12 et 13 Vérifier...

Page 120: ...Lorsqu un doublage audio est tenté sur une bande enregistrée en mode longue durée le message CANNOT REC LP MODE s affiche pendant 5 secondes S il y a formation de condensation dans l appareil l indication WARNING clignote et le message DEW DETECTED s affiche le contact est automatiquement coupé après 15 secondes Dans une telle éventualité attendre que l indicateur ne clignote plus lorsque le conta...

Page 121: ...ent pas les exclusions ou limitations de dommages indirects ou consécutifs ou les exclusions de garanties implicites Dans de tels cas les limitations stipulées ci dessus peuvent ne pas être applicables RÉPARATION SOUS GARANTIE Pour de l aide sur le fonctionnement de l appareil ou pour toute demande d information veuillez contacter votre détaillant ou notre service à la clientèle au N de téléphone ...

Page 122: ...t enregistré si plus de 2 heures se sont écoulées depuis l enregistrement précédent SHUTTER Obturateur Page 18 Lorsque cette fonction est activée position ON l enregistrement des images fixes en mode photo est accompagné d un effet d obturateur et d un déclic SELF REC Auto enregistrement Page 20 NORMAL Pendant un auto enregistrement l image enregistrée est identique à celle apparaissant sur l écra...

Page 123: ...e du compteur sur l écran à cristaux liquides ou sur le viseur C RESET Remise à zéro Page 61 Lorsque cette fonction est activée ON le compteur est automatiquement remis à zéro DATE TIME Horodateur Page 60 Pour l affichage de la date et de l heure CLOCK SET Réglage de l horloge Page 14 Lorsque cette fonction est activée ON il est possible de régler l horodateur directement à l écran LCD EVF SETTING...

Page 124: ...inales et réenregistrées sont lues ensemble REMOTE Télécommande Page 9 VCR1 Pour capter les signaux de la télécommande réglée en mode VCR1 VCR2 Pour capter les signaux de la télécommande réglée en mode VCR2 OFF Pour bloquer la réception des signaux en provenance de la télécommande B SEARCH Recherche de passages vierges Page 30 Activer cette fonction ON pour aller directement à une portion vierge d...

Page 125: ...ur le viseur C RESET Remise à zéro Page 61 Lorsque cette fonction est activée ON le compteur est automatiquement remis à zéro DATE TIME Horodateur Page 60 Pour l affichage de la date et de l heure CLOCK SET Réglage de l horloge Page 14 Lorsque cette fonction est activée ON il est possible de régler l horodateur directement à l écran LCD EVF SETTING Réglage de l écran viseur Page 17 Lorsque cette f...

Page 126: ...arre de volume s affiche lors du réglage du niveau de sortie sur le haut parleur incorporé AY DVM30EA AY DVM60EA Plein Vide R0 30 R0 00 R1 00 R0 00 a b c d e Indications dans le viseur électronique Écran à cristaux liquides Modecaméra magnétoscope a b c d e f f g h h g Indication de la date et de l heure Menu à l écran pages 57 et 59 Comme le montre l illustration ci dessous l indication de la dat...

Page 127: ...s 30 cadres 1 seconde Cet affichage ne peut être réglé j k Remarques importantes L affichage à l écran doit être activé ON afin de permettre l affichage des indications MF mise au point manuelle W BALANCE équilibre du blanc AE réglage automatique de l exposition et BACKLIGHT éclairage en contre jour au viseur ou à l écran à cristaux liquides lors de la sélection de ces fonctions C RESET ne fonctio...

Page 128: ...age 26 Indication de l équilibre du blanc Page 25 Indication du mode de l obturateur Page 27 Indication du diaphragme Page 28 o q p r s t m n Indication zoom microphone Menu à l écran page 57 Cet affichage confirme l activation du zoom microphone Indication de la lampe Page 8 Cet affichage confirme l activation de la lampe Indication du pare vent Menu à l écran page 57 Cet affichage confirme l act...

Page 129: ...d entrée c c Page 13 Crochets de la bandoulière Page 7 Poignée Page 7 Côté de l appareil Arrière de l appareil Capteur du signal de la télécommande Page 8 Porte du couvercle du logement de la cassette Page 7 Connecteur d entrée sortie DV i LINK Pages 44 et 45 Commutateur d éjection de la cassette Pages 7 et 10 Commutateur de dégagement du bloc batterie Pages 12 et 13 Micro incorporé bidirectionnel...

Page 130: ...ecture Pages 11 et 29 Touche Multi Page 35 Touche avance accélérée repérage Page 31 Touche d éclairage en contre jour Page 21 Touche de pause Pages 31 43 et 44 Touche photo Page 24 Dos de l appareil Commande de réglage optique Pages 11 et 16 Touche d enregistrement pause Pages 11 et 16 Voyant de mise en contact Page 16 Touche du menu Pages 14 et 15 Connecteur sortie audio vidéo Page 36 Prise d éco...

Page 131: ...he rebobinage repérage Pages 8 et 31 Touche de menu Pages 8 15 et 42 Touche d enregistrement vidéo Pages 8 et 44 Touches de focale variable Pages 8 et 19 Commandes de volume du haut parleur Pages 8 et 30 Touche d enregistrement pause Pages 8 et 16 Touche photo Pages 8 et 18 Touche de réglage de la date heure Pages 8 et 60 Touche d affichage télé Pages 8 et 36 Touche avance accélérée repérage Pages...

Page 132: ...20 Entretien des têtes vidéo 52 Équilibre du blanc 25 F Fil audio vidéo 6 36 Fil VHF 43 Fonctionnement 16 17 Fonctions numériques 40 Fondu d entrée et de sortie audio vidéo 23 G Garantie 55 Guide de dépannage 52 53 Guide d utilisation sommaire 10 11 I Images MagicPix 38 Image sur image 24 Indication de condensation 54 Indication de durée restante 60 Index des commandes 63 à 65 L Lampe intégrée 8 L...

Reviews: