background image

35

Advanced Copy

FUNCTIONS

 / To Others

Copy

1

DVD

HDD

DVD-Video

SP

2

3

DVD

HDD

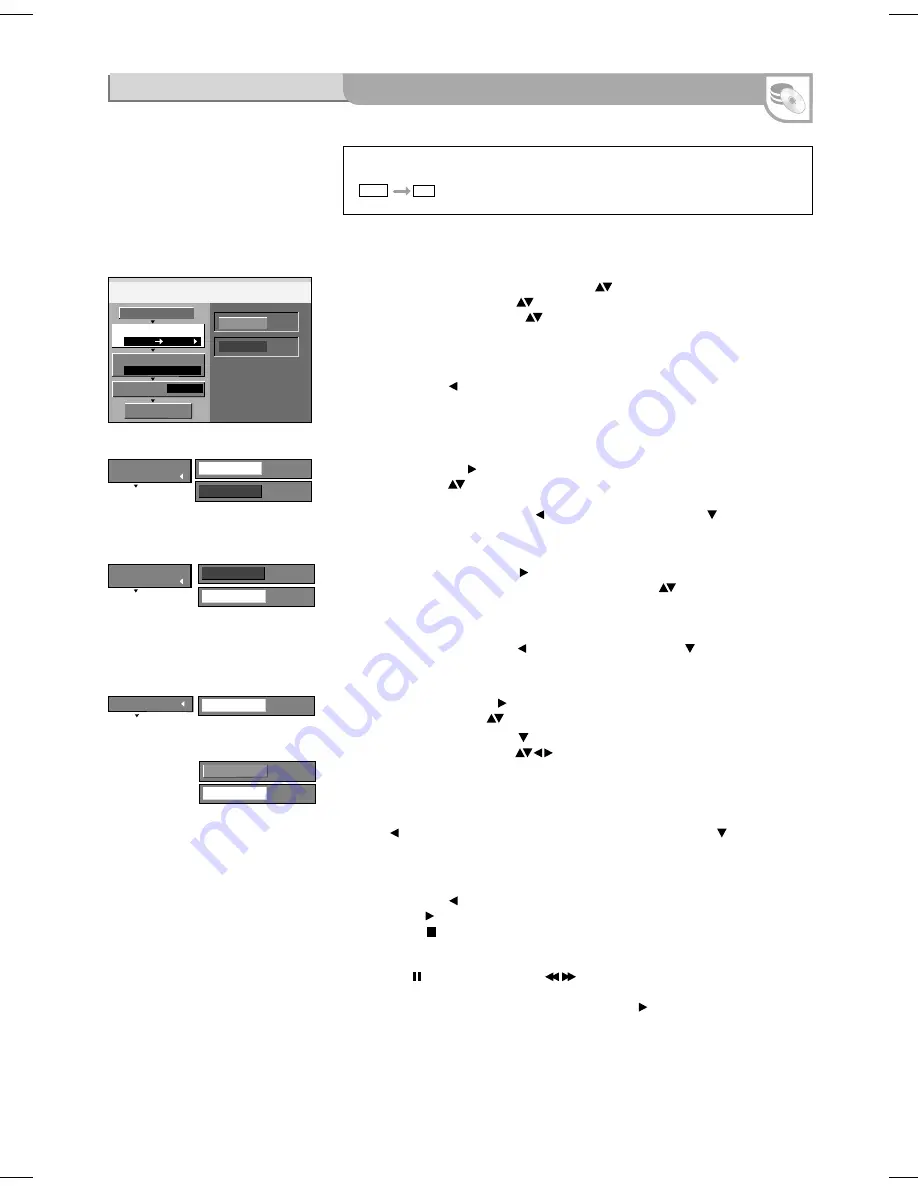
Select the copy direction.

Cancel All

Copy Direction

Copy Mode

Copy Time

Source

Destination

Off

Start Copying

DVD

Source

HDD

Destination

DVD-Video

Format

SP

Recording Mode

Off

Time Setting

On

Time Setting

2:00

Copy Time

HDD

DVD-V

1

Copy Direction

3

Copy Time

2

Copy Mode

The complete disc can be copied or the copying time can be 
defined. The titles are copied without chapters.

Copying from DVD-Video with time control

!

Press 

FUNCTIONS

, select [To Others] with  

 and press 

ENTER

.

!

Select [Advanced Copy] with  

 and press 

ENTER 

 to confirm.

!

Select the required option with  

.

Cancel All

All adjusted settings and copy lists are deleted!

!

Select [Yes] with    and press 

ENTER 

to confirm.

1


Copy Direction

!

Select [Source] with    and press 

ENTER

 to confirm.

!

Select DVD with  

 and press 

ENTER

 to confirm. The target drive is recognised 

automatically.

!

Go back to [Copy Direction] with    and select [Copy Mode] with   .

2 Copy Mode

!

Select [Recording Mode] with    and press 

ENTER 

 to confirm.

!

Select the required recording mode [XP,SP,LP,EP] with  

 and press 

ENTER

to confirm. The format is automatically detected.
The High Speed or Normal Speed setting is not possible during time-controlled 
copying.

!

Go back to [Copy Mode] with    and select [Copy Time] with   .

3 Copy Time

!

Select [Time Setting] with    and press 

ENTER

 to confirm.

!

Select [On] or [Off] with  

 and press 

ENTER

 to confirm.

!

[On]: Select [Copy Time] with    [Copy Time] and press 

ENTER

 to confirm.

Change the time setting with  

 and press 

ENTER 

to confirm.

Enter a time which is longer by a few minutes to compensate for the delay when 
starting playback.

!

[Off]: when the copy time is off, the whole disc is copied if there is sufficient 
capacity on the target drive.

!

Press    to go back to [Copy Time] and select [Start Copying] with   .

Start Copying

!

Press 

ENTER

 to start copying.

!

Select [Yes] with    and press 

ENTER

 to confirm.

!

Press 

PLAY

    to start playing the DVD-V. Copying stops at the set time setting.

!

Press 

STOP

    to stop copying prematurely and press 

ENTER

 to confirm the 

message that then appears.

The 

PAUSE

    and 

SLOW/SEARCH


 functions are possible during copying.

If the disc begins with a Top menu, start the corresponding titles.
If playback does not begin automatically, press 

PLAY

   .

These procedures and screen shots are also recorded.
When copying a DVD-Video, it is possible that the video and audio quality are not 
quite the same as the original.

Select the copy direction.

Press 

ENTER

 to 

change the settings.

Press 

ENTER

 to 

change the settings.

Enter the end time for
copying.

Nearly all commercially available videos and DVD-Videos have copy protection. 
The contents of such media cannot be copied with this unit.

Summary of Contents for Diga DMR-EX75EB

Page 1: ...DVD Recorder Model No DMR EX75EB DMR EX85EB Operating Instructions ...

Page 2: ...7 Just PLAY 13 Picture 48 DELETE 13 Sound Display 49 Connection List of language codes 50 51 Others 52 53 Playback from DIRECT NAVIGATOR 15 HDD Management 54 Simultaneous recording and playback 15 DVD Management 54 55 Playback during recording 15 Card Management 55 Discs you can record on 16 Auto Finalize 16 Picture and sound setting during playback 56 57 Connection with HDMI cable 58 59 Changing ...

Page 3: ...malfunction Dispose of batteries in accordance with the instructions given in this book Place the unit on a flat stable surface Do not place heavy object on top of the unit Your attention is drawn to the fact that recording of pre recorded tapes or discs or other published or broadcast materials may infringe copyright laws This unit is designed for indoor use only Do not use in area with strong ma...

Page 4: ...sonic UK Ltd It couldn t be simpler Also available through our Internet is direct shopping for a wide range of finished products take a browse on our website for further details Direct Sales at Panasonic UK Customer Care Centre For customers within the UK 08705 357357 Visit our website for product information www panasonic co uk E mail customer care panasonic co uk Sales and Support Information In...

Page 5: ...te Control EUR7659YG0 Guarantee Card Operating Instructions For use with this unit only Do not use it with other equipment Also do not use the cords for other equipment with this unit Reference Guide Remote control signal sensor Point the remote control at the unit s sensor Avoid obstacles in the path of the transmission The maximum range of the remote control is 7 m directly in front of the unit ...

Page 6: ... Current time recording playback counter various messages External Link A timer controlled recording is being performed by an external unit Digital channel Recording mode All on Flexible recordings Timer Recordings FR mode PLEASE WAIT Please wait DVD 1 2 3 Wrong remote control code SETUP You are in the Setup menu READ Disc is being read No READ Disc cannot be read FINAL DVD is being finalized No D...

Page 7: ...nnel AV2 EXT AV1 TV Rear panel 58 63 62 21 pin Scart terminal 19 20 21 1 3 5 7 9 11 13 15 17 2 4 6 8 10 12 14 16 18 The 21 pin Scart terminal transmits both input and output signals for picture and sound TVs equipped with the same type of terminal can be connected here This type of terminal is also called Peritel Euro Connector and Euro AV AV1 Scart terminal TV AV2 Scart terminal EXT 1 Audio outpu...

Page 8: ... coaxial cables when you connect this unit to your TV and aerial outlet or aerial cable and Satellite receiver as shown in connection types A B Keep the RF coaxial cables as far away as possible from other cables Do not roll up the RF coaxial cables 3 BE SURE TO READ THE CAUTION FOR THE AC MAINS LEAD You can use a variety of Q Link functions by connecting the unit to a Q Link compatible television...

Page 9: ... 0 9 0 9 0 9 0 9 0 9 0 9 0 9 0 9 0 9 0 9 0 9 0 9 0 9 0 9 0 9 0 9 0 9 0 9 0 9 0 9 0 9 0 9 0 9 0 9 Depending on different countries or regions the digital TV programme has its own selection of operating frequency channels frequency bands transmission parameters and frequencies The unit automatically searches for all available digital stations Automatic setup of the unit After being switched on for t...

Page 10: ...art cable 5 Connecting to a television and satellite receiver B 6 AC mains lead included Connect only after all other connections are complete To household mains socket AC 220 V to 240 V 50 Hz RF IN 1 You can use a variety of Q Link functions by connecting the unit to a Q Link compatible television The RF cable cannot be used for showing pictures from the DVD Recorder The unit must be connected by...

Page 11: ...Please check aerial connection Restart Auto Setup SELECT RETURN ENTER The TV Guide does not show any information if you have connected the unit to a satellite receiver only Connecting to a television and satellite receiver B After completing the above connections proceed to the Auto Setup 9 Your DVD Recorder is now ready to use Switch the DVD Recorder to AV2 with CH You see the television picture ...

Page 12: ...ayback Recording REC TEXT STTL DRIVE SELECT INPUT SELECT TIME SLIP Select the time frame DRIVE SELECT Select the HDD DVD or SD drive SLOW SEARCH Timer Recording with external recording control EXT LINK 5 0 5 15 5 1 0 5 0 5 1 0 Direct entry using the number buttons 0 5 0 5 15 15 0 5 1 0 0 5 Subtitles TIME SLIP DIRECTTVREC 14 18 25 14 17 14 21 13 13 21 24 17 14 13 14 14 14 Selection of channels titl...

Page 13: ...the AV input that this unit is connected to 2 1 DRIVE SELECT Select the HDD or DVD drive to record on or playback a disc DVD HDD Preparation OPEN CLOSE to insert a disc Select the channel 3 2 1 6 5 4 9 8 7 0 or up down Just watching TV programme Start playing When a menu screen appears on the television e g prerecorded DVD select To select recorded programmes to play Display the title view Start p...

Page 14: ... or FR mode to resume playback You can increase the playback speed without negative effects on the sound 56 VCD DVD A CD Not available Forwards only Moving pictures only Slow motion playback during pause Frame playback during pause SLOW SEARCH to resume playback The speed can be controlled in 5 levels With some disc formats the pause mode is switched on after 5 minutes ENTER OK to resume playback ...

Page 15: ... be selected directly and replayed immediately without searching Playback PICTURE ENTER RETURN 002 003 004 DIRECTNAVIGATOR DVD RAM TitleView VIDEO 23 9 05 Total12 1 10 05 Total5 S SUB MENU Next Previous Page 01 01 6 3 06 Total10 6 3 06 Total10 6 3 06 Total10 005 Select 001 select the previous or next page more than 6 recordings SKIP to edit a recording SUB MENU SUB MENU S 26 Playback from DIRECT N...

Page 16: ...you must format it before the first recording After inserting the disc the formatting message appears automatically Formatting prepares the media such as a recordable DVD RAM for recording All data is irreversibly erased We recommend using a DVD RAM to utilise the greatest possible functional scope of this unit R RAM RW RW V RW VR R DL Only for new discs Formatting Finalize the disc so that it can...

Page 17: ... mode If several Timer Recordings follow on in quick succession they are recorded as one title Timer Recording with the television set If your television set is equipped with the Q Link function and the possibility of programming with Timer Recording then you can do a Timer Recording with the television set switch the DVD Recorder to the Standby mode Programme the Timer on the TV set 2 1 To use Q ...

Page 18: ...ITV2 70 S4C HotWars DIYS O S News SexandtheCity Meoutofhere Rugbi 15to1 ScrapheapChallenge CorotationStreet Mon 06th 24 Hr Category VIEW info Change Display Mode Guide CSINY Emmerd select delete ENTER OK 1 2 Select a future broadcasting to programming a Timer Recording Select to watch the current programme select watch ENTER OK 1 2 Press ENTER to store the programme Timer Recording ENTER RETURN De...

Page 19: ... the title with this unit and sometimes this fails The programme overview is available immediately if your DVD Recorder has found a digital station and loaded the information in the memory This process can take a while depending on the particular station The programme overview data are continuously downloaded in the background when the unit is switched on That means that the programme overview can...

Page 20: ...me ENTER OK hold to increase decrease starting or ending time in 30 minute intervals Recording mode XP SP LP EP FR select set ENTER OK To enter the programme name 23 Subtitles On or Off Recorded subtitles cannot be deleted later ENTER OK set the programming Making the settings Timer programming overview blue 2 1 3 Repeat 1 and 2 for Name Date Start Stop Mode and STTL To delete entrys Storage space...

Page 21: ...ding Missing or incorrectly transferred data can be corrected Entering a VIDEO Plus number causes the data for programmes provided by broadcasters to be saved The appropriate codes can be found in newspapers and TV guides You can programme up to 32 programmes per month in advance Input PlusCode Number0 9 andpressENTER VIDEO Plus Record ENTER RETURN Remain 1 54 SP 14 15 16 6 3 MON Number 0 9 VIDEO ...

Page 22: ...button to delete it from the Timer Recording list It is no longer needed Repeat the steps above until you have set and deleted dummy Timer Recordings for each of the satellite stations that you will make VIDEO Plus recordings from Press RETURN when you have finished Ü VIDEO Plus Symbols To Others VIDEO Plus Record F U N C T I O N S The title or the playlist was recorded with a TV system other than...

Page 23: ...avigator TitleView BBC 6 3 MON BBC 6 3 MON BBC 6 3 MON F U N C T I O N S Delete select access ENTER OK 1 2 ENTER RETURN Playback To Others Recording Copy Delete VIDEO PICTURE PAUSE Title View to edit recorded titles Album View to edit Albums JPEG pictures to select several elements SKIP to the previous or next page select delete ENTER OK SUB MENU SUB MENU S Album View Properties Edit Set up Protec...

Page 24: ...d remaining time Current station position DVB shows a digital station Current station Discinformation during playback and or recording Screen information 49 To show the screen information again REC Record PAUSE Pause PLAY Playback Pause playback Fast forward 5 stages Rewind 5 stages Slow motion rewind 5 stages PLAY x1 3 Quick View Slow motion 5 stages 1x 2x to hide TEXT TXT TXT Digital Text STTL S...

Page 25: ... disc or the medium During Recording or Timer Recording some menus have a grey background and cannot be selected The FUNCTIONS menu cannot be launched during playback Select To Others to view more functions SchreibschutzAus FUNCTIONS DVD RAM ENTER RETURN Playback Delete To Others Recording Copy DiscProtectionOff TV Guide Playlists Flexible Rec DV Auto Rec Setup DVD Management VIDEO Plus Record Dis...

Page 26: ...he same after deleting a short title In the case of a DVD RAM the storage space of a deleted title becomes available for a new recording For RW V RW Available recording space increases only when the last recorded title is deleted With other discs R R DL R R DL the storage space is not released by deleting titles Properties Information on the title such as name date and time is displayed Select Pro...

Page 27: ...e with ENTER The selected thumbnail is displayed Confirm Exit with ENTER The selected thumbnail is displayed in the title view Divide Title You can divide a selected title A divided title cannot be joined together again At the position where the title is to be divided confirm Divide with ENTER Confirm Preview with ENTER A section will be played back from 10 seconds before to 10 seconds after the d...

Page 28: ...Create Chapter Divide the title into chapters Determine the points where a new chapter needs to begin The chapters can be selected later during playback with SKIP Press ENTER at the position where you want to create the chapter Repeat this step to create additional chapters Select Exit with and confirm with ENTER A short section right before the dividing point may be lost Delete Chapter Select Del...

Page 29: ...go back to the original size press ENTER to confirm Zoom out Rotate RIGHT Rotate LEFT Press SUB MENU during the playback Select the required setting with and press ENTER to confirm SUB MENU during picture playback Press SUB MENU Select the required option with and press ENTER to confirm If you have saved pictures in JPEG format on HDD or DVD RAM you can playback and edit these using the Album View...

Page 30: ...NTER to confirm Select the required album with and press ENTER to confirm The pictures of the selected Album are copied To continue copying select Yes with and press ENTER to confirm Repeat steps 1 3 To end copying press ENTER to confirm No Use Copy Pictures to copy individual pictures or Copy Album to copy a complete album Select Copy Pictures or Copy Album with Press ENTER to confirm Copy pictur...

Page 31: ... adjusted previously with other units are reset Album View Return to Album View DPOF Digital Print Order Format is a standard format for printing freeze frames recorded for example with a digital camera It may be possible that other units cannot show the printer settings adjusted with this unit DPOF If the folders or files do not correspond to the DCF standard or there is not enough capacity on th...

Page 32: ...press ENTER to confirm Press DIRECT NAVIGATOR The screen Picture JPEG View appears Playback of single pictures Select the required picture with or with and press ENTER to start playback Stop picture playback with STOP or DIRECT NAVIGATOR 0 9 Select Folder with Press SUB MENU Select the required option with and press ENTER to confirm Folder Change folder Select Folder with and press ENTER to confir...

Page 33: ...corded previously in High Speed Mode on HDD While copying in High Speed Mode the unit makes noises which can be reduced F U N C T I O N S Copy select access ENTER OK 1 2 ENTER RETURN Playback To Others Recording Copy Delete select set ENTER OK copy ENTER OK Copying now begins S ENTER RETURN SUB MENU HDD Total 2 171MB 4 Size Select COPYNavigator No Name Date Day Time Name of title Rec time 0 52 SP ...

Page 34: ...picture quality If there is not sufficient capacity on the disc the unit changes to the FR Mode If you are not copying in High Speed Mode titles are copied in the original recording mode and playback lists in the FR mode During copying timer controlled recordings are always made to the HDD regardless of the selected recording drive No playlist can be reproduced when copying titles which are restri...

Page 35: ...o back to Copy Mode with and select Copy Time with 3 Copy Time Select Time Setting with and press ENTER to confirm Select On or Off with and press ENTER to confirm On Select Copy Time with Copy Time and press ENTER to confirm Change the time setting with and press ENTER to confirm Enter a time which is longer by a few minutes to compensate for the delay when starting playback Off when the copy tim...

Page 36: ...he High Speed copying speed can only be selected if the corresponding setting was adjusted in the Setup menu before recording a title Press to go back to Copy Mode and select Create List with 1 Copy Direction Select Source with and press ENTER to confirm Select the corresponding source drive with and press ENTER to confirm Select Destination with and press ENTER to confirm Select the corresponding...

Page 37: ...FUNCTIONS To Others R R RW V R DL R DL Finalizing is to enable the disc to be played on other DVD players Finalize the disc to play it on other DVD players The disc becomes play only Copy Finalize Copy Only R R RW V R DL R DL RW R DL R DL RAM R RW V R Finalize Press and hold RETURN for 3 sec to stop copying Completes in 0 04 Percent complete 24 Press ENTER to record or play back Copy continues Cop...

Page 38: ... to go back to copy direction and select Copy Mode with 2 Copy Mode Select Format with and press ENTER to confirm Press ENTER to confirm PICTURE Press to return to Copy Mode and select Create List with 3 Create List Create a copy list from the existing pictures Select New item with and press ENTER to confirm Change folder Select Folder with in the Create List Picture JPEG menu and press ENTER to c...

Page 39: ... source folder has no name this folder may be given another name on the copying target Give the folder a name before copying Press FUNCTIONS Select To Others with and press ENTER to confirm Press ENTER to confirm Copy All Pictures SD RAM HDD Copy Video MPEG2 only available when saved on the SD Card All videos in MPEG2 format on the SD Card are copied You cannot use this unit to play MPEG2 videos d...

Page 40: ...TER Selecting a Source Title A complete source title can be inserted directly into Chapters in Playlists with ENTER Select a Source Title with and confirm with ENTER Select the position where the Source Title should be inserted in Chapters in Playlists with and confirm with ENTER You can also insert a Source Title as a chapter into the playlist You can create a playlist from both source titles and...

Page 41: ...Properties Information on the playlist such as chapter date and time is displayed Select Properties with and confirm with ENTER Delete This procedure deletes the playlist and it cannot be restored The source titles are retained Confirm Delete with ENTER Select Delete with and confirm with ENTER Launching the Playlists menu Press FUNCTIONS Select To Others with and confirm with ENTER Select Playlis...

Page 42: ...efore the separation point may be lost Move Chapter Select the position where the chapter is to be moved with and confirm with ENTER Select the desired chapter with and press SUB MENU again Select the desired option in the SUB MENU with confirm with ENTER Press FUNCTIONS Select To Others with and confirm with ENTER Select Playlists with and confirm with ENTER Select a playlist in the Playlist View...

Page 43: ...t playback on the external DV unit End the recording on the DVD Recorder with STOP End playback on the DV unit Recording cannot be cancelled with PAUSE In the Setup menu under Audio Mode for DV Input select Stereo 1 2 or Mix Set the DV unit to Pause at the desired start position Press REC MODE to select the recording mode SP LP EP XP Press FUNCTIONS Select To Others with and confirm with ENTER Sel...

Page 44: ...e Delete Delete All Page Profile Name Profile 1 All Services 1 BBC ONE Wales 2 BBC 2W 3 BBC THREE 4 BBC FOUR 5 CBeebies 6 BBC PARLMNT 7 Community 8 CBBC Channel 9 1Xtra BBC 3 BBC THREE 4 BBC FOUR 7 Community 9 1Xtra BBC 8 CBBC Channel Setup FUNCTIONS To Others RETURN Setup Edit Profiles Digital Analogue Download from TV Manual Signal Condition Auto Setup Restart Add new DVB Services Tuning Disc Pi...

Page 45: ...with ENTER or press RETURN Press RETURN to prematurely end the station search Press RETURN to prematurely end the station search All station settings and all created profiles are deleted Signal Condition The display in the Signal Condition menu shows the quality and strength of the selected digital station You can select and check the stations consecutively with CH The Signal Quality is only displ...

Page 46: ...me ENTER B B Options available for tuning the channels Pos Name Channel NICAM Title Page On Off Station position in the station table Set the station name Set the channel Switches NICAM on or off Select the video text page which supplies the title information ENTER ENTER ENTER ENTER A Z 0 9 21 68 100 899 Station positions Your digital channels can be found at positions 1 900 Your analogue channels...

Page 47: ...switch to standby or open the disc tray Setup FUNCTIONS To Others Setup Rec for High Speed Copy Settings for Recording Recording time in EP mode Off EP 8Hours DVD Speed for High Speed Copy Maximum SELECT RETURN ENTER Tuning Disc Picture Sound Display Connection Others Select the maximum number of hours for recording in EP mode EP 6Hours Recording time on a 4 7 GB disc EP 8Hours Recording time on a...

Page 48: ...ur rich The setting is always set to On if you selected TV System NTSC Off If the picture to be recorded is distorted Select how the still picture should be displayed Field Select this function if the picture is distorted with the setting Automatic Frame Select this function if small text or line structures are not displayed clearly with the setting Automatic Setup FUNCTIONS To Others Setup Comb F...

Page 49: ...ternal source or from a tape position select the sound track on the other unit Select the appropriate setting if you have connected an external unit to the DIGITAL AUDIO OUT of the DVD Recorder Select the audio output mode for a scan frequency of 96 kHz or 88 2 kHz Despite this setting signals are converted to 48 kHz or 44 1 kHz if they have a scan frequency over 96 kHz or 88 2 kHz or if the disc ...

Page 50: ...ernal units EXT LINK You control the recording function via an external unit e g a receiver with EXT LINK Connect the unit to the AV2 terminal with a 21 pin Scart cable Ext Link 1 For digital receivers that send a special recording control signal e g the F U N receiver TU DSF41 Ext Link 2 External recording control for satellite or digital receivers video signal The Ext Link 2 setting cannot be us...

Page 51: ...betan 6679 Afar 6565 Byelorussian 6669 Georgian 7565 Kashmiri 7583 Mongolian 7778 Serbo Croat 8372 Tigrinya 8473 Afrikaans 6570 Cambodian 7577 German 6869 Kazakh 7575 Nauru 7865 Shona 8378 Tonga 8479 Albanian 8381 Catalan 6765 Greek 6976 Kirghiz 7589 Nepali 7869 Sindhi 8368 Turkish 8482 Ameharic 6577 Chinese 9072 Greenlandic 7576 Korean 7579 Norwegian 7879 Singhalese 8373 Turkmen 8475 Arabic 6582 ...

Page 52: ...case the indication for Clock setting is automatically reset to Off If the reception conditions improve later on it is possible to activate this function If the Clock setting is set to On do not set it to Off otherwise the automatic time correction function is deactivated This DVD Recorder uses a 24 hour clock In the event of a power failure an automatic back up system maintains the clock for appr...

Page 53: ... This is shown in the unit display If the unit is in standby to record the timer controlled recordings are not affected If you want to prevent the automatic updates select the setting Software Update in Standby Off Start the search for new software manually A new software version is announced by a message Do not switch your unit off during the update This could result in the loss of data A message...

Page 54: ...The name is displayed in the DVD Management menu You cannot name a disc after it has been finalized Formatting can be cancelled and restarted The formatting process deletes all data including the recordings created with this unit Do not unplug the unit while the disc is being formatted or finalized If you activated write protection deactivate it Only for new discs DVD Management FUNCTIONS To Other...

Page 55: ...th ENTER Select Start with and confirm with ENTER The Top Menu is created The procedure concludes with the message Top Menu was created Return to DVD Management with ENTER Create Top Menu SD CARD DVD Management FUNCTIONS To Others Card Management LOC K FUNCTIONS To Others 53 No Finalizing is necessary for compatible playback It will take approximately 4 minutes Finalize the disc Yes Finalize R R R...

Page 56: ...nese SLK Slovak ESP Spanish CHI Chinese HUN Hungarian NLD Dutch KOR Korean FIN Finnish SVE Swedish MAL Malay Others NOR Norwegian VIE Vietnamese Soundtrack Subtitle On Off Angle Still Picture Audio Channel PBC L R L R Slide Show Page Language Setting Option Disc Soundtrack lang Sound properties Select the sound and the language LPCM PPCm Dolby Digital DTS and MPEG signal type ch channel number of ...

Page 57: ...tent is is not displayed correct with the Auto setting During playback of a playlist If the Video CD has playback control select a track in STOP mode with the number buttons Auto 1 Film and video content is detected and converted appropriately Auto 2 Movies with different picture frequencies are converted Video If content does not display correct with the Auto 1 or Auto 2 settings Reduces noise du...

Page 58: ...nput of the TV Connect the DVD Recorder and the television to the household mains socket HDMI IN Only use fully wired HDMI cables showing the HDMI logo Use cable of max 5 m in length to avoid interference with the video signal To the aerial To this unit Use one of the included RF coaxial cable black or grey to connect this unit s RF IN terminal to your aerial socket or aerial cable RF coaxial cabl...

Page 59: ...t the television set does not display the playback at the start of the title Press SKIP or SLOW SEARCH to return to the start of the playback Download from TV analogue channels only Station transfer from television set During data transfer from TV data for the station list are automatically downloaded from the TV set The stations are stored in the same presets of the DVD Recorder as on your TV set...

Page 60: ... terminals on the TV Connect the DVD Recorder and the television to the household mains socket This unit s rear panel 4 AC mains lead included Connect only after all other connections are complete To household mains socket AC 220 V to 240 V 50 Hz Television s rear panel 4 RF IN RF coaxial cable included black Audio cable L White R Red COMPONENT VIDEO IN 3 Video cable Y Green PB Blue PR Red To the ...

Page 61: ... of the COMPONENT VIDEO input terminal are dependent on the TV or screen Progressive television picture The progressive picture aspect ratio height to width is set to 16 9 DVD Video with a picture aspect ratio of 16 9 is properly displayed However video material with an image page ratio of 4 3 is shown stretched from right to left If it is possible to adjust the picture aspect ratio on your televi...

Page 62: ...panel 4 To household mains socket RF coaxial cable included black 2 Audio Video cable included Video Yellow L White R Red 3 S Video IN 3 Video cable or S Video cable S Video cable To the aerial To this unit Use one of the included RF coaxial cable black or grey to connect this unit s RF IN terminal to your aerial socket or aerial cable RF coaxial cable included grey RF coaxial cable included black...

Page 63: ...I IN Amplifier Television set Connecting an Amplifier DVD Recorder Connecting with HDMI over an amplifier VIDEO OR S VIDEO AUDIO Camcorder Game equipment AV1 AV2 AV3 AV4 IN COMPONENT HDMI AV4 OUT Front Connector Equipment You cannot receive signals from PCs with this unit Selecting the sound track programmes with dual channel sound Analog channels Before recording select Sound setting Bilingual Au...

Page 64: ...set Using a fully wired 21 pin Scart cable not included You can use a variety of Q Link functions by connecting the unit to a Q Link compatible television You can enjoy high quality viewing by connecting the unit to an RGB compatible television 59 Use of the supplied RF coaxial cable To prevent interference patterns from appearing on your TV use only the supplied RF coaxial cables when you connect...

Page 65: ...cording a 90 minute title to a disc with 4 7 GB of storage space Rec mode FR 43 RAM With the EP mode 8Hours setting playback on DVD RAM compatible DVD players may not be possible Select EP mode 6Hours Recording informations TV typ Disc Yes No Multi system TV PAL NTSC Yes Yes Yes Yes NTSC TV PAL TV PAL NTSC NTSC PAL No Yes PAL60 Programmes in 16 9 format are recorded in 4 3 format 16 9 format is us...

Page 66: ...5 GB 12 cm writable R DL 8 5 GB 12 cm writable R DL R DL After finalization these formats can only be replayed on DVD R DL R DL RW compatible players 99 55 DVD R DL R DL Double Layer DVD Dual Layer DVD The data are saved on two parallel layers You have more space available If the laser changes layers during playback brief image and sound distortions may occur If there is not enough capacity to rec...

Page 67: ... protection Remove 8 cm discs from the cartridge before using them with this unit Only play round discs Do not touch the recording surface of the disc RAM DVD lens cleaner RP CL720E Compatible models Only for DVD recorders Do NOT use this cleaner with any other Panasonic DVD products or with the DVD products of any other companies since doing so may damage the products Cleaning the DVD RAM Clean t...

Page 68: ...Caution All saved data are deleted during formatting Do not touch the memory card contacts Use an appropriate adapter for miniSD cards Write protection Keep the small memory cards such as the SD Memory Card out of reach of children If swallowed seek medical advice immediately Opening the cover Press the protruding section to open the cover to the slot Press on the centre of the card until it click...

Page 69: ...DCF Sub sampling 4 2 2 4 2 0 TIFF Uncompressed RGB chunky DPOF Compatible SD MP3 JPEG Format DISC MP3 JPEG 002 Folder P0000003 jpg P0000004 jpg P0000005 jpg 003 Folder Playback sequence P0000006 jpg P0000007 jpg P0000008 jpg P0000001 jpg P0000002 jpg 001 Folder Group 001 track mp3 Files track 002 track mp3 003 track mp3 002 Group 001 track mp3 002 track mp3 003 track mp3 DCIM Subfolder XXXX JPG XX...

Page 70: ... the unit on any appliance which gives off heat Do not erect the unit in places where condensation occurs for example rooms with high humidity levels in the direct air flow of an air conditioning system rooms with great fluctuations in temperature Condensation forms as moisture on a cold surface which is exposed to a sudden extreme change in temperature This condensation can damage the hard disk a...

Page 71: ...W DVD A DVD V VCD CD SD RW V RW VR Properties Enter Name Partial Delete Change Thumbnail Divide Title Playlist Edit Playlist Delete Edit Set up Protection Cancel Protection Playback RAM R R R DL R DL RW DVD A DVD V VCD CD RW V RW VR SD RAM R R R DL R DL RW DVD A DVD V VCD CD RW V RW VR SD Disc Name Disc Protection Delete all titles Format Disc Auto Play Select Finalize Create Top Menu Functions of...

Page 72: ...eo and still pictures VR format Digital programmes that are limited to one time recording cannot be recorded To record in VR format use a R R DL oder RW Suitable data for recording and playback video RAM HDD CPRM Content Protection for Recordable Media This unit is compatible with the CPRM copy protection system for recordable media When using a CPRM compatible disc a programme can be recorded Pro...

Page 73: ... location Do not block the vents at the back of the unit î The unit has found an error during recording or playback without an inserted disc The unit proceeds with the recovery procedure This procedure restores the normal operating mode The unit is not defect Please wait until the message goes off î The connected unit is not suitable for connection to HDMI î The HDMI connection does not work perfe...

Page 74: ...ns î If you connected an amplifier check the input mode î Switch off the V S S function if it causes problems It is not possible to hear the desired sound type Press DISPLAY to select the desired sound type Change the appropriate setting in the Sound Setup menu The sound cannot be set for stereo or NICAM broadcasts î Connect external unit with audio cables even if you use a digital connection î Yo...

Page 75: ...te protection device on the cartridge is set to PROTECT Deactivate the write protection î Deactivate the write protection in the DVD Management menu î The material that you want to record is copy protected The number of possible copies is limited with some programmes î Discs containing PAL and NTSC signals cannot be recorded 54 54 Some or all recorded programmes were lost î If there is a power cut...

Page 76: ...Time not set Date time incorrectly set î The transmission did not work Repeat the Automatic Time Setting Unusual station sorting î The station sorting of this unit is pre defined Use profiles to sort the stations as you want them No teletext î This DVD Recorder does not support analogue teletext î When subtitle is on or additional information in the Digital channel information is displayed Digital...

Page 77: ...nu set the setting Aspect for 4 3 Video to 4 3 î Check the setting TV Aspect in the Setup menu Part of the picture appears duplicated some of the time when using the output COMPONENT VIDEO OUT î Do not connect this unit to the television set with an HDMI cable î In the Setup menu set the Progressive setting to Off No sound Low volume Sound with interference The required audio type cannot be heard ...

Page 78: ...d digital signals similar to those on CDs LPCM sound can be used during recording in XP mode PCM Pulse Code Modulation Standard procedure for recording uncompressed digital audio signals RGB Red Green Blue This refers to the three primary colours of light red R green G and blue B and also the method of producing video that uses them By dividing the video signal into the three colours for transmiss...

Page 79: ...DEO Video 1 Vp p AV3 S VIDEO IN Y 1 Vp p C 0 3 Vp p PAL AV4 IN Video 1 Vp p AV4 S VIDEO IN Y 1 Vp p C 0 3 Vp p PAL Output For 75 Ohm termination AV1 SCART Video 1 Vp p RGB 0 7 Vp p S Video Y 1 Vp p C 0 3 Vp p PAL AV2 SCART Video 1 Vp p VIDEO Video 1 Vp p S VIDEO Y 1 Vp p C 0 3 Vp p PAL COMPONENT Y 1Vp p P 0 7Vp p P 0 7Vp p B R VIDEOOUT PAL 576p 576i NTSC 480p 480i Antenna Receive Input 75 Ohm Term...

Page 80: ...Playlists 41 NICAM 46 TIFF 29 Timer 20 NTSC 22 48 50 TIME SLIP 14 Title 26 Top Menu 23 55 TV stations analogue 46 On Screen Messages 49 Transfer Mode 57 Dialog Enhancer 57 OPTICAL 63 TV Aspect 50 Digital Audio Output 51 Optical digital audio cable 63 TV Codes 65 Digital TEXT 24 Owner ID 9 53 TV Guide 18 Direct TV recoding 17 TV System 50 Disc Menu 47 PAL 22 48 50 Disc Name 54 PCM Down Conversion 4...

Reviews: