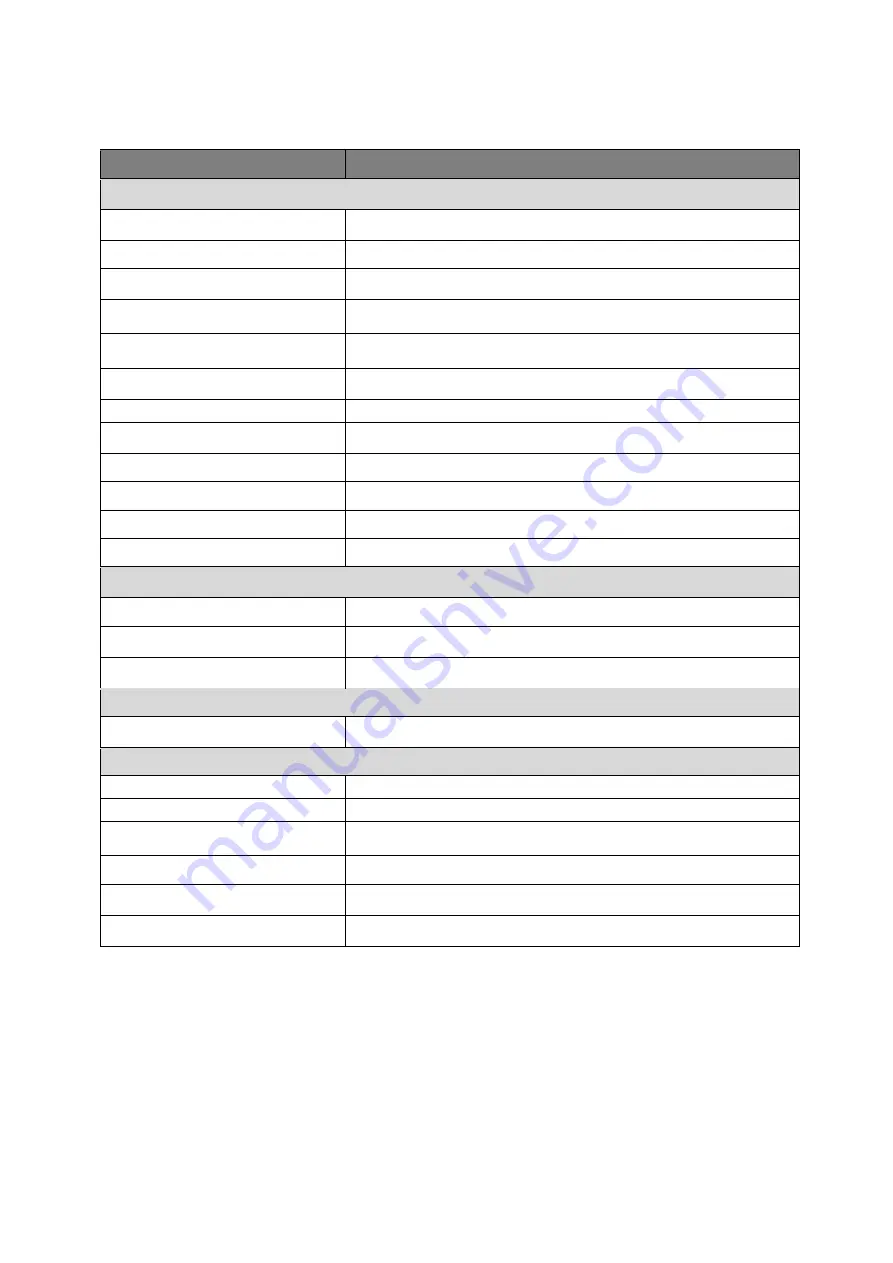
background image


1.3


Specifications 


Parameter 

CV-CFN203L 

Camera 

Image Sensor 

1/2.9" 2.0 Mega Pixels CMOS


Effective Pixels 

1936 (H) x 1097 (V) 

Min Illumination 

0.02Lux/ F2.0, 0Lux IR on 

Electronic Shutter 

PAL   : 1/25s~1/100,000s 
NTSC: 1/30s~1/100,000s 

Video Frame Rate* 

PAL   : 25fps 
NTSC: 30fps 

Synchronization 

Internal 

Day & Night 

Auto (ICR)/ Color/ B/W 

Max IR Distance 

20m 

Digital Noise Reduction 

2D 

White Balance 

Auto 

AGC 

Auto 

BLC 

Auto 

Lens 

Focal Length


3.6mm


Angular Field of View 

H: 82.8


 V: 44.2


Lens Type 

M12 

Input / Output 

Video Output 

1CH BNC HD-CVI video output 

General 

Power 

DC 12V±25% 

Power Consumption 

2.8W MAX 

Working Temperature 

-30

~+60

.  

Less than 95% RH (no condensation) 

Dimensions 

Φ85.0 mm × 69.0 mm 

Weight (approx.) 

100g 

External Case 

Plastic 

*Refer to DVR spec sheet for recording frame rate limitation


Summary of Contents for CV-CFN203L

Page 1: ...HD Analog Camera User s Manual Model No CV CFN203L Version 1 0 0 ...

Page 2: ...2 Table of Contents 1 General Introduction 1 1 1 Overview 1 1 2 Features 1 1 3 Specifications 2 2 Device Framework 3 3 Installation 4 4 Menu 6 4 1 Settings 6 4 2 Menu Operation 6 ...

Page 3: ...r HD analog camera This user s manual is designed to be a reference tool for your system Please read the following safeguard and warnings carefully before you use this series product Please keep this user s manual well for future reference ...

Page 4: ...f CMOS Please transport use and store the device within the range of allowed humidity and temperature Please don t keep the device in a place which is wet dusty extremely hot and extremely cold and with strong electromagnetic radiation or unstable lighting Please do not allow water and other liquid falling into the camera in case that the internal components are damaged Please do not allow rain or...

Page 5: ...is ok to change the cloth and wipe several times if it is not clean enough Please put the dustproof cap to protect the CMOS component when you do not use the camera Warning Please use the standard accessories provided by manufacturer and make sure the device is installed and fixed by professional engineers Please prevent the device surface from the radiation of laser beam when using laser beam dev...

Page 6: ...the DVR conforming to the HDCVI 1 2 Features High performance CMOS image sensor Support 1080p 25fps PAL 30fps NTSC Support 75 3 coaxial cable Belden 9259 or equivalent transmission up to 500m High speed long distance real time transmission Support ICR for day time and night time operation Support auto exposure auto white balance auto electronic shutter and auto gain function Support DC12V power su...

Page 7: ...ernal Day Night Auto ICR Color B W Max IR Distance 20m Digital Noise Reduction 2D White Balance Auto AGC Auto BLC Auto Lens Focal Length 3 6mm Angular Field of View H 82 8 V 44 2 Lens Type M12 Input Output Video Output 1CH BNC HD CVI video output General Power DC 12V 25 Power Consumption 2 8W MAX Working Temperature 30 60 Less than 95 RH no condensation Dimensions Φ85 0 mm 69 0 mm Weight approx 10...

Page 8: ...3 2 Device Framework Please refer to the following figures for dimension information The unit is mm Figure 2 1 Figure 2 2 ...

Page 9: ...y from the pedestal Step 2 Confirm the installation location and dig holes on the installation surface Step 3 Use tools to insert expansion bolts into the installation holes and fix them firmly Step 4 Adjust pedestal location if it is side cable outlet then pull the cable through the side outlet cable slot Align the bolt fixing holes of the device pedestal with the expansion bolt fixing holes of t...

Page 10: ...osure buckle get stuck into the pedestal rotate the enclosure and dome body to a proper monitoring location So far the device installation and cable connection are completed you can check the image via back end coding device ...

Page 11: ... you need to select the channel number for access and set control mode as HDCVI and the protocol as HD CVI Click Save button to save current setup See Figure 4 1 Figure 4 1 4 2 Menu Operation Click the right mouse button and select PAN TILT ZOOM then you will see the PAN TILT ZOOM setup menu which is as shown in Figure 4 2 and Figure 4 3 Figure 4 2 ...

Page 12: ...ious menu interface Note This manual is for reference only Slight difference may be found in the user interface All the designs and software here are subject to change without prior written notice All trademarks and registered trademarks mentioned are the properties of their respective owners If there is any uncertainty or controversy please refer to the final explanation of us Please visit our we...

Reviews: