background image

4

   PRODUCT OVERVIEW & OPERATIONS

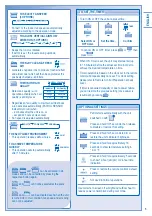
TO TURN ON OR OFF THE UNIT

POWER

•  Please be aware of the OFF indication on the remote control 

display to prevent the unit from starting/stopping improperly.

TO SET TEMPERATURE

•  For cool and dry modes, the range of temperature for selection is 

16°C ~ 30°C.

•  Operating the unit within the recommended temperature could 

induce energy saving.

COOL mode : 26

˚

C ~ 28

˚

C.

DRY mode : 1

˚

C ~ 2

˚

C lower than room temperature.

TO SELECT OPERATION MODE

AUTO mode - For your convenience

•  Unit selects the operation mode according to the room 

temperature.

•  Once auto mode is selected, the unit will operate at the standard 

setting temperature.

•  To change the standard setting temperature, press 

 for “HI” 

or 

 for “LO”.

Room 

temperature

Operation 

mode

Standard setting 

temperature

HI 

(+2°C)

LO 

(-2°C)

23°C & above

Cool

25°C

27°C

23°C

Below 23°C

Dry

22°C

24°C

20°C

COOL mode - To enjoy cool air
DRY mode - To dehumidify the environment

•  Unit operates at low fan speed to give a gentle cooling operation.

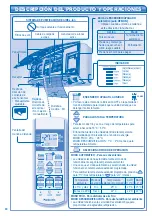
  PRODUCT OVERVIEW & OPERATIONS

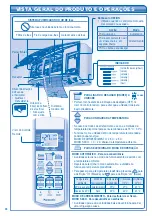
Front panel

Receiver

Auto OFF/ON button

•  Used when remote control is misplaced 

or malfunction.

Action

Mode

Press once.

Auto

Press and hold until 1 beep is 

heard, then release.

Cooling

Press the button to turn off.

e-ion AIR PURIFYING SYSTEM


Do not touch during operation

e-ion 

fi

 lters

e-ion charging wire

Active e-ion Generator

Maximum 

distances: 8m

Horizontal air

fl

 ow 

direction louver

• Manually 

adjustable.

Vertical air

fl

 ow 

direction louver

•  Do not adjust 

by hand.

Remote control 

display

INDICATOR

(Red/Orange/Blue)
(Green)
(Orange)
(Orange)
(Orange)
(Blue)

Summary of Contents for CS-C12JKV

Page 1: ...hly and keep them for future reference keep them for future reference ESPAÑOL ESPAÑOL 8 13 8 13 Antes de utilizar la unidad sírvase leer Antes de utilizar la unidad sírvase leer atentamente estas instrucciones de atentamente estas instrucciones de funcionamiento y conservarlas como funcionamiento y conservarlas como futuro elemento de consulta futuro elemento de consulta PORTUGUÊS PORTUGUÊS 14 19 ...

Page 2: ...ring lightning it may cause electric shock Air inlet Air inlet Air Air outlet outlet Air outlet Air inlet Air inlet Power Supply Do not share the same power outlet with other equipment Do not modify power cords Do not use extension cords Do not operate with wet hands Do not operate or stop the unit by inserting or pulling out the power plug Insert the power plug properly Use the specified supply c...

Page 3: ...wn Black Green Yellow Wiring colour may vary depending on a country wiring code s standard This appliance is not intended for use by persons including children with reduced physical sensory or mental capabilities or lack of experience and knowledge unless they have been given supervision or instruction concerning use of the appliance by a person responsible for their safety Children should be supe...

Page 4: ...emperature press for HI or for LO Room temperature Operation mode Standard setting temperature HI 2 C LO 2 C 23 C above Cool 25 C 27 C 23 C Below 23 C Dry 22 C 24 C 20 C COOL mode To enjoy cool air DRY mode To dehumidify the environment Unit operates at low fan speed to give a gentle cooling operation PRODUCT OVERVIEW OPERATIONS Front panel Receiver Auto OFF ON button Used when remote control is m...

Page 5: ...uces airflow noise QUIET TO ACHIEVE TEMPERATURE QUICKLY This operation will stop automatically after 15 minutes POWERFUL TO SET THE TIMER TO SET THE TIMER To turn ON or OFF the unit at a preset time TIMER Select ON or OFF timer Set the time Confirm To cancel ON or OFF timer press or then press When ON Timer is set the unit may start earlier up to 15 minutes before the actual set time in order to a...

Page 6: ...requently Power cord becomes unnaturally warm Switches or buttons are not functioning properly Timer indicator blinks FOR EXTENDED NON USE FOR EXTENDED NON USE Activate e ion operation for 2 3 hours as an alternative to remove moisture left in the internal parts thoroughly Turn off the power supply and unplug Remove the remote control batteries CAUTION Switch off the power supply and unplug before...

Page 7: ...atrol sensor or e ion indicator still blinking please consult authorized dealer Symptom Symptom Cause Cause Mist emerges from indoor unit Condensation effect due to cooling process Water flowing sound during operation Refrigerant flow inside the unit The room has a peculiar odour This may due to damp smell emitted by the wall carpet furniture or clothing Indoor fan stops occasionally during automa...

Page 8: ...ibles daños o desperfectos materiales Unidad Interior No instale desinstale ni reinstale la unidad usted mismo una instalación incorrecta podría causar fugas de agua descargas eléctricas o incendios Consulte con un distribuidor autorizado o con un especialista para realizar el trabajo de instalación No coloque sus dedos u otros objetos en la unidad las piezas giratorias pueden causar lesiones No i...

Page 9: ...el piso Después de encerar airee la habitación correctamente antes de encender la unidad No instale la unidad en áreas aceitosas y ahumadas Información para Usuarios sobre la Recolección y Eliminación de aparatos viejos y baterías usadas Informacion sobre la Eliminación en otros Países fuera de la Unión Europea Estos símbolos sólo son válidos dentro de la Unión Europea Si desea desechar estos obje...

Page 10: ... el ahorro de energía MODO FRÍO 26 C 28 C MODO DESHUMIDIFICACIÓN 1 C 2 C menos que la temperatura ambiente SELECCIONAR MODO DE OPERACIÓN MODO AUTOMÁTICO Para su conveniencia La unidad selecciona automáticamente el modo de funcionamiento según la temperatura ambiental Una vez que el modo automático es seleccionado la unidad funcionará en la temperatura estándar programada Para cambiar la temperatur...

Page 11: ...do de corriente de aire QUIET ALCANZAR TEMPERATURA RÁPIDAMENTE Esta operación se parará automáticamente después de 15 minutos POWERFUL PARA AJUSTAR EL TEMPORIZADOR PARA AJUSTAR EL TEMPORIZADOR Conectar o desconectar la unidad a una hora predeterminada TIMER Seleccione el temporizador de activación ON o de desactivación OFF Ajuste la hora Confirmar Para cancelar el temporizador de encendido ON o el...

Page 12: ...en el mando a distancia Si hay escapes de agua de la unidad interior Si el interruptor del circuito se abre frecuentemente El cable de alimentación está demasiado caliente Los interruptores o los botones no funcionan correctamente El indicador del temporizador parpadea SI NO SE VA A UTILIZAR LA UNIDAD DURANTE UN SI NO SE VA A UTILIZAR LA UNIDAD DURANTE UN PERIODO PROLONGADO DE TIEMPO PERIODO PROLO...

Page 13: ...entes señales no indican un mal funcionamiento Compruebe lo siguiente antes de llamar a un técnico Compruebe lo siguiente antes de llamar a un técnico LOCALIZACIÓN DE AVERÍAS LOCALIZACIÓN DE AVERÍAS Señal Señal Causa Causa Sale neblina de la unidad interior Efecto de condensación producido durante el proceso de enfriamiento Se escucha un sonido similar a agua fluyendo durante el funcionamiento Flu...

Page 14: ...engulam acidentalmente as pilhas Remova as pilhas da unidade se não a pretender utilizar durante um período de tempo prolongado Introduza pilhas novas do mesmo tipo seguindo as indicações de polaridade indicadas para evitar a avaria do controlo remoto Fonte de alimentação Não partilhe a tomada eléctrica com outro equipamento Não modifique os cabos de alimentação Não utilize extensões eléctricas Nã...

Page 15: ... pode ser utilizado em conjugação com um símbolo químico Neste caso terá de proceder em conformidade com o estabelecido na Directiva referente aos produtos químicos utilizados Pb INFORMAÇÕES REGULAMENTARES INFORMAÇÕES REGULAMENTARES CONDIÇÃO DE FUNCIONAMENTO CONDIÇÃO DE FUNCIONAMENTO Utilize este ar condicionado com o seguinte intervalo de temperatura Temperatura C Interior Exterior DBT WBT DBT WB...

Page 16: ...emperatura ambiente Modo de funcionamento Temperatura predefinida HI Elevada 2 C LO Baixa 2 C 23 C e superior Arrefecimento 25 C 27 C 23 C Abaixo de 23 C Seco 22 C 24 C 20 C MODO DE ARREFECIMENTO Para desfrutar de ar fresco MODO SECO Para desumidificar o ambiente A unidade opera a uma velocidade baixa da ventoinha para dar uma refrigeração suave Painel frontal Receptor Distância máxima 8m Difusor ...

Page 17: ...ALCANÇAR A TEMPERATURA RAPIDAMENTE Esta operação irá parar automaticamente após 15 minutos POWERFUL CONFIGURAÇÕES OPCIONAIS CONFIGURAÇÕES OPCIONAIS O comando Patrol começa automaticamente com a unidade ligada com Prima e segure durante 5 segundos depois liberte ou restaure esta definição Prima e segure durante 5 segundos para escurecer ou restaurar a luminosidade do indicador da unidade Prima e se...

Page 18: ...ou botões não estão a funcionar devidamente O indicador de temporizador pisca PARA PREPARAR A UNIDADE PARA UM PERÍODO DE PARA PREPARAR A UNIDADE PARA UM PERÍODO DE INACTIVIDADE PROLONGADO INACTIVIDADE PROLONGADO Active a operação de e iões durante 2 3 horas como uma alternativa para remover cuidadosamente qualquer humidade que tenha ficado nas peças internas Desligue a unidade e retire a ficha da ...

Page 19: ... Causa Causa Sai névoa da unidade interior Efeito de condensação devido ao processo de arrefecimento Ouve se o fluxo de água quando a unidade está a funcionar Fluxo do líquido de refrigeração no interior da unidade A sala tem um odor estranho Pode ser devido a um odor de humidade produzido pela parede alcatifa mobília ou vestuário O ventilador interior pára ocasionalmente quando o modo de velocida...

Page 20: ...an be used 1 year Inserte pilas AAA o R03 puede ser usado 1 año Introduza pilhas AAA ou R03 pode ser utilizado 1 ano 3 Close the cover Cierre la tapa Feche a tampa 4 Press CLOCK Presione CLOCK Prima CLOCK 5 Set time Ajuste la hora Configurar a hora 6 Confirm Confirmar Confirmar Remote Control Preparation Remote Control Preparation Preparación Del Mando A Distancia Preparación Del Mando A Distancia...

Reviews: