Panasonic CQC7103U - CAR AUDIO - MULTI-LANG Operating Instructions Manual Download Page 104

36

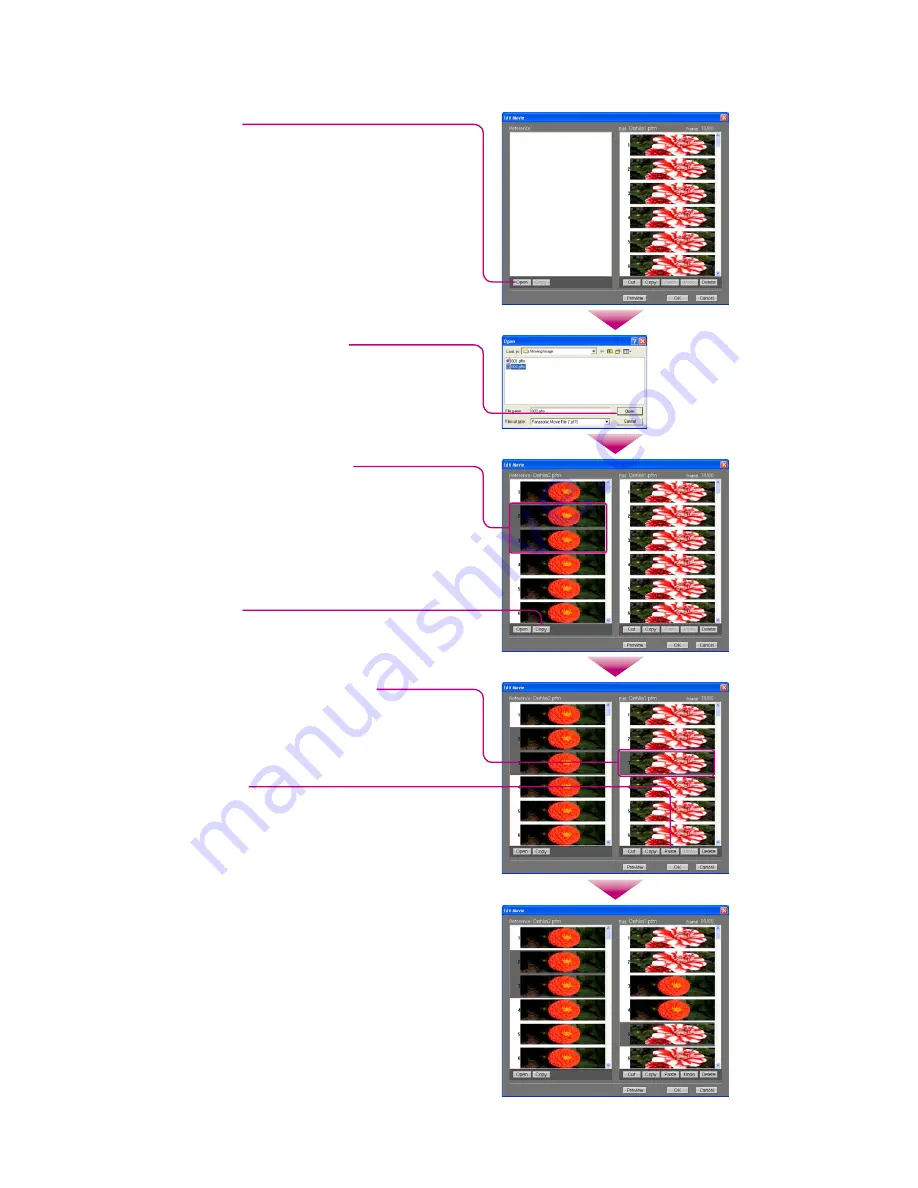
To insert a frame from another graphic pattern file:

  Click [Open].

  Select the insert destination frame.

  Click [Paste].


 The copied frame will be inserted.

  Select the frame to be inserted.

  Click [Copy].

   Select the graphic pattern file  

and click [Open].


 The selected file will be opened.

5-4

Note:

 You cannot add frames, when the number of total 

frames exceeds the designated number. (page 7)

 Adjust the number of frames so that the opening is 

30 (60 for 2004 models) frames and the closing is 20 

(40 for 2004 models) frames.

  Excess and deficiency in the number of frames cause 

failure in saving.

 Short-cut keys are available in this operation.

Summary of Contents for CQC7103U - CAR AUDIO - MULTI-LANG

Page 1: ...se instructions including Limited Warranty and Customer Services Directory carefully before using this product and keep this manual for future reference Prière de lire attentivement ces instructions y compris la Garantie limitée et le Répertoire des services à la clientèle avant d utiliser ce produit et conserver ce mode d emploi pour s y référer ultérieurement Lea con atención estas instrucciones...

Page 2: ...NINTENDED ACTIVATION OF THE ELECTRICAL SAFETY SYSTEM RESULTING IN DAMAGE TO THE VEHICLE AND PERSONAL INJURY OR DEATH Never use safety related components for installa tion grounding and other such functions Do not use safety related vehicle components fuel tank brake suspension steering wheel pedals airbag etc for wiring or fixing the product or its accessories Installing the product on the air bag...

Page 3: ...d parts and tools for installation Use the supplied or designated parts and appropriate tools to install the product The use of parts other than those sup plied or designated may result in internal damage to the unit Faulty installation may lead to an accident a malfunction or fire Do not block the air vent or the cooling plate of the unit Blocking these parts will cause the interior of the unit t...

Page 4: ... constantly growing family of electronic products owners We endeavor to give you the advantages of precise electronic and mechanical engineering manufactured with carefully selected components and assembled by people who are proud of the reputation their work has built for our company We know this product will bring you many hours of enjoyment and after you discover the quality value and reliabili...

Page 5: ...apping Screw 5 mmø x 16 mm Notes The number in parenthesis underneath each accessory part name is the part number for maintenance and service Accessories and their parts numbers are subject to modification without prior notice due to improve ments Mounting Collar and Trim Plate are mounted on the main unit at shipment Hex Nut 5 mmø YEP0FZ5701 Q ty 1 set Rear Support Strap YEFG04019 Q ty 1 XXXXXXXX...

Page 6: ...erCard Discover Card American Express and Personal Checks For hearing or speech impaired TTY users TTY 1 866 605 1277 Service in Puerto Rico Matsushita Electric of Puerto Rico Inc Panasonic Sales Company Factory Servicenter Ave 65 de Infantería Km 9 5 San Gabriel Industrial Park Carolina Puerto Rico 00985 Phone 787 750 4300 Fax 787 768 2910 CANADA WARRANTY SERVICE FOR PRODUCT OPERATION ASSISTANCE ...

Page 7: ...DUCT OR ARISING OUT OF ANY BREACH OF THIS WARRANTY As examples this excludes damages for lost time cost of having someone remove or re install an installed unit if applicable travel to and from the sevicer and loss of media data or other memory contents The items listed are not exclusive but are for illustration only ALL EXPRESS AND IMPLIED WARRANTIES INCLUDING THE WARRANTY OF MERCHANTABILI TY ARE...

Page 8: ...n al Panasonic CD changer unit CX DP880 iPod The optional adapter Direct Cable for iPod CA DC300U allows you to connect the optional iPod series iPod is a trademark of Apple Computer Inc registered in the U S and other countries XM Satellite Radio You can connect the optional XM receiver XMD 1000 with optional Digital Adapter For details refer to the operating instructions for the XM receiver Siri...

Page 9: ...ck adjustment etc 12 General 14 Sound Control 18 Radio 20 CD Player 22 MP3 WMA Player 24 Audio Setting 28 Function Setting Security Setting etc 29 Display Setting 30 Customize the Display 31 Troubleshooting 33 Error Display Messages 37 Notes on Discs 38 Maintenance 38 Specifications 39 English Français 40 Español 78 Common Each Source As Needed ...

Page 10: ......

Page 11: ......

Page 12: ...control gently Battery Replacement q w q Remove the battery holder with the remote control unit placed on a flat surface q Stick your thumbnail into the groove and push the holder in the direction of the arrow and at the same time w Pull it out in the direction of the arrow using a tough pointed object 2 3 w Put a battery in the case with side facing up e Put the case back Tough pointed object Bac...

Page 13: ... hold down SEL MENU for 2 sec or more You may need to set the following depending on the devices to be connected Using Subwoofer Subwoofer level adjustment a page 28 Subwoofer low pass filter a page 28 Note Other settings are required when a Sirius receiver an XM receiver or a Hands Free Phone System is connected a System Upgrade Guidebook The following functions are activated when the Security Fu...

Page 14: ......

Page 15: ......

Page 16: ......

Page 17: ......

Page 18: ......

Page 19: ......

Page 20: ......

Page 21: ......

Page 22: ......

Page 23: ......

Page 24: ......

Page 25: ......

Page 26: ...28 kbps or more and fixed WMA It is recommended to set the bit rate to 64 kbps or more and fixed Do not set the copy protect attribute on the WMA file to enable this unit to play back Display Information Displayed items Displayable characters Displayable length of file name folder name within 64 characters Unicoded file and folder names are reduced by half in the number of displayable charac ters ...

Page 27: ...s 32 k 320 kbps MPEG 1 audio layer 3 MP3 Sampling frequency VBR Bit rate Compression method Compression formats Recommendation Points to remember when making MP3 WMA files on the previous page Folder selection order file playback order Root Folder Root Directory Folder Selection File Selection Tree 1 Tree 2 Tree 3 Tree 4 Tree 8 Max 2 1 3 4 q q w e r t y y 5 6 8 1 8 7 In the order In the order Maxi...

Page 28: ......

Page 29: ......

Page 30: ......

Page 31: ......

Page 32: ... specific data Save all data in the root directory Files contained in a folder cannot be recognized Follow the table below with regard to the number of files that are saved to a disc Files beyond the speci fied capacity are not readable Discs recorded by the packet writing software are not supported At Customizing If customizing is interrupted on account of turning off the power stopping the engin...

Page 33: ...repair the unit by yourself because it is dangerous to do so Problem Possible cause a Possible solution Common No power to the unit The power cord battery power and ground is connected in the wrong way a Check the wiring Fuse blows out a Eliminate the cause of fuse blowout and replace the fuse with new one Consult your dealer Sound is not generated MUTE is set to ON a Set MUTE to OFF The wiring of...

Page 34: ...d minus terminals at right and left channels of speakers are connected reversely a Perform the speaker wiring in accordance with the wiring diagram Radio Poor reception or noise Antenna installation or wiring of antenna cable is faulty a Check whether the antenna mounting position and its wiring are correct In addition check to see whether the antenna ground is securely connected to the chassis No...

Page 35: ...es not work consult your dealer The microcontroller in the unit operates abnormally due to noise or other factors a Unplug the power cord and plug it again In case the unit is still out of order consult your dealer CD The CD R RWs that are playable on other devices are not playable on this unit The playability of some CD R RWs may depend on the combination of media recording software and recorder ...

Page 36: ... correct battery in the correct direction The battery is weak aReplace the battery with new one The aiming direction of the remote control unit is wrong aAim the remote control unit at the sensor of the unit and press buttons The sensor is exposed to direct sunlight The remote control unit may not be operable when the sensor is exposed to direct sunlight In such a case the system is not faulty aBl...

Page 37: ... the disc Create a new disc if necessary After 5 seconds To next file automatically CD MP3 WMA The disc is dirty or is upside down a Check the disc The disc has scratches a Check the disc No operation by some cause a Unplug the power cord and plug it again In case the unit is still out of order consult your dealer a Installation Instructions A WMA file can be copyrighted a The file protected by co...

Page 38: ...igh humidity than ordinary music CDs Leaving them inside a car for extended periods may damage and make playback impossible Some CD R RWs can not be played back successfully thanks to incompatibility among writing software a CD recorder CD R RW drive and the discs This player cannot play the CD R RW discs if the session is not closed This player cannot play the CD R RW discs which contains other t...

Page 39: ... kHz Usable Sensitivity 27 dB µV S N 20 dB English CD Player Power Supply DC 12 V 11 V 16 V Test Voltage 14 4 V Negative Ground Tone Controls Bass Treble Bass 12 dB at 60 Hz Treble 12 dB at 16 kHz Equalizer Center Frequency 60 160 400 1 k 3 k 6 k 16 k Hz CQ C7403U C7303U Band 1 60 80 100 200 Hz Band 2 500 1k 2k 3k Hz Band 3 10k 12k 15k 18k Hz CQ C7203U C7103U Variable Range of Equalizer 12 dB to 1...

Page 40: ...c Way Secaucus New Jersey 07094 http www panasonic com Panasonic Sales Company Division of Panasonic Puerto Rico Inc PSC Ave 65 de Infanteria Km 9 5 San Gabriel Industrial Park Carolina Puerto Rico 00985 http www panasonic com Panasonic Canada Inc 5770 Ambler Drive Mississauga Ontario L4W 2T3 http www panasonic ca 2005 Matsushita Electric Industrial Co Ltd All Rights Reserved ...

Page 41: ......

Page 42: ......

Page 43: ......

Page 44: ......

Page 45: ......

Page 46: ......

Page 47: ......

Page 48: ......

Page 49: ......

Page 50: ......

Page 51: ......

Page 52: ......

Page 53: ......

Page 54: ......

Page 55: ......

Page 56: ......

Page 57: ......

Page 58: ......

Page 59: ......

Page 60: ......

Page 61: ......

Page 62: ......

Page 63: ......

Page 64: ......

Page 65: ......

Page 66: ......

Page 67: ......

Page 68: ......

Page 69: ...se read these instructions carefully before using this product and save this manual for future use This version of IMAGE STUDIO is available in English only Software Operation Manual IMAGE STUDIO Ver 3 0 0 ...

Page 70: ...n of the Software shall be restricted only for the storage or back up purpose 4 Prohibition on Transfer etc The user has no right to transfer lease rent or grant a license to use the Software or otherwise to any third parties for any purposes 5 Prohibition of Modification and Reverse engineering The user may not modify reverse engineer decompile disassemble or otherwise the Software in any manner e...

Page 71: ...reted under the laws of Japan Even if any part of the present Agreement is held invalid by or in conflict with any laws having jurisdiction over the present Agreement at any court the remaining provisions will remain in full force and effect Microsoft Windows Windows Me Windows 2000 Windows XP Internet Explorer and Windows Media are either registered trademarks or trademarks of Microsoft Corporatio...

Page 72: ... Menus 16 Context Menu 18 Pre dialog Menu 19 Change the suitable car audio model to another after installation 20 Creating A Graphic Pattern 21 Editing a Graphic Pattern From a Moving Image File AVI GIF 21 Editing a Graphic Pattern Scroll Display From a Still Image File 24 Editing a Graphic Pattern Wipe Display From a Still Image File 26 Editing Opening and Closing Messages 29 Editing the Created ...

Page 73: ...N W CQ C9700U N W CQ C8400U W CQ C8300U N W as of December 2005 Check the name of your audio unit before download and installation 1 Download the application from the Panasonic web site 2 Install the application that is suitable for your audio unit on your computer 3 Operation Flow continued on the next page Run IMAGE STUDIO 5 Edit the loaded images with IMAGE STUDIO and save them in your computer...

Page 74: ...zings You can also download free of charge provided image data from the Panasonic web site The provided image data cannot be processed with IMAGE STUDIO Panasonic owns the copyrights for this application and the provided image data Copying and commercial use of these without permission are forbidden by law Example CQ C8803U Enter the customize menu Insert the CD R RW disc containing the data to be...

Page 75: ...160 x 54 dots 80 30 20 CQ C9800U N W CQ C9700U N W CQ C8400U W CQ C8300U N W 4 tone 256 x 80 dots 150 60 40 Operating Environment Supported OS Windows Me Windows 2000 Windows XP Software Microsoft Internet Explorer 5 0 to 6 0 CPU Intel Pentium 400 MHz or more is recommended Memory 128 MB or more is recommended Display Resolution of 800 x 600 16 bit color or greater Required Available Hard disk Spa...

Page 76: ...re played back at a speed of 10 frames per second Depending on the loaded AVI files the playback speed varies from the original images Format for Writing to CD R RW Discs Do not write data on a CD R RW disc if by so doing the maximum allowed number of files listed below will be exceeded If files are written on a CD R RW disc in a number which exceeds the maximum number of files allowed as given in the...

Page 77: ...eck box Click start 1 Click Control Panel 2 For Windows XP The display is different in Windows Me or Windows 2000 Click Folder Options 4 Windows XP operating system is used as an example in these instructions If another operating system is used i e Windows Me or Windows 2000 some of the displays and procedures will be different ...

Page 78: ... IMAGE STUDIO Please check the operating environment before installing it page 7 3 5 continued on the next page Click Next 4 Double click the IMGSINST icon on the desktop The setup wizard starts Read the terms of the license agreement carefully check I accept the terms of the license agreement and click Next 6 Enter your name and the name of the company you work for and click Next If you do not ha...

Page 79: ...elect the directory in which the program is to be installed 9 Click Install The installation starts 10 Click Finish The program has been installed 11 Click to select an install type and click Next As for the install type please refer to page 7 8 ...

Page 80: ...ograms 3 Click Change or Remove Programs 4 For Windows XP The display is different in Windows Me or Windows 2000 Uninstalling IMAGE STUDIO Click Control Panel 2 Click Panasonic IMAGE STUDIO 5 Click Change Remove 6 continued on the next page ...

Page 81: ... Yes 8 Select start Settings Control Panel 1 Select Add Remove Programs 2 From Install Remove select Panasonic IMAGE STUDIO and remove it 3 For Windows Me Windows 2000 Click Finish The program has been uninstalled 9 Never check these boxes ...

Page 82: ...anasonic IMAGE STUDIO will start up For Windows Me Windows 2000 Click start 1 For Windows XP The display is different in Windows Me or Windows 2000 Select All Programs Panasonic Panasonic IMAGE STUDIO Panasonic IMAGE STUDIO will start up 2 Top screen of IMAGE STUDIO Pre dialog menu ...

Page 83: ...r images Converts to the sepia mono tone image Note Sixty four 64 color moving images are not supported Image loading operation buttons These buttons are for creating moving images These buttons will change according to the situations as follows Preview screen operation buttons Slider Drag thebar to displayany position in thepreview screen Pause Play Stop Repeat play When creating a graphic patter...

Page 84: ...e position and size of the end frame the same as for the start frame Sets the aspect ratio for the start frame to the default aspect ratio for the actual device Sets the aspect ratio for the end frame to the default aspect ratio for the actual device Resets all frame sizes to the default Resets all frame positions to the default position Sets the aspect ratio for all frames to the default aspect r...

Page 85: ...another Connects to the Customize Site Version information Changes the image view Enlarges or reduces the display size Fits into the display window size Rotates the image 90 degrees clockwise Rotates the image 90 degrees counterclockwise AVI and GIF movie files cannot be supported ...

Page 86: ... aspect ratio for the actual device Sets the aspect ratio for the end frame to the default aspect ratio for the actual device Makes the position and size of the start frame the same as for the end frame Makes the position and size of the end frame the same as for the start frame Resets all frame sizes to the default Resets all frame positions to the default position Sets the aspect ratio for all f...

Page 87: ...oes to the pre dialog 2 page 38 Goes to the pre dialog 2 Goes to the pre dialog 2 page 31 Closes the pre dialog Sample images of each mode will be displayed Pre dialog 2 page 21 page 24 page 26 The file open dialog will be displayed twice the former for foreground and the latter for background successively when clicking this Closes the pre dialog ...

Page 88: ...to another after installation Accordingly you do not have to reinstall it even if you select an unsuitable install type Moreover you can make the images for 2 models or more by using only an application Click Model Selection from the Help pull down menu 1 Click o select a model to which you want to change 2 Click OK 3 ...

Page 89: ... From a Moving Image File AVI GIF You can cut out portions of the moving image up to a designated maximum of frames for each model page 7 and save them as a graphic pattern Target file AVI GIF AVI files other than the following formats are not guaranteed 24 bit and non compression or RLE compression format continued on the next page Click Create graphic pattern from the pre dialog menu 2 Click from ...

Page 90: ...or image loading Move to the end position for image loading Slider Move to any position in the image Image loading operation buttons Pause Play Stop return to the start position Reverse and fast forward Step reverse and step fast forward Move to the start position for image loading Move to the end position for image loading Slider Move to any position in the image Select a start frame of the loadi...

Page 91: ...aution You cannot add dithering or effects to files in pfs pfm pfo or pfe format that has been previously saved 12 Click Save as from the File pull down menu 13 Enter a file name and click Save The file will be saved A file extension pfm will be added to the file name Do not add any file extension other than pfm to the file name If you delete or change the file extension the images will not be displayed p...

Page 92: ...tions of a still image file Target files BMP JPG JPEG PNG and GIF Select the file to be edited and click Open Open the selected file Check that the file type is BMP JPG JPEG PNG or GIF 4 Click New from the File pull down menu 1 Click Create graphic pattern from the pre dialog menu 2 continued on the next page Click Scroll Movie 3 ...

Page 93: ...d to the file name Do not add any file extension other than pfm to the file name If you delete or change the file extension the images will not be displayed properly by the Panasonic car audio unit Drag the start frame to adjust the start position and size Regardless of the frame size the image will be converted into the default size of each model page 16 When the vertical to horizontal ratio differs ...

Page 94: ...mage file for the foreground and click Open Open the selected file Check that the file type is BMP JPG JPEG PNG or GIF The file open dialog will be displayed twice the former for foreground and the latter for background successively when Wipe Movie is clicked 4 continued on the next page Click New from the File pull down menu 1 Click Create graphic pattern from the pre dialog menu 2 Click Wipe Movie 3...

Page 95: ...n dialog for the background will appear 8 continued on the next page Click Foreground 6 Drag the foreground frame to adjust the position and size Regardless of the frame size the image will be converted into the default size of each model page 16 When the vertical to horizontal ratio differs the image will be reshaped to be displayed as the default of each model If the frame is dragged while the s...

Page 96: ...ill not be displayed properly by the Panasonic car audio unit Drag the background frame to adjust the position and size Regardless of the frame size the image will be converted into the default size of each model page 16 When the vertical to horizontal ratio differs the image will be reshaped to be displayed as the default of each model If the frame is dragged while the shift key is held down it c...

Page 97: ...successively when Wipe Movie is clicked 5 Editing Opening and Closing Messages Select the file to be edited and click Open Open the selected file 4 The number of frames cannot be specified Opening message 30 60 for 2004 models frames Closing message 20 40 for 2004 models frames If the selected file has fewer than designated framenumbers the following message appears Click New from the File pull down m...

Page 98: ...ame and click Save The file will be saved A file extension pfo will be added to the opening image file name A file extension pfe will be added to the ending image file name Do not add a file extension other than pfo or pfe to the file name If you delete or change the file extension the images will not be displayed properly by the Panasonic car audio unit Click Save as from the File pull down menu 7 ...

Page 99: ... delete or reorder frames In addition you can add frames by copying them from other moving image files Click New from the File pull down menu 1 Click Edit movie from the pre dialog menu 2 Select the graphic pattern file to be edited and click Open Open the selected file 3 continued on the next page ...

Page 100: ...e for editing Reference file Copy CTRL C Copies the selected frame Click Edit The Edit Movie screen will be opened The image on the screen shown on the left cannot be edited 4 Preview Displays the edited image to check it OK Confirms the edits made and closes the Edit Movie screen Cancel Invalidates the edits made and closes the Edit Movie screen Pause Play Stop Repeat Closes the Movie Preview scree...

Page 101: ...e copied frame will be inserted Note You cannot add frames when the number of total frames exceeds the designated number page 7 Adjust the number of frames so that the opening is 30 60 for 2004 models frames and the closing is 20 40 for 2004 models frames Excess and deficiency in the number of frames cause failure in saving Short cut keys are available in this operation 5 1 ...

Page 102: ...e will be inserted 5 2 Note You cannot add frames when the number of total frames exceeds the designated number page 7 Adjust the number of frames so that the opening is 30 60 for 2004 models frames and the closing is 20 40 for 2004 models frames Excess and deficiency in the number of frames cause failure in saving Drag and drop operation is also available in the frame position change ...

Page 103: ...nnot add frames when the number of total frames exceeds the designated number page 7 Adjust the number of frames so that the opening is 30 60 for 2004 models frames and the closing is 20 40 for 2004 models frames Excess and deficiency in the number of frames cause failure in saving Short cut keys are available in this operation ...

Page 104: ...hic pattern file and click Open The selected file will be opened 5 4 Note You cannot add frames when the number of total frames exceeds the designated number page 7 Adjust the number of frames so that the opening is 30 60 for 2004 models frames and the closing is 20 40 for 2004 models frames Excess and deficiency in the number of frames cause failure in saving Short cut keys are available in this ope...

Page 105: ...aved A file extension pfm will be added to the file name A file extension pfo will be added to the opening image file name A file extension pfe will be added to the ending image file name Do not add any file extension other than pfm pfo or pfe to the file name If you delete or change the file extension the images will not be displayed properly by the Panasonic car audio unit 9 example inserting frames from...

Page 106: ...the image will be reshaped to be displayed as the default of each model If the frame is dragged while the shift key is held down it can be zoomed in enlarged or out reduced at the default ratio of each model 4 Select the file to be edited and click Open The selected file will be opened Check that the file type is BMP JPG JPEG PNG or GIF 3 5 Process the image with dithering or effects pages 41 to 45 C...

Page 107: ... 1 Darker Blue 2 Brighter Black Text effects Adds effects to the text None default Underline Strike through Both underline and strike through Background color for 4 tone images Transparent default White Blue 1 Darker Blue 2 Brighter Black Text Drags the text to move it Returns it to its original position by double clicking Selects the font size etc for the text Rotates the text Enter your text Cli...

Page 108: ... be displayed properly by the Panasonic car audio unit Text color Color palette selection Background color Color palette selection Transparent default Note Moving text You cannot move text to a position at which the upper left of the input text would extend beyond the edge of the screen Text fonts Only 1 font can be used at a time Text in a file in which text has been entered and saved cannot be re...

Page 109: ...e by supported car audio units Select the type of dithering according to the image to be loaded Check Dithering ON Select the dithering pattern Check Dithering Process the image with dithering or effects for 4 tone for 512 color 4096 color still image for 64 color movie ...

Page 110: ... color images Note Sixty four 64 color moving images are not supported Dithering patterns for Color Dithering 1 The effect varies depending on images to which dithering is applied Select your favorite dithering after trying Ditherings 1 3 Dithering 2 Dithering 3 Halftone A continuous tone like those seen in photographs The granularity is less apparent than in dithering Not appropriate for gradatio...

Page 111: ...will be saved Clicking on Cancel will cancel each setting and close the window Clicking on Clear will reset everything to the default settings The window will not be closed You can configure the settings for the depth of the 3 primary colors R red G green and B blue and for the threshold for each tone when the image is converted to blue 4 tones Check Dithering preview screen Note You cannot set Det...

Page 112: ...een and B blue Click OK The changes will be saved Clicking on Cancel will cancel each setting and close the window Clicking on Clear will reset everything to the default settings The window will not be closed preview screen Note The settings for the RGB tone depths are only put into effect after the OK button is clicked Darker Brighter ...

Page 113: ...s the brightness Denoise Makes the noise unnoticeable Optimize Makes the image clearer through automatic adjustments Does not need to be adjusted with the slider Check Effect Select the types of effects Make adjustments with the slider Types of effects Select OK The changes will be saved Selecting Undo will cancel the effect set immediately prior to this Selecting Initialize will cancel all effect...

Page 114: ......

Page 115: ......

Page 116: ......

Page 117: ......

Page 118: ......

Page 119: ......

Reviews: