27
USB - iPod Control
English
28
CQ-VX220L
Note:
¡
Please read the operating instructions of your
iPod/iPhone as well as this book.
¡
Please disconnect iPod/iPhone accessories such as
earphones before connecting the iPod/iPhone to this
unit.
¡
If your iPod/iPhone is not working correctly, discon-
nect it from this unit, reset it and then reconnect it to
this unit.
¡
We shall not guarantee all the functions of the
iPod/iPhone to be connected.
¡
The number of displayable characters for a file name
is limited. (up to 252 bytes)
Controllable iPod, iPhone/software version
¡
iPod (5th generation, ver. 1.3)
¡
iPod nano (1st generation, ver. 1.3.1)
¡
iPod nano (2nd generation, ver. 1.1.3)
¡
iPod nano (3rd generation, ver. 1.1.2)
¡
iPod nano (4th generation, ver. 1.0.2)
¡
iPod classic (ver. 1.1.2)
¡
iPod touch (1st generation, ver. 1.1.4) (video play-
back is not supported.)
¡
iPod touch (2nd generation, ver. 2.1.1)
¡
iPhone (ver. 2.1.0)
* The applicable models have been confirmed as the
end of January 2009. We do not guarantee the oper-
ation with our future products or upgraded soft-
ware.
¡
When connecting (disconnecting) a iPod/iPhone, turn
down the volume of the unit.
¡
When connecting a iPod/iPhone, make sure the con-
nector is pushed all the way into the socket.
¡
Do not leave the iPod/iPhone for long periods of time in
places inside the car where the temperature rises too
high.
Preparation:
¡
Connect an iPod/iPhone to USB connector of this unit.
¡
Connect an iPod/iPhone to USB connector and AV1 IN of this unit with CA-LDC100X (option) for iPod/iPhone Video.
Caution
¡
Position the USB device and cable so that they do
not interfere with your driving.
¡
Do not connect any USB device other than a USB
memory, a USB audio player or an iPod/iPhone. Do
not connect multiple USB devices to the USB con-
nector. Supplying power to multiple USB devices
from the connector could cause overheating and
smoking.
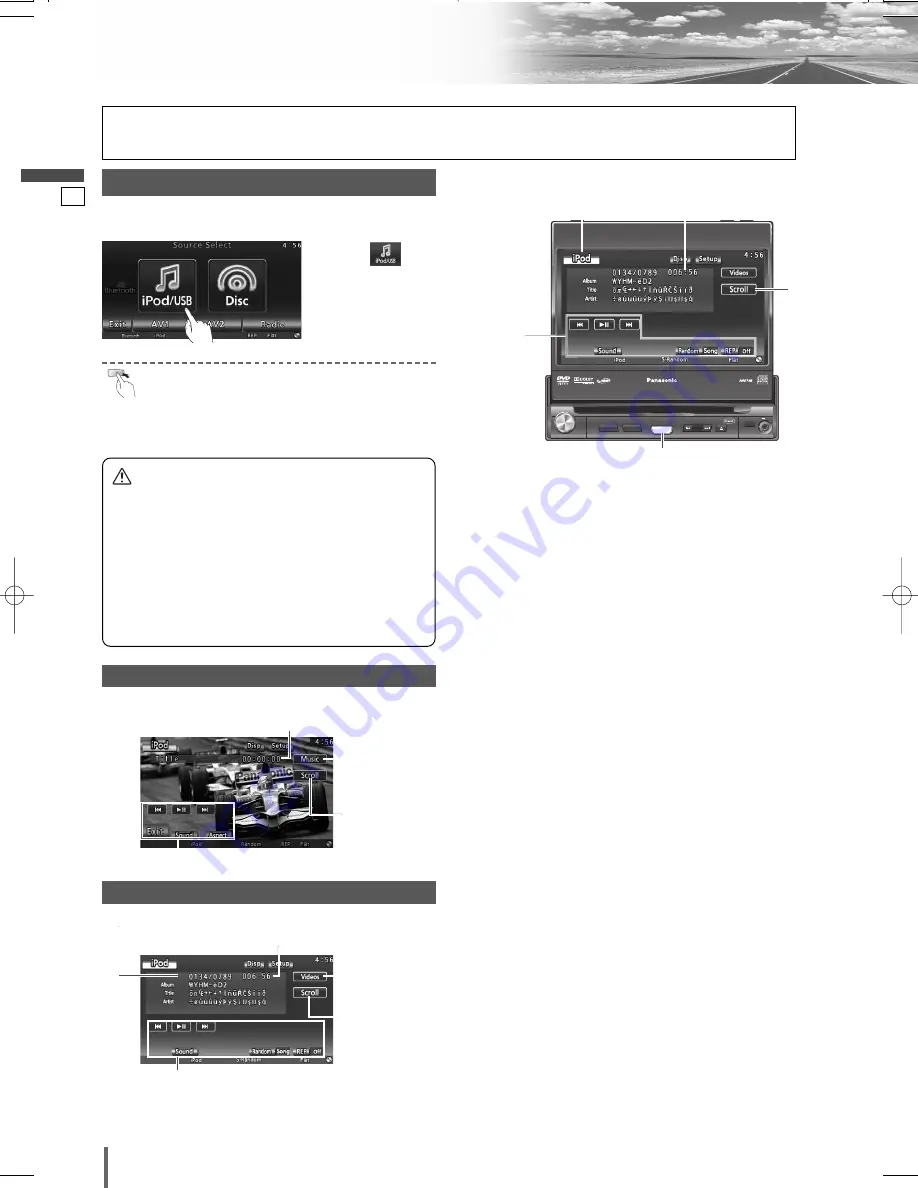
q
Touch
“
Source Button
”
.
d
Source Selection
w
Touch
(iPod/USB)
on the
Source Selection
Screen.
Video Mode Display
Source Button
Playing time
Operation Buttons
Audio Mode Display
Source Button
Current track
Playing time
Operation Buttons
Title/text scroll
Title scroll
Button leading
to the audio
mode
Button leading
to the video
mode
To switch Operation Screen ON, touch the center of
touch panel. (only for video mode)
Press
[SOURCE]
to change to desired mode.
TILT
CQ-VD5005W
DIMMER
DIM
TUNE/TRACK
MUTE
SETUP
SOURCE
POWER
VOL
PUSH
SEL
AV1 IN
OPEN
CLOSE
DIMMER
IN-DASH 7" WIDESCREEN COLOR LCD MONITOR / DVD RECEIVER
TILT
TEXT
CQ-VX220L
SOURCE
[SOURCE]
Source Button
Title/text scroll
Playing time
Operation
Buttons
VX220L̲OI̲01̲eng.qxd 09.3.17 3:58 PM ページ28


