background image


Note: 


You can connect the HDD data cable and the power cable first and then fix the HDD in the 

device. 


Please pay attention to the front cover. It adopts the vertical sliding design. You need to 

push the clip first and then put down. 

1.4


Front Panel 

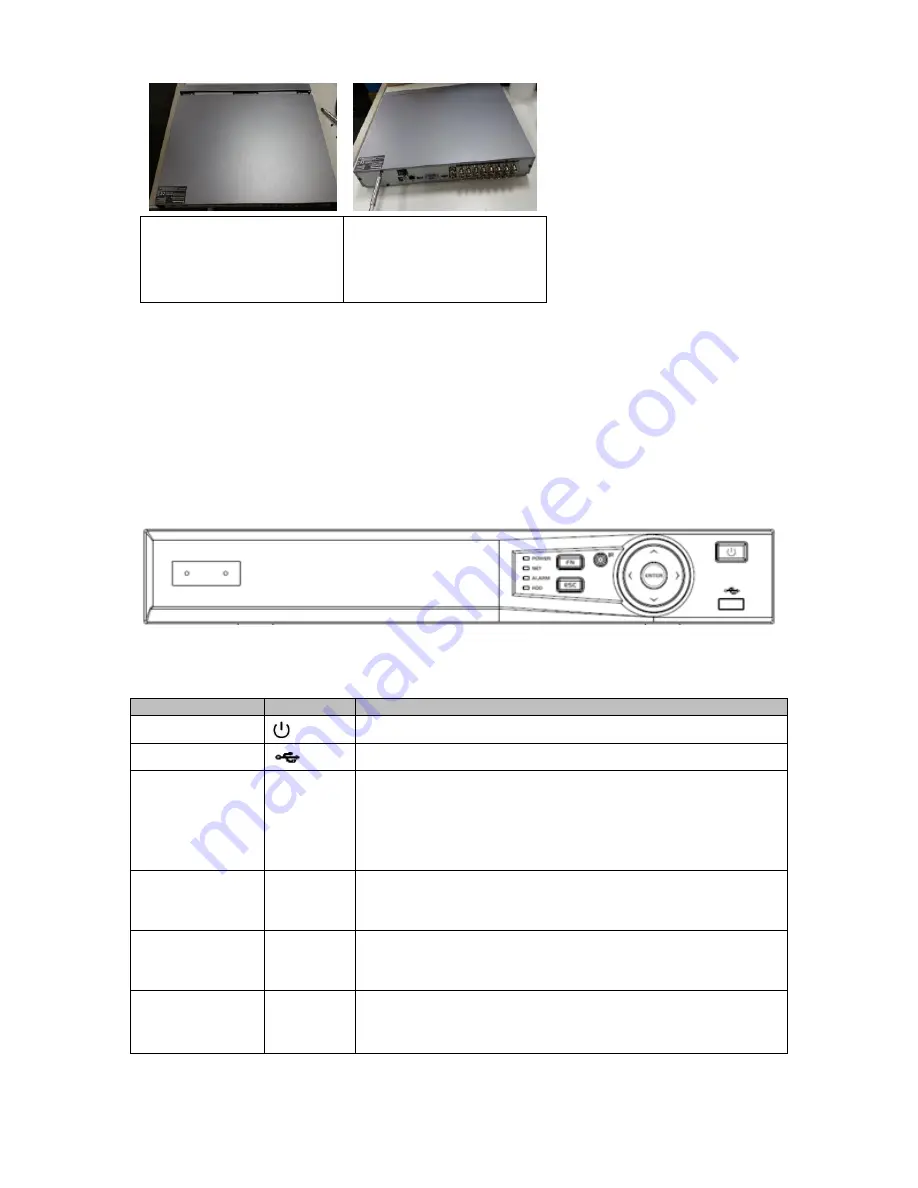
The front panel is shown as below. See Figure 1-1. 


Figure 1-1 

Please refer to the following sheet for front panel button information. 

Name 

Icon 

Function 

Power button


Press this button to boot up or shut down the device. 

USB port


Connect to USB2.0 storage device, mouse and etc. 


Up 
Down


/


Activate  current  controls,  and  then move  up,  move  down 
or jump. 


Change setup, increase/decrease numeral. 


Assistant function such as PTZ menu. 


Switch channel when playback.  

Left 
Right


/


Switch current activated controls, move up and down. 


When  device  is  in  1-channel  playback  mode,  use  it  to 
control playback control bar process.  

Cancel 


ESC


Go to previous menu, or cancel current operation (Close 
the top interface or controls). 


When playback, click it to restore real-time monitor mode. 

Confirm 


ENTER


Confirm current operation 


Go to default button 


Go to the menu.  

7. Put the cover in accordance 

with the clip and then place the 

upper cover back.       


8.  Secure the screws in the 

rear panel and the side panel. 


Summary of Contents for CJ-HDR104

Page 1: ...HD Analog Recorder Quick Start Guide Model No CJ HDR104 CJ HDR108 Version 1 0 2 ...

Page 2: ...Table of Contents 1 Hardware Installation and Connection 1 1 1 Check Unpacked DVR 1 1 2 About Front Panel and Rear Panel 1 1 3 HDD Installation 1 1 4 Front Panel 2 1 5 Rear Panel 3 2 Local Login 4 3 Web 5 ...

Page 3: ... for purchasing our HD Analog Recorder DVR This quick start guide will help you become familiar with our DVR in a very short time Before installation and operation please read the following safeguard and warning carefully ...

Page 4: ...for any problems caused by unauthorized modifications or attempted repair 5 Environment The DVR should be installed in a cool dry place away from direct sunlight inflammable explosive substances and etc This series product shall be transported storage and used in the specified environments 6 Accessories Be sure to use all the accessories recommended by manufacturer Before installation please open ...

Page 5: ... ports in the rear panel please refer to the User s Manual included in the resource CD The model in the front panel is very important please check according to your purchase order The label in the rear panel is very important too Usually we need you to represent the serial number when we provide the service after sales 1 3 HDD Installation This series DVR has only one SATA HDD Please use HDD of 72...

Page 6: ...e mouse and etc Up Down Activate current controls and then move up move down or jump Change setup increase decrease numeral Assistant function such as PTZ menu Switch channel when playback Left Right Switch current activated controls move up and down When device is in 1 channel playback mode use it to control playback control bar process Cancel ESC Go to previous menu or cancel current operation C...

Page 7: ... the cursor In HDD information interface click to switch HDD record time and other information Realize other special functions Power indicator POWER Light turns on when power connection is OK Network indicatior NET Light turns on when network connection is abnormal Alarm indicator ALARM Light turns on when alarm occurs HDD indicator HDD HDD error occurs or HDD capacity is below specified threshold...

Page 8: ...ion port RS485_A port It is the cable A You can connect to the control devices such as speed dome PTZ B RS485_B It is the cable B You can connect to the control devices such as speed dome PTZ 8 Network port 100M Ethernet port 9 HDMI High definition media interface High definition audio and video signal output port It transmits uncompressed high definition video and multiple channel data to the HDM...

Page 9: ...s 10 10 3 16 then please input http 10 10 3 16 in IE address column System pops up warning information to ask you whether install webrec cab control or not Please click yes button If you can t download the ActiveX file please modify your IE security setup After installation the interface is shown as below See Figure 3 Please input your user name and password Default factory name is ADMIN and passw...

Page 10: ... quick start guide is for reference only Slight difference may be found in the user interface All the designs and software here are subject to change without prior written notice All trademarks and registered trademarks mentioned are the properties of their respective owners If there is any uncertainty or controversy please refer to the final explanation of us Please visit our website or contact y...

Reviews: