Panasonic CFVDW07CH - WIRELESS LCD DISPLAY Operating Instructions Manual Download Page 82

82

F

Arrêt

1

Affichez l’écran d’arrêt.

Windows XP

Après avoir enregistré les données importantes et fermé toutes les applications,

sélectionnez [Arrêter l’ordinateur] dans le menu [démarrer].

Windows 2000

Après avoir enregistré les données importantes et fermé toutes les applications,

sélectionnez [Arrêter] dans le menu [Démarrer].

2

Confirmez l’arrêt.

Windows XP

Sélectionnez [Arrêter].

Windows 2000

Sélectionnez [OK] après avoir sélectionné [Arrêter le système].

3

Lorsque [Windows is shutting down] est affiché,
sélectionnez [Ok].

Votre ordinateur et l’écran déporté sans fil se mettent automatiquement hors tension.

1

Mettez votre ordinateur sous tension. 

(

 Instructions d’utilisation

de l’ordinateur)

2

<Lors de l’utilisation d’un ordinateur de la série CF-07>

Après avoir vérifié que le
témoin d’état d’écran est

allumé, mettez l’écran déporté

sans fil sous tension.

<Lors de l’utilisation d’un ordinateur
autre que de la série CF-07>

Après que   s’est affiché sur la barre de tâches, mettez
l’écran déporté sans fil sous tension.

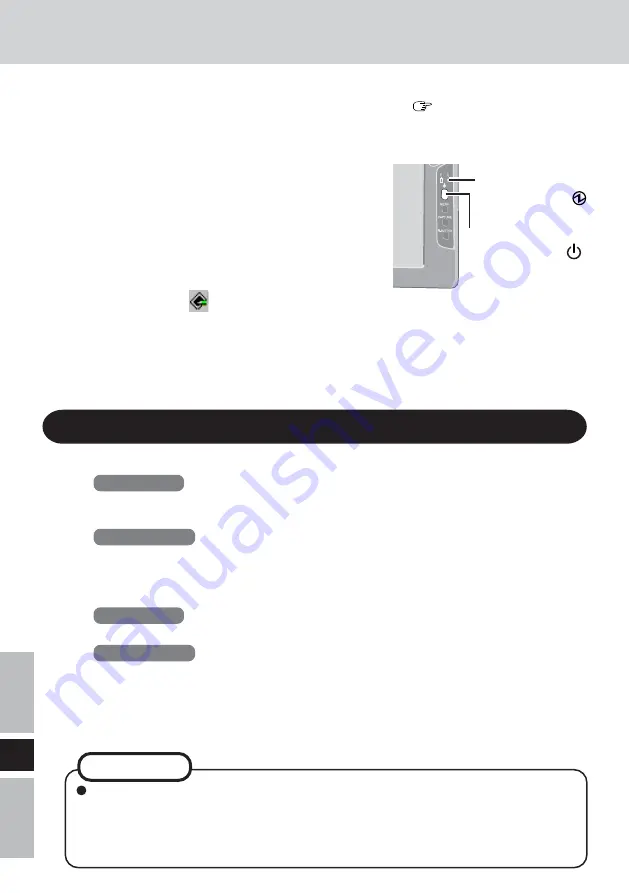
Appuyez sur le commutateur d’alimentation et maintenez-le enfoncé pendant environ
trois secondes jusqu’à ce que le témoin d’alimentation s’allume avant de le relâcher.

3

Sélectionnez l'application.

Commutateur
d’alimentation

Témoin
d’alimentation

Mise en marche/Arrêt

Lorsque l’ordinateur et l’écran déporté sans fil ne se mettent pas hors tension au

moyen de la procédure ci-dessus, “PC in standby” peut s’afficher bien que

l’ordinateur ne soit pas en mode de veille.

Dans ce cas, sélectionnez [Ok]. L’écran déporté sans fil se met automatiquement

hors tension.

REMARQUE

Summary of Contents for CFVDW07CH - WIRELESS LCD DISPLAY

Page 1: ... 22 Software Keyboard 25 Battery Power 27 Setting the Wireless Display 31 Changing the Wireless Display Settings 35 Capturing the Screen 38 Troubleshooting 39 Specifications 41 OPERATING INSTRUCTIONS E DEUTSCH ENGLISH INSTRUCTIONS D UTILISATION FRANÇAIS Première utilisation 74 Mise en marche Arrêt 81 Ecran tactile 83 Clavier logiciel 86 Alimentation par batterie 88 Configuration de l écran déporté...

Page 2: ...policy that applies on the use of wireless devices in a specific organization or environment e g airports you are encouraged to ask for authorization to use this product prior to turning on the product Regulatory Information We are not responsible for any radio or television interference caused by unauthorized modi fication of this product The correction of interference caused by such unauthorized...

Page 3: ... Falls Sie nicht sicher sind welche Regelungen in den einzelnen Fällen und Umgebungen beispielsweise auf einem Flughafen für den Gebrauch von drahtlosen Geräten gelten erkundigen Sie sich hierüber bei den zuständigen Stellen bevor Sie dieses Gerät einschalten Regulative Information Wir sind unter keinen Umständen für Radio und Fernsehstörungen verantwortlich die auf die nicht genehmigte Abänderung...

Page 4: ...s tension Informations sur la réglementation Nous ne serons pas tenus responsables de parasites radioélectriques ou de télévision provoqués par une modification non autorisée de cet appareil La rectification des parasites provoqués par une telle modification non autorisée sera la responsabilité de l utilisateur Nous et les revendeurs ou distributeurs mandatés de l appareil ne seront pas tenus resp...

Page 5: ...arty responsible for compliance could void the user s authority to operate this equipment This device complies with Part 15 of the FCC For U S A For Canada Industry Canada This product complies with RSS210 of Industry Canada Operation is subject to the following two conditions 1 this device may not cause interference and 2 this device must accept any interference including interference that may ca...

Page 6: ... SEVERE ELECTRICAL SHOCK IF THE CUT OFF PLUG IS INSERTED INTO ANY 13 AMP SOCKET If a new plug is to be fitted please observe the wiring code as shown below If in any doubt please consult a qualified electrician Warning THIS APPLIANCE MUST BE EARTHED Important The wires in this mains lead are coloured in accordance with the following code Green and yellow Earth Blue Neutral Brown Live As the colour...

Page 7: ...rly if the contacts are dirty or damaged Do not expose the battery pack to water or allow it to become wet If the battery pack will not be used for a long period of time a month or more charge or discharge use the battery pack until the remaining battery level becomes 30 to 40 and store it in a cool dry place This equipment prevents overcharging of the battery by recharging only when the re mainin...

Page 8: ...ome warm during recharging or normal use This is com pletely normal Recharging will not commence outside of the allowable temperature range 0 C to 45 C 32 F to 113 F page 27 Once the allowable range requirement is satisfied charging begins automatically Note that the recharging time varies based on the usage conditions Recharging takes longer than usual when the temperature is 10 C 50 F or less If...

Page 9: ...angegebenen dieimLieferumfang des Computers enthalten ist bzw eine angegebene Batteriepackung die separat erhältlich ist Nicht in einen Mikrowellenofen legen Die Batteriepackung nicht in einen Mikrowellenofen oder eine Druckkammer legen Verwendung unterbrechen Sollte die Batterie einen ungewöhnlichen Geruch abgeben sich warm anfühlen sich verfärben ihre Form ändern oder auf irgendeine andere Art u...

Page 10: ...es ist vollkommen normal DasAufladen wird außerhalb des erlaubten Temperaturbereiches nicht erfolgen 0 C bis 45 C Seite 58 Nachdem die erlaubte Bereichsanforderung erfüllt wurde beginnt dasAufladen automatisch Es wird darauf hingewiesen daß dieAufladezeit je nach den Benutzungsbedingungen unterschiedlich ist DasAufladen dauert länger als normal wenn die Temperatur 10 C oder weniger beträgt Wenn di...

Page 11: ...micro ondes Ne mettez pas la batterie dans un four à micro ondes ou dans une chambre de compression En cas de problème arrêtez d utiliser la batterie Si la batterie émettait une odeur anormale devenait chaude au toucher se décolorait se déformait ou changeait d aspect enlevez la de l appareil et ne l utilisez plus Ne touchez pas les bornes de la batterie La batterie risque de ne pas fonctionner no...

Page 12: ...normale Il s agit d un phénomène tout à fait normal La batterie ne se chargera pas si la température ne se situe pas entre 0 C et 45 C page 88 Lorsque la température retourne dans les limites autorisées la charge com mence automatiquement Il est important de noter que le temps de charge varie en fonction des conditions d utilisation La charge dure plus longtemps lorsque la température est de 10 C ...

Page 13: ...tion which makes computer operation possible by simply touching the surface of the wireless display Operating Instructions 1 Wireless Display 1 ENGLISH Model No CF VZSU21 Model No CF AA1623A Battery Pack 1 AC Adaptor 1 AC Cord 1 The stylus is in the wireless display at the time of purchase page 22 Stylus 1 CD ROM 1 Soft Cloth 1 Strap 1 Screws 2 ...

Page 14: ...utton Attaching the strap R BUTTON CAPTURE page 31 MENU 1 Select two screw holes from the fol lowing four holes 2 Adjust the strap to its maximum length Attach one side of the strap and fasten the screw 3 Attach the other side of the strap and fasten the screw 4 Adjust the length of the strap as de sired outside part of the strap inside part of the strap Names and Functions of Parts ...

Page 15: ...XP Start Control Panel Performance and Maintenance System Hardware Device Manager Network adapters PRISM2 IEEE 802 11 PC CARDAdapter Advanced Driver based IBSS Windows 2000 Start Settings Control Panel System Hardware Device Manager Network adapters PRISM2 IEEE 802 11 PC CARD Adapter Advanced Driver based IBSS Windows XP When you are using the computer with Windows XP Service Pack 2 perform the fo...

Page 16: ...K Follow the on screen instructions Windows 2000 Select Start Run input x softkb setup exe 1 and select OK Follow the on screen instructions For information on how to use software keyboard page 25 1 x is the drive letter of the CD DVD drive Change this to match the drive letter on your own computer CAUTION Prepare the CD ROM which is attached to the wireless display and the CD DVD drive Install th...

Page 17: ...Add Remove Hardware then select Next 2 Select Add Troubleshoot a device then select Next 3 Select Add a new device then select Next 4 Select No I want to select the hardware from a list then select Next 5 Select Ports COM LPT then select Next 6 Select Have Disk then select Browse 7 Select c Program Files Panasonic WLserial wdserial then select Open and then select OK 8 Select WDSP COM Port then se...

Page 18: ...t start up and carry out port operation confirmation before connection establishment of the wireless display For example Serial mouse devices Non virtual port applications For example MS DOS applications When a device driver is not automatically installed follow the instructions of the opera tions manual included with the device e g insert a disc and install the driver Match the COM port number to...

Page 19: ...oc Infrastructure Cancel Wireless display screen Change setting on host PC to the following value reboot the host PC then select Connect below Connect Cancel Wireless LAN card Network Type AdHoc SSID cfvdw07 17498 WEP Encryption disable TCP IP Class A Class B Class C IP Address 10 98 185 105 NetMask 255 0 0 0 MeiWDS AES Encryption disable Password wdsp This screen is a sample AES Advanced Encrypti...

Page 20: ...d from 16 bit to 24 bit or vice versa If a change is made to the display mode of a computer connecting to the wireless display the connection will be cut so we recommend not using software such as a screen saver All of the contents displayed on the wireless display may not be the same as what was displayed on the LCD of the computer Some applications that use hardware based drawing functions etc m...

Page 21: ...ting Instructions of the computer 2 When using the CF 07 series computer After confirming the DISPLAY READY indicator has lit turn on the wireless display When using a laptop other than the CF 07 series computer After has been displayed on the taskbar turn on the wireless display Press the power switch and hold it down for approximately three seconds until the power indicator turns on before relea...

Page 22: ...icking Dragging Touch and hold the object i e file or icon move your stylus on the surface drag ging the object to the de sired location then release your stylus Two quick taps One tap The double clicking speed can be set in the following procedure Windows XP start Control Panel Printers and Other Hardware Mouse Buttons Double click Speed Windows 2000 Start Settings Control Panel Mouse Buttons Dou...

Page 23: ...e dirty areas by using a dry soft cloth included Do not use benzene or thinner or disinfectant type alcohol For more information refer to Suggestions About Cleaning the LCD Surface that comes with the soft cloth Handling the Stylus Clean the stylus tip and screen prior to operation Foreign particles can scratch the screen and impede the operation of the stylus Use the accessory stylus only on the ...

Page 24: ... the calibration setup when the cursor and the stylus touches do not appear to agree 1 Press Menu button 2 Select Option 3 Select Calibration Touch the five marks on the calibration screen Menu Button 1 2 3 4 5 Touchscreen ...

Page 25: ...d key in a continuous manner For example if you want to type Ctrl C after pressing Ctrl press C If a keyboard is connected to the computer all operations on the keyboard are not reflected on the software keyboard When using two or more keys in combination Ctrl C etc use the internal keyboard or the software keyboard alone Ctrl Alt Del cannot be input through the software keyboard Except when loggi...

Page 26: ...to input mode If the software keyboard has been minimized on the taskbar it will automatically be restored and will move to the top most position on the display when the computer changes to input mode Depending on the application this function may not work Select the keyboard keypad Set the software keyboard to the topmost position on the display Set the software keyboard to transparent display NO...

Page 27: ...e is outside the allowable range Once the allowable range requirement is satisfied charging begins automatically Battery is discharging to prescribed charging level in high temperature mode Battery pack is not connected or charging not being performed 1 When the AC adaptor is connected Use the Battery Indicator to Check on the Battery Status NOTE Battery Indicator Orange 1 Green 1 Red Blinking red...

Page 28: ...or light remains red The battery remaining displays 99 and the indicator light is orange for a long period of time Low battery warning appears after a short pe riod of time Perform the Refresh Battery utility page 32 The actual remaining battery capacity and the displayed indication may differ Menu Button NOTE ...

Page 29: ... first purchased Be sure to charge it before using it for the first time When the AC adaptor is con nected to the wireless display charging begins automatically Use only the specified battery pack CF VZSU21W with your wireless display Be sure the power has been turned off before proceeding 1 Power off your wireless display page 21 Replace the battery pack with another one while theAC adaptor is co...

Page 30: ...he connector 2 Close the cover 3 Slide the latch to the left CAUTION For an improperly attached cover your battery pack may fall out while you are carrying around your wireless display Be sure the tab does not get caught when closing the cover Tab Connector Charging the Battery Pack Connect the wireless display to a power outlet Charging begins automatically CAUTION Battery Power 2 1 3 ...

Page 31: ...etwork Type AdHoc SSID cfvdw07 17498 Channel 11 TxRate mode Fully Automatic WEP Encryption disable Rate Tx Rx 11Mbps 11Mbps Display IP 10 98 185 106 PC IP 10 98 185 105 Net Mask 255 0 0 0 AES Encryption disable 100 Excellent OK Cancel Wireless Menu By selecting Wireless the wireless settings for connection with the computer and current state are displayed cannot be changed To change the settings s...

Page 32: ...the computer will power off automatically and then charging willcommence Ittakesapproximately 2 hours until the power automatically goes off through the complete dis charge of the battery from the fully charged state Allow the battery pack to charge un til the battery indicator turns green While charging the backlight is turned off automatically NOTE The battery will not be refreshed correctly in ...

Page 33: ... Power on Password Change Supervisor Password Change Touchscreen Calibration LCD Off Timer 30 min LCD Off Mode Normal resume Power Off Timer disable Set or change the Su pervisor Password Change the settings of the wireless connection in the following proce dure 1 Select Setup IftheSupervisorpasswordhasbeenset Enter the Supervisor Password then select Enter 2 Select the profile that has been set o...

Page 34: ...d General Wireless Battery Option Version Model No CF VDW07Cxx Firmware Vx xxLxxx Wireless Controller xx xx xx xx Serial No xxxxxxxxxx 100 Excellent OK Cancel This screen is a sample Setting the Wireless Display x will change depending on the configuration of the wireless display ...

Page 35: ... settingAES Encryption to something other than Disable Select Key and set AES Key using phrase or binary then select OK Change WEP Encryption When setting WEP to something other than Disable Select Key s and set WEP Key s then select OK When NetworkType is set to Infrastructure and WEP is set to 64 bits or 128 bits the check mark can be added for or removed from Shared KeyAuthentication When remov...

Page 36: ... check mark for Use this profile now in step 3 page 35 Set up your PC screen will be displayed Enter the Wireless LAN and TCP IP settings shown on the screen to your computer then select Finish When removing the check mark from Use this profile now in step 3 Completed screen will be displayed Select Finish The MeiWDS and the wireless display cannot simul taneously make settings page 37 NOTE ...

Page 37: ...en setting AES Encryption to something other than Disable Select AES Key and set the AES Key s using phrase or binary then select OK Set AES Key Lifetime 4 On the confirmation screen select Finish On the confirmation screen select OK and then restart the computer The MeiWDS and the wireless display cannot simultaneously make settings Set theAES Key setting after setting the wireless display page 3...

Page 38: ...he image data Displaying the next image high speed mode Displaying the next image The same operation is possible by pressing the Capture button Displaying the previous image The same operation is possible by pressing the R Button When the power is cut by an operation other than pressing the power switch e g when the wireless display is running on battery and the battery is inadvertently taken out ...

Page 39: ...the computer side is compatible with 802 11b and 802 11g but if there is a possibility of interference from other devices on the network set the computer s wireless LAN to 802 11b only If your computer and the wireless display do not power off normally due to a reason such as a network error it may take two or three minutes to reconnect Wait for a moment then connect again Put the wireless display...

Page 40: ...ss and confirm theAES Encryption setting Restart the computer The connection has been terminated because the display mode of the computer was changed Stop using the application or screensaver that changed the display mode select Reconnect on the wireless display and then reconnect Select Software Keyboard with the following procedure Windows XP start All Programs Panasonic Software Keyboard Window...

Page 41: ... 240 V AC 50 Hz 60 Hz 16 V DC 2 5 A Approx 9 W 4 Approx 20 W 5 222mm 162mm 14 5 mm 31 5mm excluding protrusion 8 7 6 4 0 6 1 3 Approx 715 g 1 6 lb Temperature 5 C to 35 C 41 F to 95 F Humidity 30 to 80 RH No condensation Temperature 20 C to 60 C 4 F to 140 F Humidity 30 to 90 RH No condensation Panasonic Computers 1 Varies depending on the usage conditions 2 Only for North America The AC adaptor i...

Page 42: ...42 E Memo ...

Page 43: ...ng des Comput ers einfach durch die Berührung des berührungsempfindlichen Bildschirms des drahtlosen Displays ermöglicht DEUTSCH Bedienungsanleitung 1 Drahtloses Display 1 Modell Nr CF VZSU21 Modell Nr CF AA1623A Batteriepackung 1 Netzadapter 1 Netzkabel 1 Der Stift befindet sich bei der Auslieferung im drahtlosen Display Seite 53 Stift 1 CD ROM 1 Tuch 1 Gurt 1 Schrauben 2 ...

Page 44: ...s Gurtes R BUTTON CAPTURE Seite 62 MENU 1 Wählen Sie die gewünschten zwei Schraubenlöchern aus den folgenden vier Löchern aus 2 Stellen Sie den Gurt auf seine maximale Länge ein Befestigen Sie eine Seite des Gurtes und ziehen Sie die Schraube fest 3 Befestigen Sie die andere Seite des Gurtes und ziehen Sie die Schraube fest 4 Stellen Sie die Gurtlänge wie gewünscht ein Außenseite des Gurtes Innens...

Page 45: ...e Geräte Man ager Netzwerkadapter PRISM2 IEEE 802 11 PC CARDAdapter Erweiterte Einstellungen Driver based IBSS Windows XP Wenn Sie einen Computer mit dem Windows XP Service Pack 2 verwenden führen Sie das folgende Verfahren nach der Installation des MeiWDS Programms durch Seite 46 1 Wählen Sie Start Systemsteuerung Netzwerk und Internetverbindungen Windows Firewalleinstellungen ändern Ausnahmen Pr...

Page 46: ...exe 1 ein und wählen Sie OK Folgen Sie den Anweisungen auf dem Bildschirm Informationen zur Verwendung der Software Tastatur finden Sie auf Seite 56 1 x bezeichnet das Laufwerk Sie können das Laufwerk nach Belieben ändern Bereiten Sie die mit dem drahtlosen Display mitgelieferte CD ROM und das CD DVD Laufwerk vor Installieren Sie die Software auf einem Computer der mit dem drahtlosen Netzwerk komp...

Page 47: ... stellen 11 Führen Sie einen Neustart des Computers durch 12 Bestätigen Sie daß WDSP COM Port COMx unter Anschlüsse COM und LPT in Geräte Manager angezeigt wird Windows 2000 1 Wählen Sie Start Einstellungen Systemsteuerung Hardware und dann Weiter 2 Wählen Sie Gerät hinzufügen bzw Problem beheben und dann Weiter 3 Wählen Sie Neues Gerät hinzufügen und dann Weiter 4 Wählen Sie Nein die Hardwarekomp...

Page 48: ... dem Gerät mitgelieferten Bedienungsanleitung aufgelistet sind z B setzen Sie die Disc ein und installieren Sie den Treiber Wählen Sie die Nummer des COM Ports so dass sie der in WDSP COM Port COMx angezeigten Nummer gleich ist indem Sie das folgende Verfahren durchführen Falls beispielsweise WDSP COM Port COM6 angezeigt wird wählen Sie den seriellen Anschluß COM6 Windows XP Start Systemsteuerung ...

Page 49: ...ezeigt einzufuhren 2 Schließen Sie das drahtlose Display an eine Netzsteckdose an und schalten Sie das drahtlose Display ein Seite 52 Select network type AdHoc Infrastructure Cancel 3 Dieser Bildschirm sollte angezeigt werden Wahlen Sie AdHoc Ein Aus Schalter Fortsetzung auf der nächsten Seite Anschlussstecker Sperrvorrichtung Lasche Drahtloser Displaybildschirm HINWEIS Nach Verstreichen von 10 Mi...

Page 50: ...en wird der Begriff Peer to Peer Group Gruppe von Gleichwertigen verwendet 5 Wählen Sie Connect in Drahtloser Displaybildschirm von Schritt 4 AES Advanced Encryption Standard erweiterter Verschlüsselungsstandard Erste Inbetriebnahme Drahtloser Displaybildschirm Change setting on host PC to the following value reboot the host PC then select Connect below Connect Cancel Wireless LAN card Network Typ...

Page 51: ...r Farbmodus von 16 Bit auf 24 Bit und umgekehrt wechselt Falls der Displaymodus des Computers geändert wird während dieser mit dem drahtlosen Display verbunden ist wird die Verbindung unterbrochen weshalb wir empfehlen keine Software wie etwa einen Bildschirmschoner zu verwenden Unter Umständen werden einige Anwendungen die eine Zeichnungsfunktion auf Hard ware Basis verwenden usw nicht angezeigt ...

Page 52: ...itung des Computers 2 Bei Verwendung eines Computers der Reihe CF 07 Nachdem Sie sich davon überzeugt haben dass die Displaystatusanzeige leuchtet schaltenSiedasdrahtloseDis play ein Bei Verwendung eines Computers der nicht zur Reihe CF 07 gehört Nachdem im Aufgabenbalken angezeigt wurde schalten Sie das drahtlose Display ein Drücken Sie den Ein Aus Schalter und halten Sie ihn ungefähr drei Sekund...

Page 53: ...nd Ablegen Einmal antippen Cursor Den Stift auf das gewünschte Objekt z B Datei oder Symbol legen den Stift über die Bildschirmoberfläche ziehen um das Objekt in die gewünschte Position zu bringen und dann loslassen Zweimal kurz antippen Die Doppelklick Geschwindigkeit kann mit Hilfe des folgenden Verfahrens eingestellt werden Windows XP Start Systemsteuerung Drucker und andere Hardware Maus Tap a...

Page 54: ...l Anderenfalls arbeitet der Cursor u U nicht einwandfrei Bei einer Verschmutzung des berührungsempfindlichen Bildschirms Die Schmutzflecken mit einem trockenen weichen Tuch oder einem Stück Gaze abreiben Auf keinen Fall Benzin Farbverdünner oder Desinfektionsmittel Alkohol zum Reinigen verwenden Für weitere Informationen siehe die Anleitungen unter Empfehlungen zur Reinigung der LCD Oberfläche die...

Page 55: ...Die Stiftspitze und den Bildschirm vor derVerwendung reinigen Fremdkörper können zu Kratzern auf dem Bildschirm führen und den Betrieb des Stifts beeinträchtigen Den mitgelieferten Stift nur auf dem Bildschirm des drahtlosen Displays verwenden Falls der Stift auch für andere Zwecke verwendet wird kann er beschädigt werden und den Bildschirm zerkratzen Auf keinen Fall Bleistifte Stifte mit einem sp...

Page 56: ...m Windows ausschalten und dann erneut einschalten speichern Sie zuerst alle Daten Falls Sie versuchen den Computer auszuschalten während die Daten bearbeitet werden erscheint eine Meldung die Sie fragt ob Sie die aktuellen Daten speichern möchten Schalten Sie in diesem Fall auf das Betriebssystem Windows zurück speichern Sie alle Daten und schalten Sie den Computer dann aus HINWEIS Software Tastat...

Page 57: ...s die Software Tastatur in der Taskleiste minimiert wurde wird sie automatisch auf ihre ursprüngliche Größe zurückgesetzt und auf dem Display in den Vordergrund gehoben wenn der Computer auf den Eingabemodus umschaltet Je nach der Anwendung kann es vorkommen dass diese Funktion nicht verwendet werden kann Wählen Sie die Tastatur Zifferntasten Heben Sie die Software Tastatur auf dem Display in den ...

Page 58: ...ngstemperatur liegt außerhalb des zulässigen Bereichs Sobald sich die Temperatur wieder innerhalb des zulässigen Bereichs befindet beginnt der Ladevorgang automatisch Im Hochtemperaturmodus wird die Batterie auf die vorgeschriebene Ladungsstufe entladen Die Batteriepackung ist nicht angeschlossen oder der Ladevorgang findet nicht statt 1 Wenn der Netzadapter angeschlossen ist Verwenden Sie die Bat...

Page 59: ...tterieladung wird über einen längeren Zeitraum als 99 angezeigt und die Lampe leuchtet orangefarben Nach einem kurzen Zeitraum erscheint eine Warnanzeige für geringe Batterieladung F ü h r e n S i e d a s Verfahren Refresh Battery durch Seite 63 Menü Taste HINWEIS Die tatsächlich verbleibende Batterieladung und die angezeigte Ladung können verschieden sein ...

Page 60: ...ackung vor der ersten Inbetriebnahme des Computers zu laden Wenn ein Netzadapter an das drahtlose Display angeschlossen wird beginnt der Ladevorgang automatisch Verwenden Sie nur die angegebene Batteriepackung CF VZSU21W mit Ihrem drahtlosen Display Vergewissern Sie sich dass der Strom ausgeschaltet ist bevor Sie fortfahren 1 Schalten Sie das drahtlose Display aus Seite 52 2 Herausnehmen der Batte...

Page 61: ...ßen Sie die Abdeckung 3 Schieben Sie die Sperrvorrichtung nach links Falls die Abdeckung nicht angebracht ist kann die Batteriepackung herausfallen während Sie das drahtlose Display an einen anderen Ort tragen Achten Sie darauf dass die Lasche nicht eingeklemmt wird wenn Sie die Abdeckung schließen Lasche Anschlussstecker Laden der Batteriepackung Schließen Sie das drahtlose Display an eine Netzst...

Page 62: ...n ein drahtloses Display an einen anderen Computer angeschlossen werden Bis zu vier Profile können eingestellt werden Seite 64 Wählen Sie Connect nach derWahl des Profils dann erfolgt derAnschluss unter Verwendung des gewählten Profils Wireless Menü Indem Sie Wireless wählen werden die Einstellung für den drahtlosen Anschluss an den Computer und der aktuelle Zustand angezeigt dies kann nicht geänd...

Page 63: ...t sich a u t o m a t i s c h a u s u n d d e r Ladevorgang beginnt Es dauert ungefähr zwei Stunden bis die Batterie infolge ihrer vollständigen Entladung keinen Strom mehr liefert nachdem Sie voll geladen wurde Setzen Sie den Ladevorgang der Batterie fort bis die Batterie Anzeigeleuchte auf Grün wechselt Während des Ladevorgangs wird die Hintergrundbeleuchtung automatisch ausgeschaltet Dieser Bild...

Page 64: ...or Password Change Touchscreen Calibration LCD Off Timer 30 min LCD Off Mode Normal resume Power Off Timer disable Stellen Sie das Super visor Passwort ein bzw ändern Sie es ab Ändern Sie die Einstellungen des Funkanschlusses indem Sie das folgende Verfahren durchführen 1 Wählen Sie Setup Falls Supervisor Passwort eingestellt wurde Geben Sie das Supervisor Passwort ein und wählen Sie dann Enter 2 ...

Page 65: ...n angezeigt General Wireless Battery Option Version Model No CF VDW07Cxx Firmware Vx xxLxxx Wireless Controller xx xx xx xx Serial No xxxxxxxxxx 100 Excellent OK Cancel Dieser Bildschirm dient als Muster x ändert sich entsprechend der Konfiguration des drahtlosen Displays ...

Page 66: ... Key stellen Sie den AES Schlüssel mit Hilfe einerWort oderZahlengruppeein undwählenSiedann OK Ändern Sie die WEP Verschlüsselung Wenn Sie beim Einstellen derWEP Verschlüsselung eine andere Einstellung als Disable wählen Wählen Sie Key s stellen Sie die WEP Schlüssel ein und wählen Sie dann OK Wenn Network Type auf Infrastructure und WEP auf 64 bits oder 128 bits eingestellt ist kann das Häkchen f...

Page 67: ...et up your PC wird angezeigt Geben Sie die LAN und TCP IP Einstellungen des drahtlosen Displays die auf dem Bildschirm angezeigt werden in Ihrem Computer ein und wählen Sie dann Finish Beim Entfernen des Kontrollzeichens für Use this pro file now in Schritt 3 Der Bildschirm Completed wird angezeigt Wählen Sie Finish Die Einstellungen für MeiWDS und für das drahtlose Display können nicht gleichzeit...

Page 68: ...e dieAES Schlüssel mit Hilfe einer Wort oder Zahlengruppe ein und wählen Sie dann OK Stellen Sie die Lebensdauer desAES Schlüssels ein 4 Wählen Sie Finish im Bestätigungsbildschirm Wählen Sie OK im Bestätigungsbildschirm und führen Sie dann einen Neustart des Computers durch MeiWDS Setup Utility ÄnderungderEinstellungendesdrahtlosenDisplays Die Einstellungen für MeiWDS und für das drahtlose Displa...

Page 69: ...es Der gleiche Vorgang kann auch durch Drücken der Erfassungstaste durchgeführt werden Wenn die Stromversorgung durch einen anderen Vorgang als dem Drücken des Netzschalters unterbrochen wurde beispielsweise falls das drahtlose Display mit Strom von der Batterie betrieben wurde und die Batterie versehentlich herausgenommen wurde oder wenn ein Netzadapter versehentlich aus der Steckdose gezogen wur...

Page 70: ...ichkeit einer Störung durch andere Geräte im Netzwerk besteht wählen Sie nur 802 11b für die WLAN Einstellung des Computers Falls sich Ihr Computer und das drahtlose Display nicht normal ausschalten z B auf Grund eines Netzwerkfehlers kann es zwei oder drei Minuten dauern um den Anschluss erneut herzustellen Warten Sie einen Moment und führen Sie den Anschluss dann erneut durch Stellen Sie das dra...

Page 71: ...ätigen Sie die Einstellung der AES Verschlüsselung Führen Sie einen Neustart des Computers durch Der Anschluss wurde beendet weil der Anzeigemodus des Computers geändert wurde Beenden Sie den Betrieb der Anwendung oder des Bildschirmschoners die bzw der im Bildschirmmodus geändert wurde wählen Sie Reconnect auf dem drahtlosen Display und führen Sie den Anschluss erneut durch Wählen Sie im Software...

Page 72: ...ung Betriebszeit 1 Ladezeit 1 Netzdapter 2 Eingang Ausgang Leistungsaufnahme 3 Abmessungen Breite Höhe Tiefe Gewicht Betrieb Lagerung Garantierte Computer CF VDW07CH 8 4 Typ TFT 256 Farben 800 x 600 Bildpunkte Antireflex berührbar mit dem Stift mitgeliefert 9 polige D sub Stiftbuchse Li Ion 7 4 V 1 7 Ah Ca 1 5 bis 2 5 Stunden Stromzufuhr Ein Ca 5 0 Stunden Stromzufuhr Aus Ca 2 0 Stunden 100 V 240 ...

Page 73: ... qui permet une utilisation de l ordinateur en touchant simplement la surface de l écran déporté sans fil FRANÇAIS Instructions d utilisation 1 Ecran Déporté Sans Fil 1 N de modèle CF VZSU21 N de modèle CF AA1623A Batterie 1 AdaptateurSecteur 1 Cordon Secteur 1 Au moment de l expédition le stylet se trouve dans l écran déporté sans fil page 83 Stylet 1 CD ROM 1 Chiffon doux 1 Courroie 1 Vis 2 ...

Page 74: ... de la courroie R BUTTON CAPTURE page 92 MENU 1 Sélectionnez deux des quatre orifices de vis suivants 2 Ajustez la courroie à sa longueur maximum Mettez en place un côté de la courroie et serrez la vis 3 Mettez en place l autre côté de la courroie et serrez la vis 4 Ajustez la courroie sur la longueur désirée Partie extérieure de la courroie Partie intérieure de la courroie Première utilisation No...

Page 75: ...r utilisé procédez comme suit après avoir installé le programme MeiWDS page 76 1 Sélectionnez démarrer Panneau de configuration Connexions réseau et Internet Modifier les paramètres du Pare feuWindows Exceptions Ajouter un programme puis Parcourir 2 Sélectionnez c Program Files Panasonic MeiWDS MeiWds puis Ouvrir et OK A lithium ion battery that is recyclable powers the product you have purchased ...

Page 76: ... 1 et sélectionnez OK Suivez les instructions à l écran Windows 2000 Sélectionnez Démarrer Exécuter saisissez x softkb setup exe 1 et sélectionnez OK Suivez les instructions à l écran Pour plus de détails sur l utilisation du clavier logiciel page 86 1 x est la lettre du lecteur Vous pouvez changer cette lettre selon vos préférences ATTENTION Préparez le CD ROM qui accompagne l écran déporté sans ...

Page 77: ... Suivant puis Terminer 11 Redémarrez l ordinateur 12 Assurez vous que WDSP COM Port COMx est affiché sous Ports COM et LPT dans Gestionnaire de périphériques Windows 2000 1 Sélectionnez Démarrer Paramètres Panneau de configuration Ajout Suppres sion de matériel puis Suivant 2 Sélectionnez Ajouter Dépanner un périphérique puis Suivant 3 Sélectionnez Ajouter un nouveau périphérique puis Suivant 4 Sé...

Page 78: ...ette et installez le pilote Procédez comme suit pour faire correspondre le numéro de port COM avec le numéro qui s affiche dans WDSP COM Port COMx Par exemple si WDSP COM Port COM6 est affiché réglez le port série sur COM6 Windows XP démarrer Panneau de configuration Performances et maintenance Système Matériel Gestionnaire de périphériques Ports COM et LPT Windows 2000 Démarrer Paramètres Panneau...

Page 79: ...e couvercle puis insérez la batterie dans l écran déporté sans fil Après avoir inséré la batterie fermez le couvercle puis faites glisser le verrou vers la gauche Configuration de l écran déporté sans fil Connecteur Verrou Languette Écran déporté sans fil affichage REMARQUE L écran déporté sans fil se met automatiquement hors tension au bout de 10 min utes Dans ce cas commencez la procédure à l ét...

Page 80: ...ans certains cas le terme Peer to Peer Group est utilisé ici AES Advanced Encryption Standard norme avancée de chiffrement Première utilisation 5 Selectionnez Connect dans Écran déporté sans fil affichage a l étape 4 Écran déporté sans fil affichage Change setting on host PC to the following value reboot the host PC then select Connect below Connect Cancel Wireless LAN card Network Type AdHoc SSID...

Page 81: ...n ordinateur connecté à l écran déporté sans fil la connexion s interrompt Il est donc recommandé de ne pas utiliser un logiciel tel q un écran de veille Il se peut que le contenu affiché sur l écran déporté sans fil ne soit pas toujours identique à celui qui était affiché sur l écran à cristaux liquides de l ordinateur Certaines applications qui utilisent des fonctions de dessin basées sur matéri...

Page 82: ...Lors de l utilisation d un ordinateur de la série CF 07 Après avoir vérifié que le témoin d état d écran est allumé mettez l écran déporté sans fil sous tension Lors de l utilisation d un ordinateur autre que de la série CF 07 Après que s est affiché sur la barre de tâches mettez l écran déporté sans fil sous tension Appuyez sur le commutateur d alimentation et maintenez le enfoncé pendant environ...

Page 83: ... réglée en procédant comme suit Windows XP démarrer Panneau de configuration Imprimantes et autres périphériques Souris Tap and Bottons Double click Speed Windows 2000 Démarrer Paramètres Panneau de configuration Souris Tap and Bottons Double click Speed Curseur REMARQUE Deux tapotements rapides Tapotement simple Touchez l objet c à d un fichier ou une icône sans retirer le stylet et déplacez le s...

Page 84: ...le Nettoyer les parties souillées au moyen d un chiffon doux sec tel que de la gaze Ne pas utiliser de benzène de diluant ou d alcool du type désinfectant Pour plus d informations se reporter à Suggestions pour nettoyer la surface de l affichage à cristaux liquides LCD fourni avec le chiffon doux Manipulation du stylet Nettoyer la pointe du stylet et l écran avant l utilisation Des particules étra...

Page 85: ...ion d étalonnage lorsque le curseur et les touchers du stylet paraissent ne pas coïncider 1 Appuyez sur le bouton Menu 2 Sélectionnez Option 3 Sélectionnez Calibration Touchez les cinq marques x sur l écran d étalonnage 1 2 3 4 5 Bouton Menu ...

Page 86: ...el Avant d arrêter puis de redémarrer Windows enregistrez toujours toutes les données Si vous essayez d arrêter l ordinateur pendant que des données sont en cours d édition un message apparaît demandant l enregistrement ou non des données actuelles Dans ce cas retournez dansWindows enregistrez toutes les données puis arrêtez l ordinateur REMARQUE Clavier logiciel Lors de la sélection de Software K...

Page 87: ...t sur la barre des tâches il est alors automatiquement rétabli et se déplace à l avant plan de l écran lorsque l ordinateur change en mode d entrée Avec certaines applications il se peut que cette fonction soit inopérante Sélectionnez le clavier pavé Réglez le clavier logiciel pour qu il soit à l avant plan sur l écran Réglez le clavier logiciel pour qu il soit transparent REMARQUE La spécificatio...

Page 88: ...nte est hors de la plage admissible Une fois que la condition de plage admissible est satisfaite la charge commence automatiquement La batterie se décharge jusqu au niveau de charge prescrit en mode température élevée La batterie n est pas connectée ou la charge n est pas en cours Utilisez le témoin de batterie pour vérifier l état de la batterie Cet écran déporté sans fil empêche une surcharge de...

Page 89: ...hage de batterie restante est de 99 et la couleur du témoin est orange pendant une période de temps prolongée Un avertissement de batterie faible apparaît après une courte période de temps Exécutez le programme utilitaire Refresh Bat tery page 93 La capacité de batterie réelle restant et l indication affichée peuvent être différentes REMARQUE Bouton Menu ...

Page 90: ...vant de l utiliser pour la première fois La charge commence automatiquement lorsque l adaptateur secteur est connecté à l écran déporté sans fil N utilisez que la batterie spécifiée CF VZSU21W avec l écran déporté sans fil Assurez vous que l alimentation a été coupée avant de continuer 1 Mettez hors tension votre écran déporté sans fil page 82 Remplacez la batterie par une autre pendant que l adap...

Page 91: ...ermez le couvercle 3 Faites glisser le verrou vers la gauche Si vous fermez mal le couvercle la batterie peut tomber pendant que vous transportez l écran déporté sans fil Faites attention de ne pas coincer la languette en fermant le couvercle Languette Connecteur Charge de la batterie Raccordez l écran déporté sans fil à une prise électrique La charge commence automatiquement ATTENTION ATTENTION 3...

Page 92: ...l un écran déporté sans fil peut être connecté à un autre ordinateur Il est possible de régler jusqu à quatre profils page 94 Après avoir sélectionné le profil sélectionnez Connect et la connexion s établira avec le profil Charge restante de la batterie Menu Wireless En sélectionnant Wireless les paramètres de la fonction sans fil pour la connexion à l ordinateur et l état actuel sont affichés ne ...

Page 93: ...ors tension automatiquement puis la charge commencera Il faut environ 2 heures avant que l a l i m e n t a t i o n s e c o u p e automatiquement par décharge complète de la batterie depuis l état de charge complète Laissez la batterie se charger jusqu à ce que le témoin de batterie devienne vert Pendant la charge l éclairage arrière est automatiquement désactivé Cet écran est un exemple Status Ful...

Page 94: ...tion Setup Power on Password Change Supervisor Password Change Touchscreen Calibration LCD Off Timer 30 min LCD Off Mode Normal resume Power Off Timer disable Spécifiez ou changez le mot de passe de superviseur Procédez comme suit pour modifier les paramètres de la connexion sans fil 1 Sélectionnez Setup Si le mot de passe de superviseur a été spécifié Saisissez le mot de passe de superviseur puis...

Page 95: ... version s afficheront General Wireless Battery Option Version Model No CF VDW07Cxx Firmware Vx xxLxxx Wireless Controller xx xx xx xx Serial No xxxxxxxxxx 100 Excellent OK Cancel Cet écran est un exemple x varie selon la configuration de l écran déporté sans fil ...

Page 96: ...yptage AES Lors du réglage du cryptage AES sur autre chose que Disable Sélectionnez Key et réglez la clé AES avec phrase ou binary puis sélectionnez OK Changez le cryptage WEP Lors du réglage du cryptage WEP sur autre chose que Disable Sélectionnez Key s et réglez la les clé s WEP puis sélectionnez OK Lorsque Network Type est réglé sur Infrastructure et que WEP est réglé sur 64 bits ou 128 bits il...

Page 97: ...le now à l étape 3 page 96 L écran Set up your PC s affichera Saisissez les paramètres de Wireless LAN et TCP IP affichés sur l écran de l ordinateur puis sélectionnez Fin ish Si vous décochez Use this profile now à l étape 3 L écran Completed s affichera Sélectionnez Finish REMARQUE Il n est pas possible de régler en même temps le MeiWDS et l écran déporté sans fil page 98 ...

Page 98: ...e Disable Sélectionnez AES Key et réglez la les clé s AES avec phrase ou binary puis sélectionnez OK Spécifiez la durée de vie de la clé AES 4 Dans l écran de confirmation sélectionnez Finish Dans l écran de confirmation sélectionnez OK puis redémarrez l ordinateur MeiWDS Setup Utility Modification des paramètres de l écran déporté sans fil Il n est pas possible de régler en même temps le MeiWDS e...

Page 99: ...tion est possible en appuyant sur le bouton Cap ture Affichage de l image précédente La même opération est possible en appuyant sur le bouton R Lorsque l alimentation est coupée par une opération autre qu une pression sur le commutateur d alimentation par exemple lorsque l écran déporté sans fil fonctionne sur batterie et que la batterie est retirée par inadvertance ou lorsque l adaptateur secteur...

Page 100: ...avec 802 11b et 802 11g mais si d autres appareils risquent de causer de l interférence sur le réseau réglez l interface de réseau local sans fil de l ordinateur sur 802 11b uniquement Si l ordinateur et l écran déporté sans fil ne se mettent pas hors tension de façon normale pour une raison telle qu une erreur de réseau le rétablissement de la connexion peut prendre deux ou trois minutes Patiente...

Page 101: ...less et vérifiez le paramètre du cryptage AES Redémarrez l ordinateur La connexion a été annulée parce que le mode d affichage de l ordinateur a été modifié Cessez l utilisation de l application ou de l économiseur d écran qui a modifié le mode d affichage sélectionnez Reconnect sur l écran déporté sans fil et rétablissez la connexion Sélectionnez Software Keyboard dans la procédure qui suit Windo...

Page 102: ...ace Port Série Batterie Tempsdefonctionnements 1 Temps de charge 1 Adaptateur Entrée Secteur 2 Sortie Consommation de puissance 3 Dimensions Physiques largeur hauteur profondeur Poids Condition En marche d utilisation À l arrêt Ordinateurs garantis CF VDW07CH Type 8 4 TFT 256 colors 800 600 dots Anti reflets capacité de toucher au stylet fourni Mâle 9 broches D Li ion 7 4 V 1 7 Ah Environ 1 5 h 2 ...

Page 103: ...103 F Mémo ...

Page 104: ... 2005 Matsushita Electric Industrial Co Ltd All Rights Reserved Printed in Japan FJ0305 0 DFQX5544ZA ...

Reviews: