background image

7

Using the Touch Pad

*2

When the horizontal scroll function has not been enabled, any scrolling will be vertical scrolling.

z

The screen will not scroll if you trace toward the center of the Touch Pad.

z

On screens that cannot be scrolled (e.g., desktop screen), if you scroll, the computer may try to scroll the screen, 
causing the cursor to freeze. If this happens, remove your finger from the Touch Pad and begin again, this time 
starting from the center of the Touch Pad.

z

For example, on a screen that will only scroll horizontally, even if you execute a vertical scroll, the screen will 
scroll horizontally.

6

Once scrolling has begun, continue to trace a circle on the Touch Pad without removing 
your finger from the pad.

z

As long as you are tracing a circle, you can continue scrolling using any position on the Touch Pad.

z

To scroll in the opposite direction, trace a circle in the opposite direction without removing your finger from the 
Touch Pad.

7

When you finish scrolling, remove your finger from the Touch Pad.

„

Change the settings for the Touch Pad utility

1

Click 

 on the notification area, and then click [Settings]. 

When 

 is not displayed:

Î

page 6

, step

1

-

A

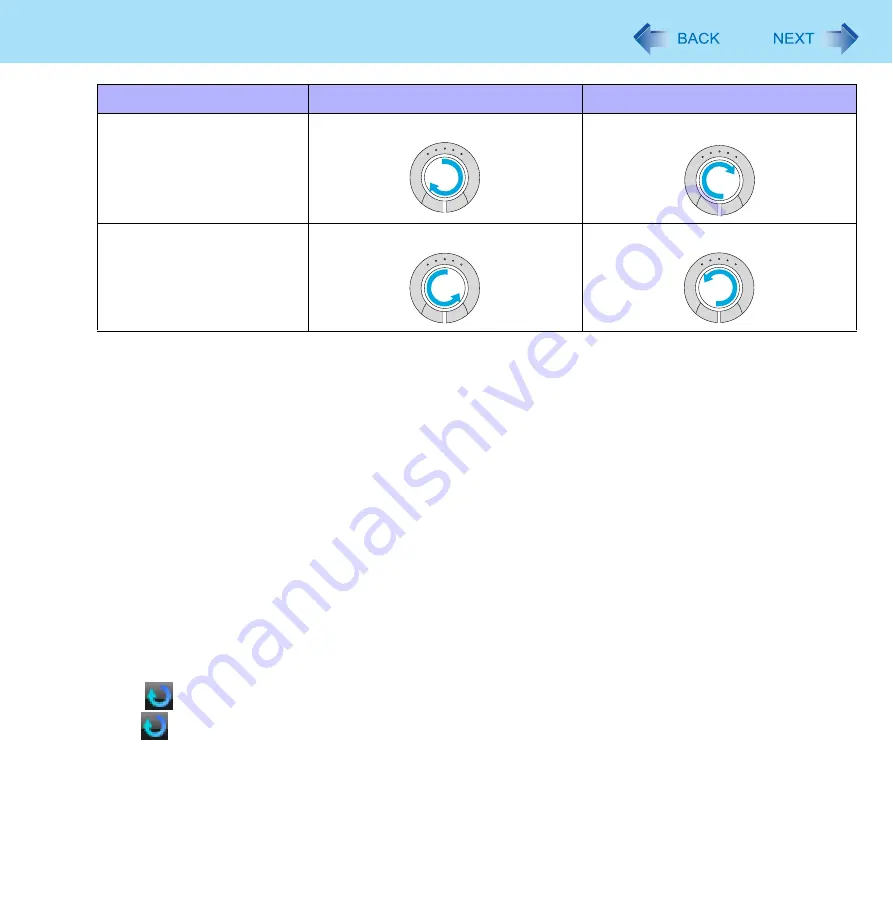
Vertical scroll 

Horizontal scroll

*2

Trace clockwise

To scroll down

To scroll right

Trace counter-clockwise

To scroll up

To scroll left

Summary of Contents for CF-T7 Series

Page 1: ...1 Reference Manual Personal Computer Model No CF T7 Series We recommend that this Reference Manual be printed ...

Page 2: ...Windows starts and click OK Illustrations and Terminology in this Reference Manual NOTE NOTE provides a useful fact or helpful information CAUTION CAUTION indicates a condition that may result in minor or moderate injury Enter This illustration means to press the Enter key Fn F5 This illustration means to press and hold the Fn key then press the F5 key When using with the Fn key and the Ctrl key f...

Page 3: ...is may remedy the problem z Depending on the processing status on Windows sound may be interrupted at Windows startup You can mute the sound at startup A Right click the desktop and click Personalize Sounds B Remove the check mark from Play Windows Startup sound and click OK The thermal control may set the computer to hibernation if you use the computer in a high ambient temperature and use an app...

Page 4: ...ver the work surface Tapping Clicking tapping or clicking To right click Can only be performed by clicking the right button Double Tapping Double Clicking double tapping or double clicking Dragging Two quick taps but on the second tap leaving your finger down applying pressure and moving it on the work surface or While holding down the button moving your finger on the work surface Scroll Trace a c...

Page 5: ...ally by tracing repeatedly in the desired direction You can use separate settings for each account regarding whether to use the Touch Pad utility or the Virtual Scrolling func tion Using the Touch Pad Utility You can scroll easily by tracing a circle on the Touch Pad NOTE z External mouse drivers cannot be used at the same time as the Touch Pad utility Î page 48 1 Make the following settings to us...

Page 6: ...ger in the appropriate area to begin scrolling The finger position on the Touch Pad can be changed using the Touch Pad utility Î page 7 This explanation assumes in the default setting 1 If the horizontal scroll function has not been enabled the segment shown in the figure above A is also included in the area to begin vertical scrolling 5 Trace a circle around the Touch Pad without lifting your fin...

Page 7: ...ute a vertical scroll the screen will scroll horizontally 6 Once scrolling has begun continue to trace a circle on the Touch Pad without removing your finger from the pad z As long as you are tracing a circle you can continue scrolling using any position on the Touch Pad z To scroll in the opposite direction trace a circle in the opposite direction without removing your finger from the Touch Pad 7...

Page 8: ...check mark scroll the region where the mouse cursor is located within the active window If you remove the check mark scroll the selected region within the active window In either case if the mouse cursor is outside the active window scroll the selected region Reverse the direction of the vertical scrolling You can change the direction in which the screen scrolls when you trace the Touch Pad clockw...

Page 9: ...e name e g Synaptics TouchPad in Devices then click Settings 5 Click Virtual Scrolling add a check mark for the scroll functions you want to use then click OK 6 Click OK at Mouse Properties A Width of the initial scope By dragging the inner circumference of the starting area you can change the width of the initial scope A in five stages You can also change the width by sliding the Initial scope sl...

Page 10: ...n click Exit B Click Start Control Panel Uninstall a program Touch Pad Utility and then click Uninstall to remove the program z To begin using the Touch Pad utility again A Click Start and input c util wheelpad in Start Search and then press Enter B Right click setup in wheelpad folder and click Run as administrator If there are two or more setup files right click the file whose Type is Applicatio...

Page 11: ...sitivity using the Touch Sensitiv ity By dragging slide bar to the Heavy Touch position the cursor will only move with a strong touch on the Touch Pad By dragging slide bar to the Light Touch position the cursor will move even with a light touch on the Touch Pad z By design the Touch Pad is to be used with a fingertip only Do not place any object on the work surface or press down forcefully with s...

Page 12: ...age 13 To right click z You can choose either of the two ways below z Touch and hold the object i e file or icon z Touch the object i e file or icon and tap the right button of the mouse image on the display Functions Operation Moving the cursor The cursor is moved to the location pointed by the stylus Clicking Tapping One tap Double clicking Double tapping Two quick taps Dragging Touch and hold t...

Page 13: ...use the touchscreen function may not be used z When the operation of panning only the internal LCD is performed while the display resolution is set higher than the resolution of the internal LCD the touchscreen function will not work properly z Even when only an external display is in use the cursor will move on the external display if the surface of the internal LCD is touched when the touchscree...

Page 14: ...l The cursor may move to the edge of the display z Do not operate the computer when such things as dust are on the screen Do not allow contact with substances that could dirty the touchscreen such as oil z Do not apply too much pressure when operating the touchscreen Only a light touch is required to operate the touchscreen Applying too much pressure may damage the surface z Do not touch the scree...

Page 15: ...select the angle You can select rotation angles of 90 180 or 270 degrees from the landscape mode NOTE z Be sure to use the above procedures to rotate the display By using the Display Rotation Tool you can change the settings of the display rotation 1 Right click on the notification area and then click Setting 2 Change the settings A Changing the key combination B Changing the angle Default 180 deg...

Page 16: ... set the display resolution larger than the resolution of the internal LCD z If motion video is played while the display is rotated the picture may not be displayed properly or the sound may be broken up This problem can be corrected by rotating the display to 0 degree z The Touch Pad scroll function does not work while the display is rotated z If the display is rotated when the resolution is set ...

Page 17: ...dows It may not appear in some application conditions Key Functions Pop up Icon Fn F1 Fn F2 LCD brightness Fn F1 down Fn F2 up You can select a different brightness level setting for when the AC adaptor is con nected and for when it is not connected In the default setting the LCD brightness is set to be darker when the AC adaptor is not connected NOTE z When you change the LCD brightness the Adjus...

Page 18: ... F5 or F6 intermittently Fn F7 Activate sleep Î page 35 __ Fn F9 Remaining battery power Î page 21 Fn F10 Activate hibernation Î page 35 __ Fn NumLk Run the ScrLk Scroll Lock function The functions differ depending on the application software __ Fn Home Lead to the last page or move the cursor to the end of the current line End __ Fn Ï Move the back page PgUp __ Fn Ð Move the next page PgDn __ Key...

Page 19: ... key combination A Press Fn once Locked B Press another key Lock released z When using successive Fn key combinations A Press Fn twice Locked B Press another key Fn key remains locked until you press Fn again Notification Make sounds when Fn key is pressed 1 Show status on screen Displays the Fn key status on the notification area Fn is locked Fn is not locked Disable popup The Pop up icon will no...

Page 20: ...tor in the Main menu of the Setup Utility is set to Flashing the indicator will alternately become lighter and darker Flashing Î page 67 Green 1 Fully charged Red The remaining battery power is approximately 9 or less Blinking red 1 Battery pack or charging circuit may not be working properly Quickly save your data and power off your computer Remove the battery pack and disconnect the AC adaptor t...

Page 21: ...ode ECO is enabled so overcharging is avoided There are three methods to check the remaining battery power To check the remaining battery power on the screen After logging on to Windows 1 Press Fn F9 To check the remaining battery power and remaining time using the Windows Battery Meter After logging on to Windows 1 Click or on the notification area Checking the Remaining Battery Power Display Con...

Page 22: ... ECO is enabled Low battery warning appears soon after a short time of use z The battery display may not be the same as that of Battery Meter This is not a malfunction To check the remaining battery power using the battery indicator When the power is off or in sleep or hibernation 1 Close the display completely 2 Disconnect the AC adaptor 3 Slide the power switch A and confirm the battery indicato...

Page 23: ... the remaining battery power is low 6 Click OK When the remaining battery power becomes 10 Low battery level When the remaining battery power becomes 5 Critical battery level z Displays a message that the remaining battery power is low z The computer enters hibernation Charge the battery Connect the AC adaptor or replace the battery to start up the computer z Connect the AC adaptor immediately If ...

Page 24: ...ery Recalibration C When the message requests shut down of Windows click Yes The Battery Recalibration starts After the battery pack is fully charged discharging starts When the discharging is completed the power goes off automatically After the Battery Recalibration is finished normal charging starts CAUTION z Do not close the LCD while Battery Recalibration is being executed NOTE z The temperatu...

Page 25: ...ith the way you use your computer z Economy Mode ECO disabled In the default setting the Economy Mode ECO is set to Disabled Charge the battery to 100 fully charged We recommend that you disable the Economy Mode ECO if you use the bat tery pack frequently z Economy Mode ECO enabled Stop the battery recharging at 80 of fully charged By stopping the battery recharging before 100 fully charged the bu...

Page 26: ... displayed read the message on the screen carefully and click OK D Connect the AC adaptor If you do not click OK at step C the computer will go into forced sleep after about three minutes to prevent the remaining battery power from dropping The computer will go into forced sleep even while application software is running or data is being sent or received or when the hard disk is being accessed so ...

Page 27: ... first time Charging starts automatically when the AC adaptor is connected to the computer z Use only the specified battery pack with your computer z In sleep do not remove replace the battery pack Otherwise your data will be lost and the computer may be damaged 1 Turn off the computer z Do not use the sleep function 2 Turn your computer over and remove insert the battery pack z To remove Slide bo...

Page 28: ...es not match the dents of the computer detach the battery pack once then slide it while pushing it lightly to avoid floating CAUTION z Make sure the latches are securely locked otherwise the battery pack may fall when you carry the computer z Do not remove the battery pack forcibly when the latches are locked Doing so may damage the battery pack z Do not apply pressure from the top of the closed d...

Page 29: ...anges 1 Click or on the notification area and click More power options 2 Click Create a power plan click the basic plan and input the name of power plan 3 Click Next 4 Change the settings and click Create z To change the settings or to make more detailed settings above Changing the Power Plan Setting 1 Click or on the notification area and click More power options 2 Click the power plan other than...

Page 30: ...in use Î page 61 Using LAN Power Saving Utility Î page 56 Use Sleep Hibernation z Press Fn F7 to set the computer to sleep or Fn F10 to set it to hibernation when you have to leave the computer This shuts down computer operation to reduce power consumption Disable Wake Up from wired LAN and Wake Up from wireless LAN functions when they are not needed This reduces power consumption in Sleep Hiberna...

Page 31: ...om 100 to 50 3 Follow the on screen instructions CAUTION z When this utility is executed the following may occur Videos cannot be played back smoothly Image quality may deteriorate Making detail settings You can set or cancel the following power saving functions z Screen display power saving function Refresh rate will automatically be reduced to 40 Hz if the internal LCD brightness level is set be...

Page 32: ...N function to save power in sleep hibernation Disable this function if you want to use the Wake Up from wireless LAN function z Screen colors This function set Colors in Display Settings to Medium 16 bit z Power plan This function set the power plan to Panasonic Power Management default settings and then make the following changes Change Maximum processor state in Processor power management both O...

Page 33: ...Apply and OK C Click Display Settings D Click Power Settings E Click Intel R Display Power Saving Technology to add a check mark F Move the slide bar to Maximum Battery and click OK G Click OK There is no need to reboot the computer z For how to enable disable the Wake Up from wired LAN function Î page 55 For how to enable disable the Wake Up from wireless LAN function Î page 64 ...

Page 34: ...lt setting the Windows password will be requested to resume z Do not enter sleep or hibernation in the conditions below otherwise the data or file may be corrupted sleep or hibernation may not work or malfunction may occur in the computer or the peripheral devices When any of the hard disk drive indicator and the SD Memory Card indicator is on accessing drive or card When playing recording audio f...

Page 35: ...tes to enter sleep or hibernation z At the beep 1 immediately release the power switch After releasing the switch do not operate it until the power indi cator blinks or goes off If you slide and hold the power switch for longer than four seconds the computer will forcibly shut down and unsaved data will be lost even if you have set When I press the power button to Shut down in Choose what the powe...

Page 36: ... remove the SD SDHC Memory Card z If the computer enters sleep while a USB keyboard or mouse is connected touching the USB keyboard keys or mouse will resume the computer Sleep 1 Click or on the notification area and click More power options Change when the computer sleeps 2 Select the setting for Put the computer to sleep and then click Save changes z The setting for hibernation may change unexpe...

Page 37: ...pty and press Enter 5 Enter your password again in Confirm New Password and press Enter 6 In Setup Notice press Enter 7 Press F10 and then select Yes and press Enter CAUTION z Do not forget your password If you forget your Supervisor Password you will not be able to use your computer Con tact technical support office z When running the Setup Utility do not leave and go away from your computer even...

Page 38: ...s set to Disable but we recommend that Password on boot be set to Enable for security reasons Note that this hard disk lock does not guarantee complete protection of data 1 Select Enable in Hard Disk Lock in the Security menu of the Setup Utility Î page 69 CAUTION z When starting up the computer if the message Hard disk access is prohibited by Hard Disk Lock appears run the Setup Utility and chang...

Page 39: ...s forced in z Note that the PC Card removal may not be complete depending on the status of the PC Card or the device connected to the PC Card this may occur when a SCSI card is used to connect an external hard disk to the computer In such cases turn off the power from the Start menu then remove the card To insert the card 1 Insert the PC Card with the label side up until it securely fits in the sl...

Page 40: ...oval some types of card will not be recognized In this case restart the computer z If the computer freezes after resuming from sleep or hibernation remove and reinsert the card If the problem persists restart the computer z When a card is inserted power consumption increases Remove the card when it is not in use especially when oper ating by battery power z To connect peripheral devices SCSI IEEE1...

Page 41: ...s For further information refer to the instruction manual of the devices Handling and storage cautions z Store the SD SDHC Memory Card in the case after removing it from the computer z Do not Disassemble or modify the card Hit bend drop or wet the card Touch the terminals with fingers or metal object Remove the labels of the card Attach other labels or stickers to the card z Do not place the card ...

Page 42: ...rectly z Do not forcibly draw out the card otherwise the slot may be damaged z Insert the card in the correct direction otherwise the card and the slot may be damaged z After resuming from sleep or hibernation do not access the SD SDHC Memory Card for approximately 30 seconds To insert the card 1 Insert the SD SDHC Memory Card with the label side facing up and with the cut corner on top To remove ...

Page 43: ...the mini port replicator NOTE z To use the mini port replicator set USB Port setting to Enable default in the Advanced menu of the Setup Utility z When the mini port replicator is connected LAN cable and external display should be connected to the mini port repli cator The LAN port and external display port cannot be used z If devices connected to USB ports 2a 2b 2c does not operate In the case of...

Page 44: ...lick Display Settings and set a suitable number of colors resolution or refresh rate for each display Depending on the settings some external displays may be distorted or displayed incorrectly In this case check the refresh rate setting z When you use the simultaneous display DVD Video MPEG files and other motion image files may not be played back smoothly z Carefully read the instruction manual o...

Page 45: ...ow different parts of my desktop on each display extended 3 Click Right or Left for the location of extended desktop and click OK To change the display settings 1 Right click the desktop and click Graphics Properties 2 Click Extended Desktop and select the settings for Primary Device and Secondary Device 3 Click Display Settings and set the display color and resolution etc 4 Click OK NOTE z Always...

Page 46: ...ged or the Extended Desktop is closed When there is no display after the position of the extended display is changed The application running is displayed at the position of the extended display before the change Return the position of the extended display to the condition before the change Move the application to the internal LCD and then correct the position of the extended display When there is ...

Page 47: ...ructions or refer to the instruction man ual of the USB device z You may need to install the driver again when connecting the device to another port z When a USB device is connected sleep and hibernation may not function normally If the computer does not start up normally remove the USB device and restart the computer z If the computer enters sleep or hibernation while a USB keyboard or mouse is c...

Page 48: ...am Touch Pad Utility and then click Uninstall to remove the program Follow the on screen instructions z A standard user needs to enter an administrator password 3 Click Start Control Panel Uninstall a program Synaptics Pointing Device Driver and then click Uninstall to uninstall the driver Follow the on screen instructions z A standard user needs to enter an administrator password 4 After uninstal...

Page 49: ... util drivers mouse setup exe and press Enter z Follow the on screen instructions 5 Restart the computer and if Synaptics Pointing Device Settings is displayed remove the check mark from Show this screen at startup and click Close 6 Click Start and input c util wheelpad and press Enter Right click setup in wheelpad folder and click Run as administrator If there are two or more setup files right cl...

Page 50: ...g the disk to a magnetic field Storing the disk in locations prone to high temperatures low pitched noise dampness or dust Applying more than one label on the disk z Confirm the contents of a floppy disk before formatting it Confirm that no important data is left on the floppy disk because all data will be erased z Use the write protect tab A This is a must for preserving important data This preve...

Page 51: ...ghtning strike 1 Connect the computer and the telephone jack A using the telephone cable included B z Hold the cable so that the shape of the connector C matches the port and insert fully until it clicks 2 Click Start Control Panel Connect to the Internet Dial up and change the settings as necessary NOTE z Do not enter sleep or hibernation during communications z To remove the cable press and hold...

Page 52: ... double click the internal modem 6 Click Power Management and add a check mark for Allow this device to wake the com puter and then click OK To set the time to return the computer to sleep The computer will enter sleep after the set time even when the communication is not completed You can avoid such uncom pleted communication if you select Never but the computer does not return to sleep after res...

Page 53: ...time to respond so set the calling time longer than normal If this is not possible on the transmission side reduce the number of rings before answering on the software that you are using to keep the com puter in idle waiting for the call ...

Page 54: ...ibernation 2 Connect the cable Connect the LAN port A and the network system server HUB etc using a LAN cable 3 Turn on the computer NOTE z Even when a password is set in the Setup Utility and Password on boot is set to Enable entering the password is unnecessary for turning on or resuming the computer z Connect the AC adaptor z The Power On by LAN function is off under the following conditions Wh...

Page 55: ... make the following setting Click Wake Up Capabilities in Property and select Magic Packet in Value 8 Click OK Enabling Disabling the Wake Up from wired LAN function When the Wake Up from wired LAN function is enabled the computer automatically resumes from sleep or hibernation when the computer is accessed from the network server via the internal LAN port Default setting The Wake Up from wired LA...

Page 56: ...k the time you prefer to set in Auto Off Setting for LAN To switch ON OFF manually Click On or Off in Manual Switching for LAN When the AC adaptor is connected Off is shaded in gray NOTE z Do not turn off the wired LAN to use Wake Up from wired LAN function You will not be able to resume this computer using another computer on the network z When or is not displayed on the notification area Click S...

Page 57: ...ces when it is set to ON This utility allows you to control the function of the wireless switch This utility also allows you to enable or disable wireless devices from a pop up menu in the notification area In the default setting all wireless devices are enabled The Wireless Switch Utility icon The icon appears in the notification area when the computer is turned ON It shows the status of wireless...

Page 58: ...ss Switch Utility icon or on the notification area and click Set tings 2 Select the setting you want to assign to the wireless switch 3 Click OK To check the wireless communication status 1 Place the cursor over the Wireless Switch Utility icon or on the notification area NOTE z Do not turn on off the switch repeatedly at too short intervals z Do not restart log off or enter sleep or hibernation i...

Page 59: ...ation After installation the Wireless Connection Disable Utility is automatically started after a user is logged in An icon appears on the notification area Indicates that the utility is enabled and the wireless connection is disabled since a LAN cable is connected Indicates that the utility is enabled and the wireless connection is enabled since no LAN cable is connected Indicates one of the foll...

Page 60: ... Wireless Connection Disable Utility to monitor the LAN port and disable wireless connection when a LAN cable is connected z Monitoring LAN Cable OFF Disables the Wireless Connection Disable Utility and enables wireless connection regardless of whether a LAN cable is connected or not z Exit Exits the Wireless Connection Disable Utility and enables wireless connection ...

Page 61: ...ing on wireless LAN If you cannot turn on wireless LAN using the wireless switch confirm the Wireless Switch Utility setting Î page 57 If you cannot turn on wireless LAN in the Wireless Switch Utility try the following procedure A Click or on the notification area and click Network and Sharing Center B Click Manage network connections C Right click Wireless Network Connection and click Enable z A ...

Page 62: ...Click Close NOTE z If you cannot communicate with the access point or if the access point is not detected right click on the notifica tion area and click Connect to a network and then click in the Connect to a network screen z The settings depend on the network environment For further information ask the system administrator or the person in charge of the network z If you use the stealth type wire...

Page 63: ... in Device Manager A Click Start Computer System properties Device Manager z A standard user needs to enter an administrator password B Double click Network adapters and double click Intel R Wireless WiFi Link 4965AG C Click Advanced and then click Wireless Mode in Property D Select the settings in Value e g 5 802 11a g E Click OK If you turn on off 802 11a using the popup menu of Wireless Switch ...

Page 64: ...fic or the computer is taken out of the communication range of the access point The Wake Up from wireless LAN function will also be disabled if the wireless switch Î page 57 at the ON position is set to OFF NOTE z The computer may resume when another computer in the network makes unintentional access Using the following procedure you can prevent accidental startup by unintentional access A Click S...

Page 65: ...lay will be changed accordingly To communicate between two computers using the wireless LAN and without using an access point make the following settings on each computer z Set the network to be accessed as wireless ad hoc z Set the network names to the same name z Set the network authentication to the same authentication z When using encryption set the same encryption and the same network key on ...

Page 66: ...ter User Password z Note the following In the Advanced and Boot menus you cannot make the settings of all items In the Security menu you can only change the User Password and TPM You can change User Password when User Password Protection is set to No Protection You can change TPM when Embedded Security TPM Sub Menu is set to No Protection In the Exit menu you cannot make the setting of Get Default...

Page 67: ... Fn Ctrl Key Select whether to switch Fn with Ctrl functions and vice versa on the internal keyboard Do not attempt to replace the markings on the keys or the keys themselves Normal Replace Display The display during the Windows start up process When an external display is not connected the information appears on the internal LCD even though External Monitor is set External Monitor Internal LCD Ba...

Page 68: ...s set to Enable To use Power On by LAN make additional settings in Device Manager Î page 54 Deny Allow Wireless LAN Only for model with wireless LAN Disable Enable Wireless WAN Only for model with wireless WAN Disable Enable Bluetooth Only for model with Bluetooth Disable Enable PC Card Slot Disable Enable SD Slot Disable Enable USB Port Disable Enable Legacy USB Support Select whether to use the ...

Page 69: ...e the message Press F2 for Setup F12 for LAN is not displayed on Panasonic boot screen However F2 and F12 will work even if the message is not displayed Disable Enable Boot First Menu Disable Enable Hard Disk Lock Disable Enable User Password Protection No Protection Protected XSet User Password Enter the sub menu XEmbedded Security TPM Sub Menu Only for model with TPM For information on TPM refer...

Page 70: ... the default setting press 1 NOTE z The default order is USB FDD Hard Disk USB CDD PCI LAN z To boot from the following devices make the settings as below z In the Boot menu the names of the connected devices including internal devices will be displayed z If more than one of the same devices are connected only one device name will be displayed Boot Menu Boot priority order 1 USB FDD 1 2 Hard Disk ...

Page 71: ...To exit without saving the changes to CMOS Get Default Values To return the settings to the default values Load Previous Values To load the previous values from CMOS Save Current Values To save the changes to CMOS Repair Your Computer To start System Recovery Options and run system diagnostics and restoration This does not appear when the computer is turned on for the first time after purchase Win...

Page 72: ...y you can click any part out of the loupe window or press and hold Alt and right click z To change the loupe window size drag the bottom right corner C The size range you can enlarge shrink depends on the screen s resolution NOTE z If you execute the scroll operation while the loupe window is displayed the window directly below the loupe window will scroll vertically The loupe window will not be d...

Page 73: ... assignment z When using the external mouse Touch Pad A Click Mouse Touch pad B Click a combination of Ctrl Alt and Shift and add the check mark Multiple keys can be combined for example Ctrl Alt C Select either Right click or Left click to use in combination with the key s selected in step B above z When using the keyboard A Click Keyboard B Click the text box and then press the key used for the ...

Page 74: ...the CPU memory and supported system 1 Click Start All Programs Panasonic DMI Viewer The DMI Viewer screen appears 2 Click the item to display the detailed information To save the information as a text file A To save the item that is displayed Click File Save Selected Data To save all items Click File Save All Data B Select the folder input the file name and then click Save ...

Page 75: ...may take some time The time required will depend on the disk capacity About the defragmentation When files have been repeatedly written or rewritten to the hard disk some files may become segmented and saved in fragments If this fragmentation continues it may take some time to read from or write to the hard disk The Disk Defragmenter is a function that sorts these fragmented files in the most effi...

Page 76: ...Con sult the peripheral manufacturer z Also check the items in No response Î page 79 z If it is no longer possible to shut down Windows after installing application software click Start Control Panel Uninstall a program and remove the installed application If it is possible to shut down when the application is removed then consult the application software manufacturer z Check a disk error using th...

Page 77: ...rform reinstallation and return the hard disk to its default condition Operating Instructions Reinstalling Software When resuming from the sleep or hibernation Enter Password does not appear z Even when a password has been set in the Security menu of the Setup Utility and Password on boot is set to Enable Enter Password does not appear when the computer resumes from the sleep or hibernation Set th...

Page 78: ...r if there is no external mouse con nected A If an application with a high CPU usage rate is running exit this application and click Start All Programs Panasonic Touch Pad Utility B Uninstall and then reinstall the Synaptics TouchPad driver and Touch Pad utility Î page 48 When using an external mouse When using the Touch Pad z Uninstall the Touch Pad utility using the following pro cedures A Click...

Page 79: ...d with the computer z As a result of the physical characteristics of the touchscreen sometimes the position of the stylus does not match the position of the cursor on the screen This is not a malfunction Perform Tablet Calibration Î page 14 Some applications may not work properly z When switching to a different user with the Fast User Switching function the following problems may occur Some applic...

Page 80: ...After replacing the battery pack with a fully charged one turn your computer on again The battery indicator is blinking z If blinking red Quickly save your data and power off your computer Remove the battery pack and disconnect the AC adaptor then con nect them again If the problem persists contact your technical support office The battery pack or charging circuit may be defective z If blinking or...

Page 81: ...er System properties Device Manager z A standard user needs to enter an administrator password B Double click Mice and other pointing devices If a name other than Synaptics PS 2 is displayed then an external mouse driver is installed Delete it then restart the computer z Restart the computer by using the keyboard Press and press Î three times and press Ï to select Restart and press Enter If the co...

Page 82: ...en or display defects always on pixels or always off pixels z This is not a malfunction High precision and advanced technologies are necessary for the production of color liquid crystal displays color LCDs Therefore if 0 002 or less of the picture elements either fail to light or remain constantly lit that is more than 99 998 of elements are functioning properly this is not considered a defect Not...

Page 83: ...y leave an afterimage The screen becomes disordered z The screen display may become distorted if the resolution or number of colors is changed or if an external display is con nected or disconnected while the computer is operating Restart the computer The display cannot be changed and the operation of the Touch Pad and the touchscreen do not match the display angle z When some applications are run...

Page 84: ...mode In this case turn on the external display again However in the case of some external displays the screen display may be distorted or the mouse cursor may not be prop erly displayed depending on the settings In this case try setting the number of colors screen area resolution and refresh rate to smaller values The sidebar gadgets are not correctly displayed z Log off and log on Windows again T...

Page 85: ...ms Accessories System Tools Character Map B Point to the desired font name such as European fonts and select it Combined key operations with the Fn key do not work z Check whether Fn Ctrl Key is set to Replace in the Main menu of the Setup Utility Î page 67 Change the setting back to Normal or if continuing with Replace selected use Ctrl in place of Fn Cannot input by touching the display z When m...

Page 86: ... Sound video and game controllers and check if is displayed If is displayed click the driver for which is shown press Del and click OK in the confirm deletion screen Then restart the computer To change the volume z Press Fn F5 to lower the volume or Fn F6 to increase the volume The audio is distorted z During audio playback operating a key with Fn may cause distortion of the sound Stop playing and...

Page 87: ...gnize when the device is connected or disconnected or the device may not operate properly Use the following procedure A Click Start Computer System properties Device Manager z A standard user needs to enter an administrator password B Select the applied device and remove the check mark for Allow the computer to turn off this device to save power in Power Management This item may be unavailable for...

Page 88: ...ormation menu of the Setup Utility Î page 66 z If the RAM module is not confirmed Turn the computer off and reinsert the RAM module Confirm the recommended specifications Regarding the RAM module refer to Operating Instructions Expanding Memory or Specifications The address map for IRQ I O port address etc is unclear z You can check with the following procedure A Click Start Computer System proper...

Page 89: ...e network z If the hub unit link lump does not light up one of the following problems may have occurred A problem or failure in the hub unit Incorrect cable type or incorrect connection A break in the cable Cannot check the computer s MAC address z Check the computer s MAC address using the following procedure A Check that the LAN or wireless LAN is not disabled in the Setup Utility or the Device ...

Page 90: ... or on the notification area and click Network and Sharing Center B Click Manage network connections C Right click Wireless Network Connection and click Properties z A standard user needs to enter an administrator password D Click Internet Protocol Version 4 TCP IPv4 and click Properties E Confirm the protocol settings such as IP address and do the settings properly again z Depending on the access...

Page 91: ...may become slower than the nomi nal speed depending on the operating conditions Communications with access point are cut off z Shorten the distance between the computer and the access point and try the detection again z If there are multiple access points aside from the access point to which this computer is connected confirm that different channels have been set for each access point Cannot set w...

Page 92: ...he hard disk of PC Information Popup is not displayed z As long as it is activated the PC Information Viewer will appear in front of all other screens z Depending on your network environment it may take about 1 minute to start up PC Information Viewer Running PC Information Viewer A Click Start All Programs Panasonic PC Information Viewer PC Information Viewer Click the items to display detailed i...

Page 93: ...ew In Advanced settings remove check mark Hide extensions for known file types NOTE z You can also save a copy of the screen to a file using the following procedure Click Start All Programs Panasonic PC Information Viewer Screen Copy z At the time of purchase the computer is set so that a copy of the screen can be saved to a file by pressing Ctrl Alt F7 This setting can be changed using the follow...

Page 94: ...strument that is susceptible to damage Strong vibration or shock to the hard disk may result in malfunctions such as data read errors However you can reduce the risk of hard disk deterioration or data loss by observing the precautions regarding the operating environment and handling When the automatic display function for the PC Information Popup is enabled the small popup screen x Notifications A...

Page 95: ...tification area and click Check for information now B Click x Notifications About Hard Disk Usage Change the settings You can change the display conditions for information on how to use the hard disk or disable the function to display informa tion A Right click PC Information Popup icon on the notification area and click Notification settings B Click General or Hard Disk Usage and make the necessa...

Page 96: ...96 PC Information Popup NOTE z When the icon is not displayed click Start All Programs Panasonic PC Information Viewer PC Informa tion Popup ...

Page 97: ...us software commercially available Update virus definition files frequently and conduct virus checks regularly Do not use disks or programs of unknown origin Run a virus check on new programs before executing them Use Windows Firewall Update Windows In an Internet connected environment execute the Windows Update and use the latest Windows service pack or patch pro gram to update Windows on your co...

Page 98: ... power saving function z If the power saving function sleep or hibernation is activated while communications software is used the network con nection may be interrupted or the performance may be adversely affected In this case restart the computer z In a network environment set Never for Put the computer to sleep and Hibernate after Î page 36 About Windows related files Network Connections and Com...

Page 99: ...es between the com puter and the manuals z Trademarks Microsoft Windows Windows Vista and the Windows logo are registered trademarks or trademarks of Microsoft Corporation of the United States and or other countries Intel Core and Centrino are either registered trademarks or trademarks of Intel Corporation SDHC Logo is a trademark Adobe the Adobe logo and Adobe Reader are either registered tradema...

Reviews: