background image

Operating Instructions

[For assistance, please call: 1-800-272-7033]

71

Note

Click [Delete Buffered Images] to delete images already buffered. 

Click [Save] to save the settings. The buffered images will be deleted.

Clicking [Cancel] takes you back to the Trigger page without saving 
changes.

4.

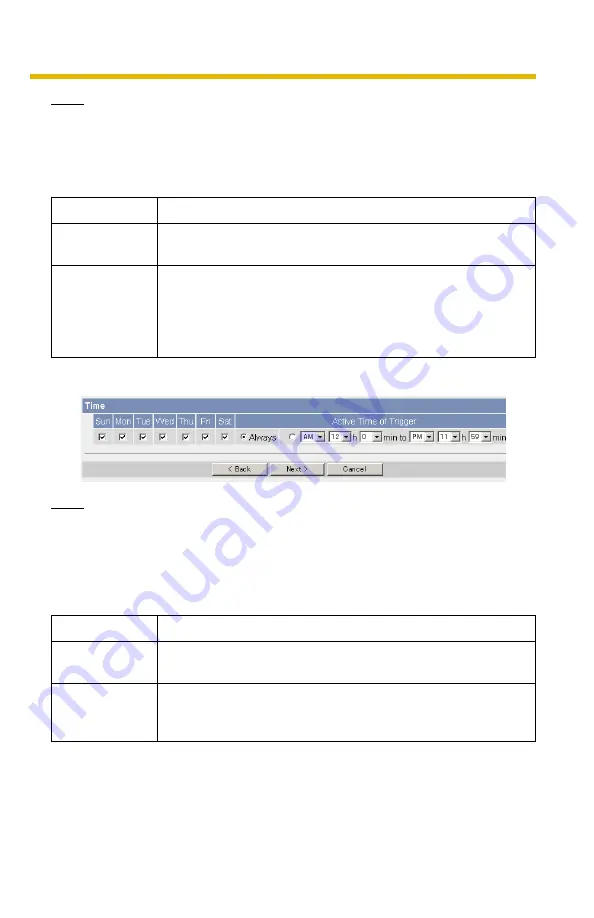
Set the time, and click [Next>].

Note

The timer works by an internal clock. Set the date and time before using timer 
buffer/transfer (see page 48). 

Clicking [<Back] takes you back to the previous page.

Clicking [Cancel] takes you back to the Trigger page without saving 
changes.

Setting

Description

Enable Image 
Buffer/Transfer 

Check the box to enable the Trigger setting. Uncheck the 
box to disable it.

Trigger

Selecting [Timer] enables the camera to buffer/transfer 
images during the specified date and time by timer.

Selecting [Motion Detection] enables the camera to buffer/
transfer images when the motion is detected during the 
specified date and time.

Setting

Description

Day of the week  •

Check the box to enable the day. Uncheck the box to 
disable it. 

Active Time of 
Trigger 

To set a trigger time, check the time option and set a time 
period. Check [Always] if you are not specifying a time 
period.

Summary of Contents for BL-C1A - Network Camera

Page 1: ...ead this manual before using and save this manual for future reference Panasonic Network Camera Website http panasonic net pcc ipcam BL C1A BL C20A Network Camera Indoor Use Only Model No BL C1A BL C20A Wired Type Wireless Wired Type ...

Page 2: ...imum of 12 cameras can be displayed on a single page DynamicDNS Service Support DynamicDNS service allows you to access the camera over the Internet with a domain name of your choice e g bob viewnetcam com instead of a global IP address Multi Language Display The Top page Single Camera and Multi Camera page can be displayed in English French German Italian Spanish Russian Simplified Chinese Korean...

Page 3: ...d Reader are either registered trademarks or trademarks of Adobe Systems Incorporated in the United States and or other countries Microsoft Windows Hotmail and ActiveX are either registered trademarks or trademarks of Microsoft Corporation in the United States and or other countries Screen shots reprinted with permission from Microsoft Corporation All other trademarks identified herein are the pro...

Page 4: ...e page 96 Lens Focus 0 3 m about 11 13 16 inches Unlimited Power on Normal Operation 2 Updating Firmware Getting IP address 3 Got IP address Setting Finished setting Not on LAN Orange blinking Orange blinking The camera is reset to factory default status after 1 minute FACTORY DEFAULT RESET button pressed Orange blinking Turning off about 5 seconds UPnPTM Failure Orange blinking About a 2 second i...

Page 5: ... 1 800 272 7033 5 BL C1A Rear View Stand Tripod Mounting Hole See Getting Started Serial number MAC Address See Getting Started Ethernet LAN port See Getting Started Hook for AC adaptor cord DC IN jack See Getting Started FACTORY DEFAULT RESET Button ...

Page 6: ...DEFAULT RESET Button Indicator The indicator color shows camera status Lens 0 3 m about 11 13 16 inches Unlimited Stand Tripod Mounting Hole See Getting Started Switch WIRED or WIRELESS Ethernet LAN port See Getting Started Hook for AC adaptor cord Serial number MAC Address See Getting Started DC IN jack See Getting Started ...

Page 7: ... Camera s Basic Features 28 2 1 Setup Page of the Camera 28 2 2 Connecting the Camera to Your Network 31 2 3 For BL C20A Using Wireless LAN 36 2 4 Using UPnP Universal Plug and Play 39 2 4 1 Connecting the Camera to a Router that Supports UPnP 40 2 4 2 Connecting the Camera to a Router that does not Support UPnP 41 2 5 Registering with the DynamicDNS service 42 2 5 1 DynamicDNS Service 46 2 6 Sett...

Page 8: ...the Wireless Status 99 6 1 3 Confirming Session Status 99 6 1 4 Confirming Sensor Logs 100 6 1 5 Restarting the Camera 100 6 1 6 Updating the Camera Firmware 101 6 1 7 Creating a Configuration File 104 6 1 8 Loading Settings from a Configuration File 105 6 1 9 Resetting the Camera to Factory Default 106 6 2 Support page 107 6 2 1 The Help page 107 6 2 2 For BL C20A The Wireless Help page 108 6 2 3...

Page 9: ...erver Settings on a Web Browser 128 7 5 2 Setting UPnP to Display Camera Shortcut in My Network Places 131 7 5 3 Setting the Internet Temporary File Setting on the Web Browser 131 7 6 ASCII Character Table 132 7 7 File Size and Number of Buffered Images 133 7 8 Specifications 136 Index 139 ...

Page 10: ...ber in the address See page 33 for details about the port number If the camera image is not displayed see page 9 and page 10 of the Troubleshooting on the CD ROM 3 The Enter Network Password window is displayed Enter the user name and password that you set previously and click OK Note When Permit access from guest users is set on the Security Administrator page see page 52 the authentication windo...

Page 11: ...nally when Do not permit access from guest users or Permit access from guest users mobile only is set on the Security Administrator page see page 52 the Login tab will not be displayed A To Single Camera page page 12 B To Multi Camera page page 20 C To Buffered Image page page 22 D To Setup page page 28 E To Maintenance page page 98 F To Support page page 107 G To log in to the camera page 56 A B ...

Page 12: ...ital zoom can be operated only when displaying video Motion JPEG The refresh interval is set to Motion by default The setting can be changed on the operation bar see page 19 The refresh interval may change depending on the network condition PC performance what object you view and the number of simultaneous users When displaying video Motion JPEG the camera allows up to 20 simultaneous accesses The...

Page 13: ...d them from the Panasonic Network Camera support website at http panasonic net pcc support netwkcam Error messages and screen color When general or guest users access the Single Camera page outside the Operation Time or when over 20 the maximum number users access the page simultaneously a gray screen and error messages will be displayed on the page Error Message Cause and Remedy The operation tim...

Page 14: ...veX Controls 2 Check Enable in Run ActiveX Controls and plug ins ActiveX Controls can be installed from the CD ROM 1 Restart the PC 2 Confirm that Internet Explorer is closed 3 Double click ocx install bat on the CD ROM Note When the IP address was changed for the camera enter it on the address bar Video Motion JPEG may not be displayed Wait for a moment If you use a proxy server set the web brows...

Page 15: ...rity Warning window on Microsoft Windows XP Service Pack 2 To view a video Motion JPEG ActiveX Controls must be installed Follow the steps shown below to install ActiveX Controls 1 Click the warning displayed above the tabs and click Install ActiveX Control 2 Click Install ...

Page 16: ...er Display is not enabled as the default 1 2 2 Auto Centering the Image Click to Center Using your mouse click any portion of the camera image when using the digital zoom The image will automatically move to place the selected point in the center of the screen 1 Move the cursor to the desired point 2 Click it The clicked point is centered Note A clicked position may deviate from the center dependi...

Page 17: ...ble while zooming in or out Images can only be moved within the page when magnification is 1 As the magnification increases the image quality decreases This feature is not available when viewing on a cell phone When camera images are buffered and transferred the camera images are not zoomed in and out Clicking the right mouse button Moving the mouse up or down while pressing the right mouse button...

Page 18: ...lution to display an image 2 Click the Capture image button The camera image opens in another window 3 Right click the image and select Save Picture As The Save as dialog box is displayed 4 Specify a folder enter the file name and click Save The camera image is saved in the folder 5 Click Close Capture Image Button ...

Page 19: ...dard Clicking or darkens or brightens the image respectively Refresh Interval Sets a refresh interval Motion 60 second interval Resolution Selects 640 480 or 320 240 default pixels Image Quality Selects the image quality Favor Clarity optimizes the image for good clarity Standard keeps the standard quality default Favor Motion optimizes the image for motion display ...

Page 20: ...b at the top of the page The Multi Camera page can display up to 12 camera images 3 Close the web browser Capture Image Button See page 18 Switches displayed cameras If you select All at the View Type video Motion JPEG cannot be displayed Selects 320 240 default or 160 120 pixels resolution Selects the refresh interval Motion 60 second interval Clicking the camera name displays the Single Camera p...

Page 21: ...the Multi Camera page you may need 3 to 4 Mbps bandwidth If sufficient bandwidth is not available the refresh interval may increase The Click to Center feature can be used while using the digital zoom When an image is not displayed on the Multi Camera page Confirm that the global IP address is specified correctly for each camera and that each camera is connected to the Internet For Internet access...

Page 22: ... transfer settings see page 60 or page 70 Buffered images can be viewed on this Buffered Image page 1 Access the camera see page 10 The Top page is displayed 2 Click the Buffered Image tab at the top of the page 3 Click the trigger number The trigger number is displayed see page 60 or page 70 The trigger is displayed see page 60 or page 70 ...

Page 23: ...camera can buffer about 250 frames If 3 triggers are enabled maximum 5 triggers the internal memory capacity is divided into 3 sections In this case each trigger can buffer about 80 frames See page 133 for more details regarding the internal memory capacity The digital zoom can be used while viewing buffered images while playing video Motion JPEG The Click to Center feature can be used while using...

Page 24: ...page see page 60 or page 70 Note If you are buffering images to the internal memory the following operations also delete all buffered images Turning off the camera Saving the Date and Time page Restarting updating firmware or resetting the camera to factory default Changing the Enable Disable settings on the Image Buffer Transfer page See page 60 or page 70 ...

Page 25: ...displayed enter the administrator s or general user s user name and password A still image is displayed Video Motion JPEG cannot be displayed E g http 50000 mobile or viewnetcam com 50000 mobile Pressing 5 will refresh the image 160 120 resolution is displayed on the first access Pressing 0 switches the resolution to 320 240 Displays up to 50 Logs in order of time Only for an administrator An admi...

Page 26: ...nic Network Camera Some cell phones display images at a decreased size If Permit access from guest users or Permit access from guest users mobile only is selected users can access cell phone specific screens via a cell phone or PC without the need for authentication Only administrators can operate the Sensor log and Buffer Transfer Panasonic Network Camera support website http panasonic net pcc su...

Page 27: ...istrator see page 25 2 Select Buffer Transfer 3 Select a trigger number that you want to enable or disable Example Enabling the Buffer Transfer setting No 1 Selecting Control Page changes to the previous page 4 Select Save Selecting Save enables or disables the buffer transfer settings and all buffered images will be deleted Selecting Cancel takes you back to the previous page without saving chang...

Page 28: ...Permit access from guest users is set on the Security Administrator page click the Login tab see page 56 and log in as an administrator When users other than an administrator are accessing the camera the Setup and Maintenance tabs are not displayed 2 Click the Setup tab at the top of the page 2 3 4 5 6 7 8 9 10 11 12 13 14 15 1 The feature is for only BL C20A ...

Page 29: ...ent and daylight saving time settings see page 48 6 Camera Sets camera name white balance AC power source frequency and color night view see page 50 Account 7 Administrator 1 Sets authentication and administrator security user name and password see page 52 8 General User 1 Sets general user security user name and password and access levels see page 57 Buffer Transfer 9 Trigger Sets image buffer or...

Page 30: ...ra IP address or host name and camera name on the Multi Camera page maximum 12 cameras see page 92 14 Operation Time Sets the time period to display camera images see page 94 15 Indicator Control Sets the indicator display see page 96 1 If you change the Administrator General User Multi Camera page settings or Limit Continuous Motion JPEG setting changes will not be applied to video Motion JPEG vi...

Page 31: ...of each connection mode 3 Enter each parameter in the relevant data field Automatic Setup The camera automatically obtains the network settings subnet mask default gateway and DNS server address using the router s DHCP feature The camera also automatically searches for an unused IP address on your network If you select Yes for Allow Access from the Internet the camera automatically enables port fo...

Page 32: ... 99 5 Click Restart The camera restarts and the Top page is displayed When the camera is restarted all buffered images in the internal memory are deleted Checking Yes for Allow Access from the Internet on Automatic Setup may not display the Top page because the port number may change Use the Setup Program to access the camera DHCP Setup Static Setup Clicking Cancel takes you back to the previous p...

Page 33: ... To prohibit the Setup Program from changing the network settings uncheck the box Port Number Static DHCP Only The default port number is 80 When you use multiple cameras with a router on your network each camera must be assigned its own port number see page 41 2 4 2 Connecting the Camera to a Router that does not Support UPnP Do not set the following port numbers FTP 20 and 21 Telnet 23 SMTP 25 D...

Page 34: ...ransferring camera images by E mail or FTP Setting cameras by their host names on the Multi Camera Setup page Using the DynamicDNS service Using the sensor log notification If you have been assigned a DNS server addresses by your ISP or network administrator enter them in this data field There are usually two addresses Set 4 numbers 0 255 and 3 periods such as 192 168 0 253 Note that 0 0 0 0 and 2...

Page 35: ...Auto Negotiation normally For wireless connection BL C20A only Auto Negotiation must be selected If the camera cannot be accessed see page 9 of Troubleshooting on the CD ROM 1 If the IP address is automatically obtained from a DHCP server this field does not need to be set Setting Description ...

Page 36: ...lpha numeric and is case sensitive Communication mode 802 11b There are a lot of 802 11b compliant products and they are inexpensive They are widely prevalent so it is likely that 802 11b will match your existing wireless devices 802 11b g default This mode supports both the 802 11b and 802 11g wireless LAN standards It is the communication mode that is easiest to install on your existing wireless...

Page 37: ... HEX 26 characters 128 bit HEX 32 characters 152 bit ASCII 5 characters 64 bit ASCII 13 characters 128 bit or ASCII 16 characters 152 bit Selecting WEP at Cipher enables you to set WEPKey1 4 One or all of the four keys can be set Check the same key number as set to the wireless router and set the same encryption as at the wireless router Example HEX 10 characters 64 bit 012345abcd HEX 26 character...

Page 38: ...ddress filtering feature on the wireless router The wireless module MAC address is one value higher than the camera MAC address It takes about 1 minute for the new settings to become effective It is not possible to access the camera simultaneously by both wired and wireless connection To communicate using wireless connection set up the camera using wired connection and flip the switch from WIRED t...

Page 39: ...UPnPTM is enabled on the router set Enable for auto port forwarding 1 Click UPnP on the Setup page 2 Set up UPnP Setting Description Auto Port Forwarding If the network setting is Static or DHCP enabling auto port forwarding allows you to access the camera from the Internet Note If the network setting is Automatic Setup also enable Allow Access from the Internet on the Network page see page 33 Dis...

Page 40: ... a router supporting UPnPTM follow the procedures shown in Getting Started Note On some routers the UPnPTM feature is disabled by default Enable your router s UPnPTM feature following the router manual before you set up the camera See the Panasonic Network Camera support website at http panasonic net pcc support netwkcam for details If a maximum idle time is set in PPPoE or PPTP connection with yo...

Page 41: ...P address for a global one Each camera must be assigned a unique port number 1 Access the camera see page 10 2 Click the Setup tab at the top of the page 3 Select Static on the Network page The Static IP Address Configuration page is displayed Make a note of the IP address and port number since they are required to enable port forwarding on the router 4 Click Save without changing the settings 5 C...

Page 42: ...ing with a DynamicDNS to access the camera from the Internet See http www viewnetcam com for details about the Viewnetcam com service 1 Click DynamicDNS on the Setup page When you select Disable or Viewnetcam com see page 42 When you select User specified DynamicDNS see page 44 When you select Disable 2 Click Save The DynamicDNS service is disabled Clicking Cancel cancels your settings without sav...

Page 43: ...ocedures below Personal Camera URL is available after registering with the Viewnetcam com service If port forwarding is not enabled or your network is not connected to the Internet the Viewnetcam com service is not available 7 Register with the Viewnetcam com service following the instructions on the website The Viewnetcam com page is displayed Setting Description Personal Camera URL The camera s ...

Page 44: ...he Camera URL at Viewnetcam com on the Status page restart the camera After that confirm that your registered URL is displayed on the pages Confirming Internet access Due to the router s specifications the image may not be displayed even if you access the camera from your PC on the same LAN as the camera In this case try Accessing from a PC on another network see page 10 Accessing from your cell p...

Page 45: ...o DynamicDNS page The DynamicDNS page is displayed Setting Description DynamicDNS Server URL 1 1 Note that Space and are not available Input URL acquired from the DynamicDNS service industry company Enter 1 255 characters The URL must be started with http Updating time Specify the updating time User Name 2 2 Note that and are not available Input User Name acquired from the DynamicDNS service indus...

Page 46: ...remember address such as bob viewnetcam com that can be used to view images from your camera over the Internet What are the advantages of DynamicDNS service In order to view camera images over the Internet you need to know your camera s global IP address However many Internet Service Providers ISPs assign their customers a dynamic IP address that changes monthly weekly or each time they log on Unl...

Page 47: ...cDNS address such as bob viewnetcam com 4 When you enter your DynamicDNS address in your web browser while away from home or the office the DNS server looks up the global IP address assigned to your DynamicDNS address 5 The DNS server finds your current global IP address and allows you to connect to your camera Note Ask your ISP about what type of IP address you are using Some ISPs assign you a lo...

Page 48: ...ngs of the trigger setting sensor log operation time and Buffered Image page Note Saving a new date and time deletes all buffered images on the internal memory 1 Click Date and Time on the Setup page 2 Set each parameter Set Automatic Time Adjustment to synchronize the time automatically with an NTP server Clicking Cancel cancels your settings without saving changes ...

Page 49: ...nizes the camera s internal clock automatically every day Check the box to enable it Set the NTP server IP address Set 4 numbers 0 255 and 3 periods such as 192 168 0 253 Note that 0 0 0 0 and 255 255 255 255 are not available Set a host name 1 255 characters Note that Space and are not available Select your time zone Note The camera will not synchronize to the NTP server if there is more than a 1...

Page 50: ...ra on the Setup page 2 Set each parameter Clicking Cancel cancels your settings without saving changes Setting Description Camera Name The camera name is displayed on the Single Camera page Enter ASCII characters see page 132 or characters from other languages 1 15 characters for a 1 byte character and 1 7 characters for a 2 byte character Note that Space and are not available ...

Page 51: ...re AC Power Source Frequency This setting may correct flickering caused by power line frequency 60 Hz default 50 Hz Select 60 Hz in the United States Color Night View In the color night view mode the camera image becomes brighter in a low illuminance The camera image returns to normal operation in a bright location If you enable the color night view mode refresh interval may increase Subjects that...

Page 52: ...mit access from guest users permitting access without a User Name or Password or Permit access from guest users mobile only permitting access without a User Name or Password at General Authentication risks the images being viewed by third parties Control the contents of the images accordingly IMPORTANT It is important to limit access to the camera by use of a unique User Name and a secret Password...

Page 53: ... a user name and password Note If you set Permit access from guest users Login tab is displayed at the top of the page After you log in as an administrator see page 56 the Setup page and the Maintenance page can be accessed If you set Permit access from guest users mobile only an authentication window is not displayed even if you access the cell phone page All guest users can view images without a...

Page 54: ...When finished Success is displayed 4 Click Go to Security Administrator page The Security Administrator page is displayed Note When the user name and password have been changed the camera displays an authentication window Enter the user name and password and click OK User Name Password User Name 6 to 15 characters Enter the user name Password 6 to 15 characters Enter the password Note The password...

Page 55: ...m guest users mobile only on the Security Administrator page see page 52 to allow access from guest users Items Administrator General Users Guest Users User Name and Password Required Required Not Required Number of Users 1 50 Accessible Pages All Pages Pages Except For Setup and Maintenance page Pages Except For Setup and Maintenance page Access Level All Operations Access level can be set for ea...

Page 56: ...er you log in as an administrator the Setup page and the Maintenance page can be accessed 1 Click Login tab at the top of the page 2 Check a login mode and click Login Note The authentication window is displayed Enter the user name and password set for General Users or Administrator 3 Enter a valid user name and password according to the Login mode selected in step 2 and click OK ...

Page 57: ...urity Administrator page the access level can be set for guest users Note For general users the Setup and Maintenance tabs are not displayed 1 Click General User on the Setup page 2 To create a general user click Create When setting Do not permit access from guest users When setting Permit access from guest users or Permit access from guest users mobile only To change the settings of general users...

Page 58: ...st Up to 50 general users can be registered The list is used to modify or delete general user settings User Name Password User Name 6 to 15 characters Enter the user name Password 6 to 15 characters Enter the password Note The password must be different from the user name Retype Password Reenter the password Enter ASCII characters see page 132 Note that Space and are not available Access Level An ...

Page 59: ...sts No Transfer No Memory Overwrite No Transfer Memory Overwrite FTP E mail Transfer Method Select one from the lists No Transfer No Memory Overwrite No Transfer Memory Overwrite FTP E mail Time Setting Image Setting Image Buffer Frequency Setting Time Setting Image Setting Image Buffer Frequency Setting Save the settings to complete Buffer Transfer by Timer Page 60 Save the settings to complete B...

Page 60: ...er 3 Check Enable Image Buffer Transfer and select Timer for the trigger and click Next Note Click Delete Buffered Images to delete images already buffered Click Save to save the settings The buffered images will be deleted Clicking Cancel takes you back to the Trigger page without saving changes Setting Description Enable Image Buffer Transfer Check the box to enable the Trigger setting Uncheck t...

Page 61: ...e previous page Clicking Cancel takes you back to the Trigger page without saving changes Trigger Selecting Timer enables the camera to buffer transfer images during the specified date and time by timer Selecting Motion Detection enables the camera to buffer transfer images when the motion is detected during the specified date and time Setting Description Day of the week Check the box to enable th...

Page 62: ...thout saving changes Setting Description Image Resolution Select an image resolution 640 480 320 240 default or 160 120 pixels for the buffer transfer Image Quality Select the image quality Favor Clarity optimizes for good quality Standard offers standard quality default Favor Motion optimizes for enhanced motion Mobile Phone is for a transfer to a cell phone Note 640 480 pixels cannot be set for ...

Page 63: ...E mail or FTP confirm that the default gateway and DNS server addresses are assigned correctly see page 31 Setting Description No Transfer No Memory Overwrite If the internal memory is full the camera stops buffering No Transfer Memory Overwrite If the internal memory is full the camera deletes the old images and continues to buffer the image FTP The camera transfers the image to an FTP server see...

Page 64: ...s 64 When you set FTP for Transfer Method Select FTP and click Next The following page is displayed Clicking Back takes you back to the previous page Clicking Cancel takes you back to the Trigger page without saving changes ...

Page 65: ...e image buffer frequency value is set within 1 minute the camera logs in to the server only once This can reduce transfer time Upload File Name 1 Set a file name on the FTP server to receive the transferred files Enter 1 232 characters Entering creates directories for a file E g NetworkCamera image jpg Overwrite Setting Selecting Overwrite File overwrites the image on the server with a newer image...

Page 66: ...without saving changes Note The camera works only with an SMTP Simple Mail Transfer Protocol server It does not work with mail servers like Hotmail that use a web browser The subject name by E mail transfer uses only 24 h format The file name is image jpg E g image 20050101093020500 The underlined numbers mean 9h30min20s500ms on January 1 2005 The letter s is inserted after the day when referring ...

Page 67: ... Address 2 Set the sender s E mail address We recommend you to set the administrator s E mail address Destination E mail Address 2 1 3 Set the destination E mail address up to 3 Subject 2 Enter a subject with ASCII characters see page 132 or characters from other languages 0 44 characters for a 1 byte character and 0 22 characters for a 2 byte character Text 2 Enter text with ASCII characters see ...

Page 68: ...iods such as 192 168 0 253 Note that 0 0 0 0 and 255 255 255 255 are not available Or set a host name 1 255 characters Port No Enter a number 1 65535 Usually set to 110 Login ID 2 If your ISP requires a login ID to log in to a POP3 server set it 1 63 characters Password 2 If your ISP requires a password to log in to a POP3 server set it 0 63 characters SMTP authentication Users are authenticated b...

Page 69: ...ed When finished Success is displayed 9 Click Go to Trigger page The Trigger page is displayed Note If you are buffering images to the internal memory the following operations also delete all buffered images Turning off the camera Saving the Date and Time page Restarting updating firmware or resetting the camera to factory default ...

Page 70: ...ng viewed Check the level by performing motion detection recording See page 83 Enabling Motion Detection delays the frame rate of the camera A change to light or wind conditions may detect motions accidentally Motion Detection may not work in dark areas Objects moving fast may not be detected 1 Click Trigger on the Setup page 2 Click a No to enable buffer transfer 3 Check Enable Image Buffer Trans...

Page 71: ...g Cancel takes you back to the Trigger page without saving changes Setting Description Enable Image Buffer Transfer Check the box to enable the Trigger setting Uncheck the box to disable it Trigger Selecting Timer enables the camera to buffer transfer images during the specified date and time by timer Selecting Motion Detection enables the camera to buffer transfer images when the motion is detect...

Page 72: ... Description Image Resolution Select an image resolution 640 480 320 240 default or 160 120 pixels for the buffer transfer Image Quality Select the image quality Favor Clarity optimizes for good quality Standard offers standard quality Default Favor Motion optimizes for enhanced motion Mobile Phone is for a transfer to a cell phone Note 640 480 pixels cannot be set for a transfer to a cell phone ...

Page 73: ...r Check the box to enable the setting The camera buffers or transfers the image right before the motion detection signal is detected Set an interval number of images to buffer and total number see page 133 The number of buffered images may not match the total number due to memory capacity image resolution image quality or what object you view Enable Post trigger Image Buffer Check the box to enabl...

Page 74: ...cannot buffer images during motion deactivation time Because of this images taken before detection are not saved in internal memory and so cannot be received Depending on the settings for image buffer transfer even if it is set to for example take 1 image per second and store 10 images before detection because the images are not stored in internal memory if the Motion Detection detects something d...

Page 75: ...E mail or FTP confirm that the default gateway and DNS server addresses are assigned correctly see page 31 Setting Description No Transfer No Memory Overwrite If the internal memory is full the camera stops buffering No Transfer Memory Overwrite If the internal memory is full the camera deletes the old images and continues to buffer the image FTP The camera transfers the image to an FTP server see...

Page 76: ...s 76 When you set FTP for Transfer Method Select FTP and click Next The following page is displayed Clicking Back takes you back to the previous page Clicking Cancel takes you back to the Trigger page without saving changes ...

Page 77: ...e image buffer frequency value is set within 1 minute the camera logs in to the server only once This can reduce transfer time Upload File Name 1 Set a file name on the FTP server to receive the transferred files Enter 1 232 characters Entering creates directories for a file E g NetworkCamera image jpg Overwrite Setting Selecting Overwrite File overwrites the image on the server with a newer image...

Page 78: ...8 When you set E mail for Transfer Method Select E mail and click Next The following page is displayed Clicking Back takes you back to the previous page Clicking Cancel takes you back to the Trigger page without saving changes ...

Page 79: ... numbers 0 255 and 3 periods such as 192 168 0 253 Note that 0 0 0 0 and 255 255 255 255 are not available Or set a host name 1 255 characters Port No Enter a number 1 65535 Usually set to 25 Reply E mail Address 2 Set the sender s E mail address We recommend you to set the administrator s E mail address Destination E mail Address 2 1 3 Set the destination E mail address up to 3 Subject 2 Enter a ...

Page 80: ...iods such as 192 168 0 253 Note that 0 0 0 0 and 255 255 255 255 are not available Or set a host name 0 255 characters Port No Enter a number 1 65535 Usually set to 110 Login ID 2 If your ISP requires a login ID to log in to a POP3 server set it 1 63 characters Password 2 If your ISP requires a password to log in to a POP3 server set it 0 63 characters SMTP authentication Users are authenticated b...

Page 81: ...en Triggered page is displayed Enter the settings referring to page 78 page 80 9 Click Save after confirming the settings The new settings are saved When finished Success is displayed Setting Description Disable The camera does not send an E mail notification when buffering or transferring images Enable The camera sends an E mail notification up to 3 destinations when buffering or transferring ima...

Page 82: ...nishes all transfers For example if the camera transfers 3 images per minute and 6 images in total by setting 1 minute for motion deactivation time the sensor will follow the pattern below If you are buffering images to the internal memory the following operations also delete all buffered images Turning off the camera Saving the Date and Time page Restarting updating firmware or resetting the came...

Page 83: ...vel 4 Click Save to save the settings Clicking Cancel cancels your settings without saving changes 5 Click Go to Motion Detection page The Motion Detection page is displayed Preview Display the current threshold and detection level The threshold is the line between the green and red bar The detection level is the line between the dark red and light red color Note The Threshold and Sensitivity sett...

Page 84: ...not recommended for uses that require a high reliability constantly such as surveillance etc What is the threshold The threshold is the minimum value for the camera to detect motions on the image during the motion detection buffering Setting the threshold lower allows subtler changes to be detected Setting the threshold higher allows only bigger changes that might occupy half the image to be detec...

Page 85: ...is designed to alleviate false detections due to overall brightness changes caused by sunlight But in some cases the camera may falsely detect rapid brightness changes by artificial light such as fluorescent light In other cases the motion detection function on the Network Camera Recorder may detect objects and brightness changes The way to detect motion differs between the camera and the Network ...

Page 86: ...or Trigger Setting and check Enable 1 Click Sensor Log on the Setup page When enabling the image buffer transfer setting and selecting Motion Detection in the Trigger page the Sensor log window is displayed 2 Set each parameter Note Click Save to save the settings Clicking Cancel cancels your settings without saving changes Clicking Save deletes new arrival sensor logs ...

Page 87: ...as 192 168 0 253 Note that 0 0 0 0 and 255 255 255 255 are not available Or set a host name 1 255 characters Port No Enter a number 1 65535 Usually set to 25 Reply E mail Address 2 Set the sender s E mail address We recommend you to set the administrator s E mail address Destination E mail Address 1 3 2 Set the destination E mail address up to 3 Subject 2 Enter a subject with ASCII characters see ...

Page 88: ...iods such as 192 168 0 253 Note that 0 0 0 0 and 255 255 255 255 are not available Or set a host name 0 255 characters Port No Enter a number 1 65535 Usually set to 110 Login ID 2 If your ISP requires a login ID to log in to a POP3 server set it 1 63 characters Password 2 If your ISP requires a password to log in to a POP3 server set it 0 63 characters SMTP authentication Users are authenticated b...

Page 89: ... the Multi Camera page The Image Display page allows you to change the initial settings display settings when a user accesses the camera for the Single Camera Multi Camera Limit Continuous Motion JPEG Language and Banner Display 1 Click Image Display on the Setup page 2 Set each parameter Clicking Cancel cancels your settings without saving changes ...

Page 90: ...PEG Limit time of Continuous Motion JPEG Refresh Interval Set the time to change the video Motion JPEG to still images 10 seconds Unlimited Set a refresh interval after the image is changed to still images 3 second interval 60 second interval Language Select the initial language from English Japanese French German Italian Spanish Simplified Chinese Russian or Korean The selected language is displa...

Page 91: ...gle page burdens the PC that stores the image linked with the URL If the image URL linked with an image stored in a PC that requires an authentication is set the authentication window will be displayed when displaying the Single page Banner user All users The banner can be displayed for all users Administrator only The banner can be displayed for the administrator General user only The banner can ...

Page 92: ...Click Multi Camera on the Setup page 2 Click Add Note If you click the camera number the modification page is displayed Camera settings can be modified or deleted here If you configured multiple cameras you can change the camera number Select the number and click Move 3 Set each parameter Clicking Cancel cancels your settings without saving changes By clicking Clicking this link enters this camera...

Page 93: ...s box to enable the camera IP Address 1 or Host Name 2 Set an IP address or host name to enable the camera Port No Set a port number 1 65535 Camera Name 3 This camera name is displayed only on the Multi Camera page 1 Set 4 numbers 0 255 and 3 periods such as 192 168 0 253 Note that 0 0 0 0 and 255 255 255 255 are not available 2 Enter ASCII characters for the host name see page 132 Note that Space...

Page 94: ...sed if the time period is set incorrectly Confirm the time period after the setup If you access the camera as an administrator you can view the image outside the time period 1 Click Operation Time on the Setup page 2 Click a No to set the operation time Note If No 1 7 are disabled the camera can always be operated 3 Check Enable set the time and click Save Clicking Cancel takes you back to the pre...

Page 95: ...ettings Therefore if Monday or Tuesday is disabled in a setting but enabled in other settings the camera can be operated on both Monday and Tuesday Setting Description Enable Check the box to enable the setting Uncheck the box to disable it Day of the week Check the box to enable the day Uncheck the box to disable it Operation Time To set an operation time check the time option and set a time peri...

Page 96: ...nges Note See page 4 for the Indicator Display table Selecting Never turn indicator on keeps indicator always off 3 Click Save when finished The new settings are saved When finished Success is displayed 4 Click Go to Indicator Control page The Indicator Control page is displayed Setting Description Turn indicator on whencamera is on The indicator always turns on or blinks See page 3 and page 4 of ...

Page 97: ...ngs to be changed from browsers external devices or software applications and decreases security Only disallow settings from browsers Only disallows camera setting changes from browsers Do not allow setting changes Restricts camera setting changes from browsers external devices or software applications and increases security 4 Click Save Note When using Network Camera Recorder software or Wireless...

Page 98: ...isplays information on access to the camera see page 99 4 Sensor Log Displays sensor logs see page 100 5 Restart Restarts the camera see page 100 6 Update Firmware Updates the camera firmware see page 101 7 Save Settings Creates a configuration file see page 104 8 Load Settings Loads settings from a configuration file see page 105 9 Reset to Factory Default Resets the camera to its default setting...

Page 99: ...site at http panasonic net pcc support netwkcam for details about status information 6 1 2 For BL C20A Confirming the Wireless Status The Wireless Status page allows you to check the status of the wireless connection The wireless status information provides support for troubleshooting regarding wireless connection Clicking Wireless Status displays the following page 6 1 3 Confirming Session Status...

Page 100: ...tor from the outlet and reconnecting it again The camera can also be restarted on the Restart page Note When the camera is restarted the buffered images and sensor logs will be deleted 1 Click Restart on the Maintenance page 2 Click Restart Restarting takes about 1 minute for BL C1A or about 90 seconds for BL C20A The Top page is displayed when finished Item Description New Sensor Logs Displays th...

Page 101: ...on the internal memory will be deleted after the firmware update The firmware version is displayed on the Top page and the Status page 1 Download the new firmware from the Panasonic Network Camera support website at http panasonic net pcc support netwkcam and save it on your PC 2 Click Update Firmware on the Maintenance page 3 Click Update Firmware The procedure can take up to 7 minutes for BL C1A...

Page 102: ...the firmware including directory information and click Open The firmware file name is displayed 6 Confirm the firmware file name and click Update Firmware Clicking Cancel takes you back to the Top page without updating the firmware The following message is displayed during the update Wait about 5 minutes for both BL C1A and BL C20A The camera restarts automatically after the update The Top page is...

Page 103: ...ating Instructions For assistance please call 1 800 272 7033 103 7 Confirm that the version number on the Top page is updated If the version number is updated the firmware update is complete Updated version ...

Page 104: ...age 2 Click Save 3 Click Save on the File Download dialog box 4 Specify the location and click Save on the Save As dialog box The configuration file is saved at that location Note The file extension dat cannot be changed If you change it the settings cannot be loaded If you try to update the camera create a configuration file after updating the firmware If there is a firmware version difference be...

Page 105: ...re also loaded If you try to update the camera create a configuration file after updating the firmware If there is a firmware version difference between the camera that you create a configuration file from and the camera that you try to load settings to the settings may not have been loaded to the camera 1 Click Load Settings on the Maintenance page 2 Click Browse 3 Select the configuration file o...

Page 106: ...dress subnet mask etc are reset to factory default If the camera is reset to factory default the network connection mode changes to Automatic Setup Reconfigure the camera referring to Getting Started Note The internal clock will not be reset but the time format will return to AM PM mode see page 48 See page 110 page 118 for the default settings Pressing the FACTORY DEFAULT RESET button resets the ...

Page 107: ...llowing features Clicking Help on the Support page displays the following page Support 1 Help Displays the Help page see page 107 2 For BL C20A Wireless Help Displays the Wireless Help page see page 108 3 Product Information Displays the product information website see page 108 4 Support Information Displays the support information website see page 108 1 2 3 4 ...

Page 108: ...ator 6 2 3 Product Information See the Panasonic Network Camera support website for product information Clicking Product Information on the Support page displays the URL click it Note If the camera is not connected to the Internet the website cannot be displayed 6 2 4 Support Information See the Panasonic Network Camera support website for product information Clicking Support Information on the Su...

Page 109: ...BL C20A see Getting Started To reset the camera press the FACTORY DEFAULT RESET button for 1 second when the camera is on The indicator blinks orange and then turns off for 5 seconds Do not turn off the camera during the reset operation The reset operation takes about 1 minute Note The internal clock will not be reset but the time format will return to AM PM mode see page 48 See page 110 page 118 ...

Page 110: ...s not available 2 IP address Static only 192 168 0 253 When setting Static 1 Subnet Mask Static only 255 255 255 0 When setting Static 1 Host Name DHCP only Blank When setting DHCP Not always required 0 63 characters 4 Default Gateway Static DHCP only Blank When using Gateway 1 DNS Server 1 DNS Server 2 Static DHCP only Blank When using DNS 1 Max Bandwidth Usage Mbps Unlimited 0 1 0 2 0 3 0 5 1 or...

Page 111: ...Key 1 4 ASCII 13 Characters 128 bit Blank UPnP Auto Port Forwarding Disable Display Shortcut Icon in My Network Places Enable Dynamic DNS DynamicDNS Disable Viewnetcam com User specified DynamicDNS Disable DynamicDNS Server URL Blank When using User specified DynamicDNS 1 255 characters 8 Updating time 10 min At the time of starting 10 30 min 1 3 6 12 24 h User Name Blank 0 63 characters 9 Passwor...

Page 112: ... GMT 05 00 Adjust Clock for Daylight Saving Time No check Start Day Apr First Sunday 2 AM End Day Oct Last Sunday 2 AM Camera Camera Name Network Camera Required 1 15 characters 6 White Balance Auto Auto Fixed Indoor Fixed Fluorescent White Fixed Fluorescent Daylight Fixed Outdoor AC Power Source Frequency 60Hz 50Hz 60Hz Color Night View Enable Enable Disable Items Default Required Note ...

Page 113: ...strator 6 15 characters 3 Retype Password Blank When setting administrator 6 15 characters 3 CGI interface Only disallow settings from browsers Allow setting changes Only disallow settings from browsers Do not allow setting changes General User User ID List Blank User Name Blank When setting general user 6 15 characters 3 Password Blank When setting general user 6 15 characters 3 Retype Password B...

Page 114: ... 480 Image Quality Standard Favor Clarity Standard Favor Motion Mobile phone Image Buffer Frequency Every 1 s buffer 1 image 1 image per hour 15images per second Motion deactivation time None When selecting Motion Detection None 10 30 s 1 3 5 10 min Transfer Method No Transfer No Memory Overwrite Notify Disable When selecting Motion Detection Motion Detection Threshold Third blocks from the left S...

Page 115: ...o new arrival sensor log Disable Enable When there is no new arrival sensor log Enable Active Time Checked Time PM 12 h 0 min AM PM 1 12 h 0 10 20 30 40 50 min Notice setup of a sensor log Blank Port No SMTP 25 2 Port No POP 110 2 Subject Sensor Log How to authenticate No authentication No authentication POP before SMTP authentication SMTP authentication Items Default Required Note ...

Page 116: ...age Quality Standard Favor Clarity Standard or Favor Motion Multi Camera Refresh Interval Motion When reducing traffic 3 5 10 30 60 s or Motion Limit time of Continuous Motion JPEG Unlimited Unlimited 10 30 s 1 5 10 30 60 min Refresh Interval 30 s 3 5 10 30 60 s Language English English Japanese French German Italian Spanish Simplified Chinese Russian Korean Banner Display No check When displaying...

Page 117: ...cters Port No When setting Multi Camera 20 21 25 and 110 are not available 2 Camera Name BL C1A For BL C1A BL C20A For BL C20A When setting Multi Camera 1 15 characters 7 Change Camera Order From No 1 To No 1 No 1 No 12 Operation Time Operation Time Always Indicator Control Indicator Control Turn indicator on when camera is on Turn indicator on when camera is on Turn indicator on during camera acc...

Page 118: ... You can enter a ASCII characters see page 132 Note that Space and are not available 6 You can enter a ASCII characters see page 132 or characters from other languages 1 15 characters for a 1 byte character and 1 7 characters for a 2 byte character Note that Space and are not available 7 You can enter a ASCII characters see page 132 or characters from other languages 1 15 characters for a 1 byte c...

Page 119: ...Note Do not use alcohol polishing powder cleanser benzine thinner wax petroleum products or hot water to wipe the camera Also avoid glass cleaner pesticide or hair spray They may cause change in the shape or color of the camera Do not directly touch the lens Fingerprints may cause an unclear image 7 2 2 Cleaning the Lens A dusty lens may cause unclear images Remove the dust with a cotton bud Note ...

Page 120: ...hown below Set an IP address within the range specified in the class corresponding to your local network OS Steps Windows XP Start Settings Control Panel Network and Internet Connections Network Connections Local Area Connection in use Properties Select Internet Protocol TCP IP Properties Use the following IP address Windows 2000 Start Settings Control Panel Network and Dial up Connections Local A...

Page 121: ...ng the Static or DHCP setting Displaying the Setup page Finding the camera 1 Insert the CD ROM into the CD ROM drive of your PC If the Panasonic Network Camera Setup window does not appear click setup exe on the CD ROM 2 Click Camera Setup Displays version information about this program Sets up the camera Displays the camera manuals If your PC does not have Adobe Acrobat Reader install it from the...

Page 122: ...P address and port number by looking up the MAC address of your camera Note When trying to find multiple cameras the MAC address on the rear side verifies which camera you are setting up See page 125 for details about setup from the MAC address Camera Status Camera List window Port No MAC Address IP Address ...

Page 123: ...r Manual Setup 1 Click Execute on the Camera List window shown on page 122 2 Click the corresponding button Note See Getting Started for local and Internet access setup Sets up the camera to be viewed on the LAN Sets up Internet access to the camera Manually sets up the camera Displays the Setup page see page 28 ...

Page 124: ...page 33 page 35 If more than 20 minutes have passed since the camera was turned on the camera cannot be set up from the Setup Program If the camera cannot be set up restart the camera If Camera setup completed is displayed click Close to finish Manual Setup 3 Close all Setup windows ...

Page 125: ...our PC If you cannot disable your firewall or antivirus software you can set up the camera using the camera MAC address as shown below 1 Enter the camera MAC address in the data field and click Set up camera Note The camera s MAC address can be found on the sticker affixed to the rear of the camera see page 5 or page 6 2 After confirming the network settings click OK After about a minute the Secur...

Page 126: ...the user name and password that you set above and click OK 5 When the Single Camera page is displayed the setup is complete If a Security Warning window is displayed click Yes See page 14 See page 15 for Security Warning window when using Microsoft Windows XP Service Pack 2 6 For BL C20A Configure wireless configuration See page 36 ...

Page 127: ...uter that supports UPnP 1 Enable the Auto Port Forwarding feature on the UPnP page see page 39 2 Register with the DynamicDNS service on the DynamicDNS page see page 42 3 Confirm that the camera can be accessed from the Internet see page 10 If you cannot access the camera see page 9 of the Troubleshooting on the CD ROM When you are using a router that does not support UPnP Follow the procedures sh...

Page 128: ...rewall of a proxy server in a corporate environment may prevent access to the camera Consult your network administrator Note A proxy server is used to protect your network when connected to the Internet If the camera is accessed via a proxy server problems may occur Consult your network administrator before installing the camera If the camera is accessed via a proxy server the refresh interval may...

Page 129: ...Click the Connections tab and click LAN Settings 4 See if the Use a proxy server for your LAN check box is checked or not If checked click Advanced If not checked click Cancel Proxy settings are not required See if this check box is checked or not If checked click Advanced ...

Page 130: ...Operating Instructions 130 5 Enter the camera s IP address into the Do not use proxy server for addresses beginning with data field Example 192 168 0 253 6 Click OK ...

Page 131: ... Steps Windows XP Start Settings Control Panel Add or Remove Programs Add Remove Windows Components Select Networking Services Details Check UPnP User Interface OK Next Complete Windows XP Service Pack 2 Start Settings Control Panel Add or Remove Programs Add Remove Windows Components Select Networking Services Details Check Internet Gateway Device Discovery and Control Client and UPnP User Interf...

Page 132: ...erating Instructions 132 7 6 ASCII Character Table space 0 1 2 3 4 5 6 7 8 9 ASCII Character Table A B C D E F G H I J K L M N O P Q R S T U V W X Y Z _ a b c d e f g h i j k l m n o p q r s t u v w x y z ...

Page 133: ...if images cannot be transferred due to server or network failure the maximum number of buffered transferred images will remain the same Example Image Resolution 320 240 Image Quality Standard The maximum number of buffered images for each setting About 250 The number of enabled settings Resolution Items Capture Favor Clarity Standard Favor Motion Mobile phone 640 480 pixels File Size About 60 KB A...

Page 134: ...5 The maximum number of buffered images for each setting About 250 About 120 About 80 About 60 About 50 The number of enabled settings 1 2 3 4 5 The maximum number of buffered images for each setting A About 250 About 120 About 80 About 60 About 50 The maximum number of Enable Pre trigger Image Buffer images B Approx one third of A About 80 About 40 About 25 About 20 About 15 The actual number of ...

Page 135: ...es in the Pre trigger memory β are moved to the buffered image memory γ so that they can be seen by the user Post trigger images are stored in the buffered image memory γ The Pre trigger memory β is used for buffering new Pre trigger images and not storing buffered images Used for buffering new Pre trigger images Post trigger images are stored D About 90 images C About 170 images Motion is detecte...

Page 136: ...rizontal axis 53 Vertical axis 41 Exposure Auto Other Specifications Items Specifications Video Compression JPEG 3 Levels Video Resolution 640 480 320 240 default 160 120 Buffered Image 1 About 250 frames 320 240 standard Frame rate 2 Max 7 5 frames second 640 480 Max 15 frames second 320 240 or 160 120 Supported Protocols TCP UDP IP HTTP FTP SMTP DHCP DNS ARP ICMP POP3 NTP UPnP Message Transfer C...

Page 137: ...Cord Length About 3 m 9 feet 10 inches Output 9 V DC 750 mA Consumption For BL C1A About 1 7 W For BL C20A About 4 6 W Temperature Operation 5 C 41 F to 40 C 104 F Storage 0 C 32 F to 50 C 122 F Humidity Operation 20 80 No Condensation Storage 20 90 No Condensation 1 The maximum number of frames changes depending on the image quality and resolution 2 Frame rate may slow down depending on the netwo...

Page 138: ...munication mode Communication Standard IEEE 802 11b 802 11b g 802 11g exclusive Data Transfer Mode IEEE 802 11b Direct Sequence Spectrum Spread DS SS IEEE 802 11g Orthogonal Frequency Division Multiplexing OFDM Frequency Range 2 412 2 462 GHz Channel 1 11 Security WEP 64 128 152 bit SSID ...

Page 139: ...Operating Instructions 139 Index ...

Page 140: ... 109 G General User page 57 H Help page 107 I IEEE 802 11b g 36 Image Display page 89 Indicator Control page 96 L Load Settings page 105 Login 56 M Maintenance page 98 Motion Detection 70 83 Multi Camera page 20 Multi Camera Setup page 92 N Network page 31 O Operation Bar 19 Operation Time page 94 P Product Information page 108 R Reset to Factory Default page 106 Restart page 100 S Save Settings p...

Page 141: ...Operating Instructions 141 T Timer Image Buffer Transfer 60 Top page 11 Trademarks 3 U Update Firmware page 101 UPnP page 39 W WEP 37 Wireless Help page 108 Wireless page 36 Wireless Status page 99 ...

Page 142: ...elow or to executive or regional sales offices These locations do not repair consumer products When you ship the product Panasonic Servicenters are listed in the servicenter directory Call 1 800 272 7033 for the location of an authorized servicenter This Network Camera is designed for use in the United States of America Sale or use of this product in other countries areas may violate local laws Fo...

Reviews: