


•
If Security Warning window is displayed to install ActiveX
Controls, click [Yes].
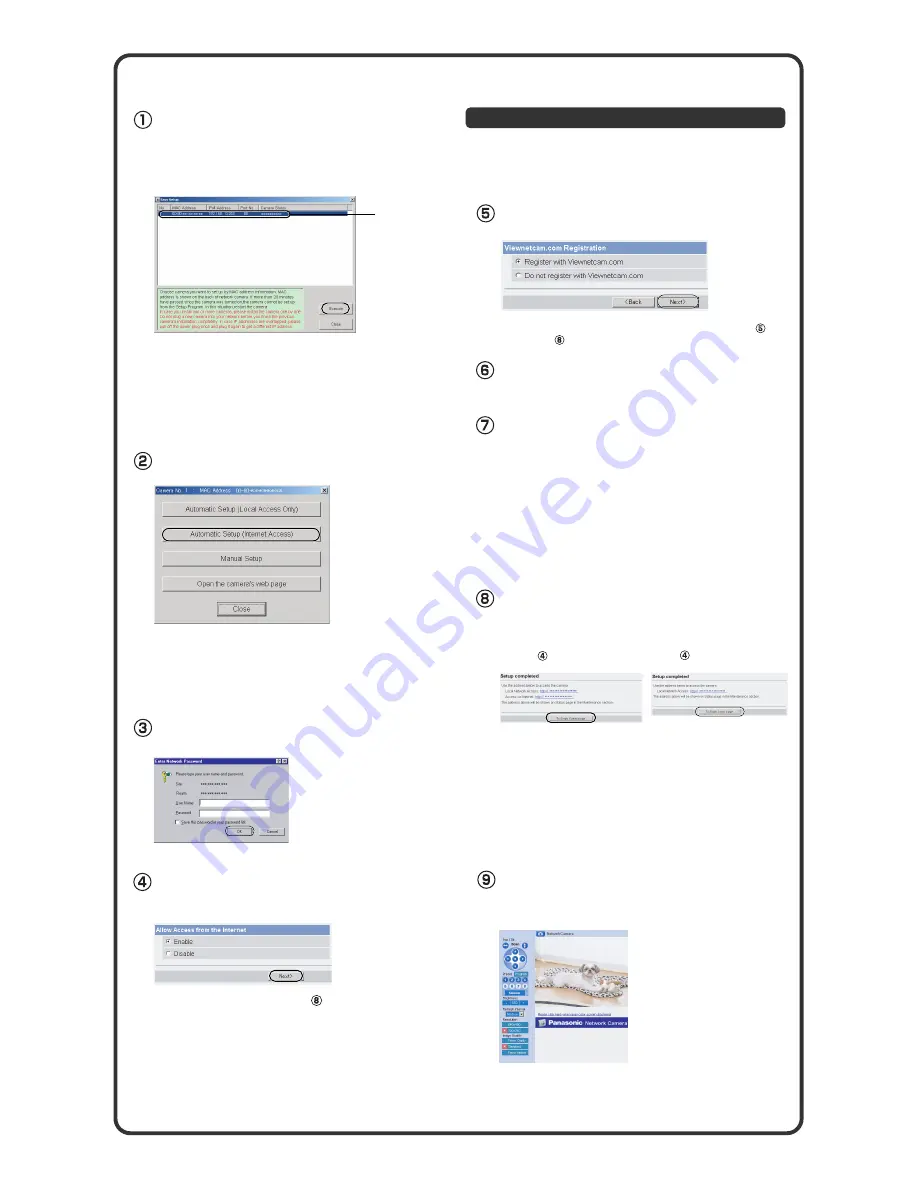
Click [Automatic Setup (Internet Access)].
The Enter Network Password window is displayed. Enter the
username and password that were set, and click [OK].
To register with the "Viewnetcam.com FREE DDNS service",
check [Register with Viewnetcam.com] and click [Next>].
When "Setup complete" is displayed, make a note
of the URL in the blank below and click [To Single
Camera page].
By registering with the Viewnetcam.com FREE DDNS service, you can
create a personalized web address at which your camera's live video
can always be found on the Internet. For detailed information, access
"
http://www.viewnetcam.com
".
To enable access over the Internet, check [Enable]. Not to
enable access over the Internet, check [Disable]. And click
[Next>].
•
When [Enable] was selected
at step
.
• If the message "Failed to configure the router's Port Forwarding by UPnP"
is displayed, your router may not support UPnP
TM
or UPnP
TM
is not enabled.
Enable your router's UPnP
TM
or set Port Forwarding manually following the
router's manual and try Automatic Setup again. For more information about
setting up a router, refer to the Panasonic Network Camera support web-
site at
http://panasonic.co.jp/pcc/products/en/netwkcam/
• If the message "Failed to register with Viewnetcam.com." is displayed, con-
firm that the router is connected to the Internet.
•
The image is a simulated screen image.
After a while, the "Viewnetcam.com FREE DDNS
service" website is displayed. Follow the displayed
instructions for registration.
When the Single Camera page is displayed, the
setup is completed.
• For the first time installation or after pressing the Factory Default Reset
button, only [Automatic Setup (Local Access Only)] can be selected. To set
up the camera with Static or DHCP settings, after performing the [Automatic
Setup (Local Access Only)], run the Setup Program again and select
[Manual Setup].
The Enter Network Password window is displayed.
Enter the user name and password that were set,
and click [OK].
•
When [Disable] was selected at
step
.
•
When [Do not register with Viewnetcam.com] was selected at step
,
skip to step .
Notes
• The port number must be specified at the end of camera URL.
For example
Using port 80: http://(Cameraname).viewnetcam.com
or http://IP Address
Using any other port: http://(Cameraname).viewnetcam.com:Port Number
or http://IP Address:Port Number
• Make a note of the URL for the camera.
Note
Check [Every visit to the page] for
"Temporary Internet files" on your web
browser. If it is not checked, the camera
may display old images.
Select the camera on the camera list to set up the
Internet access and click [Execute].
•
This program searches for the cameras that are connected to the
router and displays the MAC Addresses, IP addresses and Port
Numbers.
• When searching for multiple cameras, the cameras can be identified with the
MAC Addresses labeled near the Ethernet (LAN) port of the cameras.
Select a camera.
Note
If more than 20 minutes have passed since the camera was turned on, the
camera cannot be set up from the Setup Program. In this situation, restart the
camera.
To Set Up Internet Access to the Camera
Registration with the "Viewnetcam.com FREE DDNS service"
•
If you select [Disable], skip to step .
• The URL for the local network access may be different from the one set up on
the previous page. Make a note of the URL here again.