45
Maintenance Menu
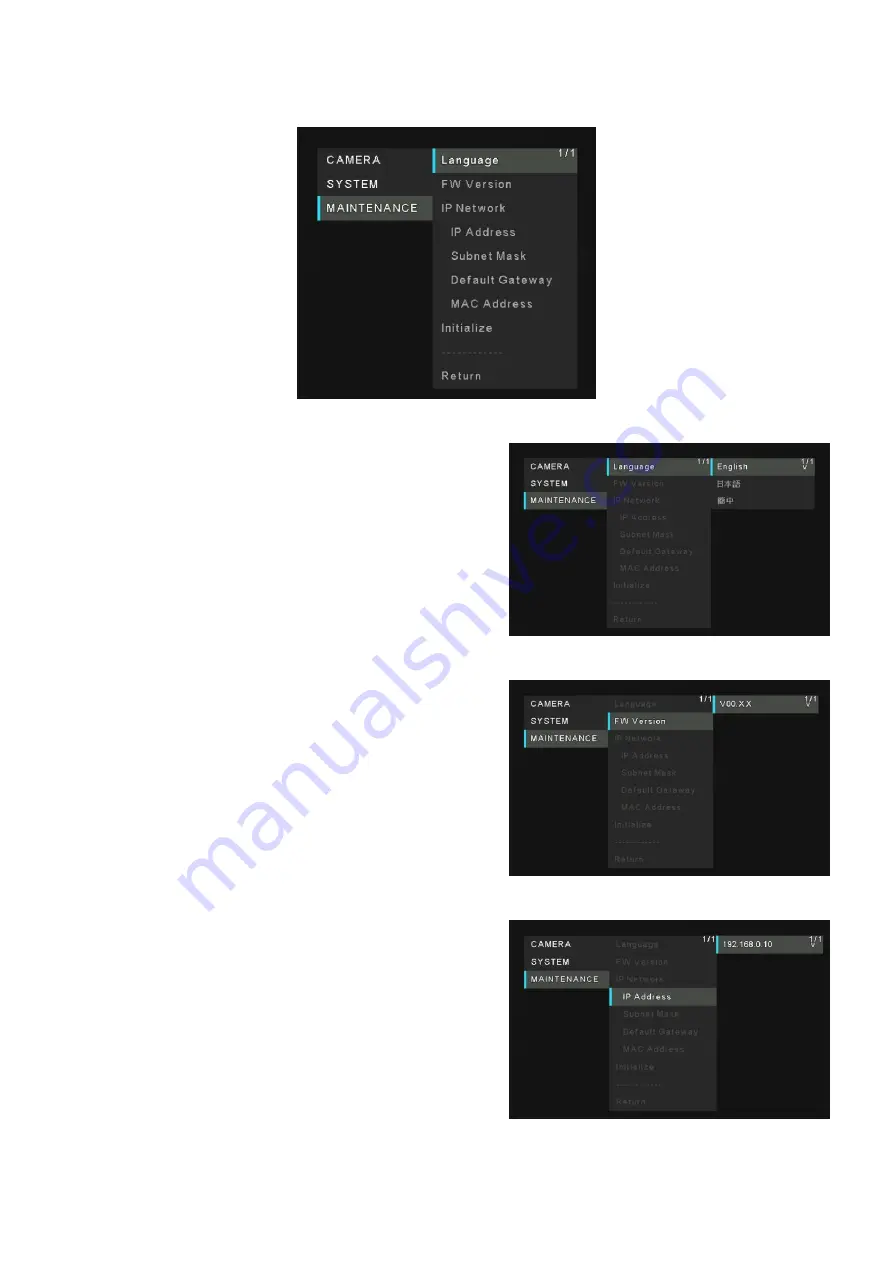
Language
The system supports three language
– English, Japanese, and
Simple Chinese.
FW Version
Display the current firmware version of the unit.
IP Address
Display the IP address of the unit.
Page 1: ...ions and Settings 4K Integrated Camera Operations and Settings Operating Instructions This Operations and Settings describes how to operate the unit and how to establish its settings For more information on how to perform basic operation and installation refer to the Operating Instructions Basics ...
Page 2: ...rface and the HDMI Logo are trademarks or registered trademarks of HDMI Licensing Administrator Inc in the United States and other countries Other names of companies and products contained in these Operating Instructions may be trademarks or registered trademarks of their respective owners About Copyright and License Distributing copying disassembling reverse compiling reverse engineering and also...
Page 3: ...E PRODUCT BY THE USER 4 INCONVENIENCE OR ANY LOSS ARISING WHEN IMAGES ARE NOT DISPLAYED DUE TO ANY REASON OR CAUSE INCLUDING ANY FAILURE OR PROBLEM OF THE PRODUCT 5 ANY PROBLEM CONSEQUENTIAL INCONVENIENCE OR LOSS OR DAMAGE ARISING OUT OF THE SYSTEM COMBINED BY THE DEVICES OF THIRD PARTY 6 ANY DEMANDS FOR COMPENSATION CLAIMS ETC OCCASIONED BY THE INFRINGEMENT OF PRIVACY BY INDIVIDUALS OR ORGANIZATI...
Page 4: ...ft 15 Wireless Remote Control optional accessory 16 Network Settings 18 Use the Easy IP setup Software 18 Setting the Initial Account 20 Basic Shooting Operation 21 Power on and Power Off the Camera Unit 22 Power on the Camera Unit 22 Power off the Camera Unit 22 Priority Mode 23 Selecting the Camera Unit 26 Selecting Scene Mode 26 Scene Mode Type 26 How to select the Scene mode 26 Operating the C...
Page 5: ...r AWB B 31 Auto Tracking White Balance Adjustment ATW 32 3200K and 5600K Presets 32 Menu Operation 33 Operations Table 33 When performing the operations using the wireless remote control 33 Menu Items 35 Main Menu Screen 35 Camera Menu 35 Scene 36 Picture Level 37 AGC Max Gain 37 Slow Shutter 37 Shutter Speed 37 Gain 38 Chroma Level 38 White Balance Mode 38 Detail 38 Contrast 39 DRS 39 Back Light ...
Page 6: ...s 44 Color Bar 44 Mic 44 Maintenance Menu 45 Language 45 FW Version 45 IP Address 45 Subnet Mask 46 Default Gateway 46 MAC Address 46 Initialize 46 Menu Table 47 Web Screen Start up 48 Connecting to Web Screen by Using a PC 49 Switching between Live and Setup Screen 50 Web Live Screen Operation 51 Web Screen Configuration 53 Select the Setup Screen 53 ...
Page 7: ...User Mng User Management 65 User auth User authentication 65 Network Settings 67 Network 67 RTMP Setting 69 Maintenance Settings 70 Language 70 Product Info 71 Upgrading the firmware Firmware file 72 Default Reset 73 Web Camera Functions 74 Controllable functions 74 Troubleshooting 75 Operation 75 Video 76 IP images 77 USB 77 Specification 78 Index 81 ...
Page 8: ...S 10 14 macOS 10 13 macOS 10 12 OS X 10 11 Safari Google Chrome Other Graphics card support hardware acceleration for decode H 264 H 265 JPEG streaming Adobe Reader for viewing the operating instructions available on the website IMPORTANT Failure to provide the required personal computer environment may slow down the delineation of the images on the screen make it impossible for the web browser to...
Page 9: ...eb browsers Change the administrator password periodically To avoid passwords that can be guessed easily by third parties set a password of at least 8 characters in length including at least 3 different types of characters such as upper case lower case numbers and symbols Restrict access to the unit by authenticating the users for example to prevent setting information stored on the unit from leak...
Page 10: ...o signal control signal power supply with one Ethernet cable IP image output functions It supports 4K30p output with RTMP Real Time Messaging Protocol which can upload video directly to live distribution service and it demonstrates high operability in live production use Affinity with remote camera By supporting PoE power supply and RTMP RTSP support the affinity with the remote camera series is f...
Page 11: ...er USB Cable Tripod screw I head type 1 4 x 20 UNC Drop prevention wire M4 screw 10 mm length 4 screws Mount kit L Mount kit M4 screw 5 mm length 4 screws Optional Accessories Wireless remote control AW RM50G Size AA dry battery x 2 obtained separately Direct ceiling mount bracket WV Q105A Note For details on optional accessories refer to the catalog or consult your local dealer ...
Page 12: ...to auto making it impossible for these items to be operated manually To operate them manually switch from the auto settings to the manual settings as required When using the ATW auto tracking white adjustment function under fluorescent lights the white balance may vary Operating temperature range Avoid using the unit in cold locations where the temperature drops below 0 o C 32 F or hot locations w...
Page 13: ...ture and dust Avoid using the unit in an environment with high concentration of moisture or dust since these conditions will damage the internal parts Information on software used with this product This product incorporates the following software 1 the software developed independently by or for Panasonic Corporation 2 the software owned by third party and licensed to Panasonic Corporation 3 the so...
Page 14: ...ignal with a different remote control ID Flash red light Firmware updating Red light Firmware update failure or other abnormal 5 Tally status indicator 6 Wireless remote control signal light sensing area 7 LAN indicator LINK ACT Lights up when data is transmitted received via LAN 8 LAN connector Use a category 5e or above LAN cable with a maximum length of 100 m 328 ft 9 HDMI terminal 10 USB termi...
Page 15: ... Up and Down When the perpendicular fixing screw A is loosened the camera can be tilted approximately 25 up or down After adjusting the position of the camera firmly tighten the screw to fix the camera in position Panning the Camera Right and Left When the horizontal fixing screw B is loosened the camera can be pan 110 in the horizontal right or left After adjusting the position of the camera firm...
Page 16: ...information on the unit s directions and other settings which have been registered in the units preset memories No 1 to No 12 and reproduce those settings Setting in preset memories No 13 and above cannot be called from the wireless remote control 7 PRESET button Press this button and any of the buttons from 1 to 12 simultaneously to register a preset memory 8 Pan tilt buttons and menu operation b...
Page 17: ...d from the behind the unit it may be either difficult or impossible to perform the desired operations If the unit is installed near fluorescent lights plasma monitors or other such products or if the unit is exposed to sunlight the effects of the light may make it impossible for the unit to be operated using the wireless remote control Be sure to follow the steps below for installation and use Tak...
Page 18: ...up Software programs at the same time for a single camera The IP address settings may no longer be recognized as a result To enhance the security of the Easy IP Setup Software it will not be possible to make network settings for the target camera once about 20 minutes or more have elapsed after turning the power of the camera on When the Easy IP Setup accommodate period setting is 20min The Easy I...
Page 19: ...e button is clicked it takes about 1 minute for the settings in the unit to be completed If the USB terminal power supply or LAN cable is disconnected before the settings are completed the settings will be canceled In this case repeat the steps to establish the settings When a firewall including software has been introduced enable access to all the UDP ports ...
Page 20: ...s not adhere to the above policy take responsibility for use of the device with due consideration for the security risks in the installation environment etc A warning is displayed if the set password goes against the recommended setting policy When changing the password click the Back button and set the password again When continuing with the setting with full understanding of the security risks c...
Page 21: ...AM1 to CAM4 buttons on the wireless remote control to select the unit if using the wireless remote control Even when using only one unit it must still be selected from the wireless remote control 4 Select the scene shooting mode Select one of the three Full Auto Shutter Priority and Manual scene modes each of which corresponds to a set of circumstances in which the subject will be shot Select the ...
Page 22: ...ge When transferring to the POWER ON mode Status indicator LED Green after the initial setting operation is completed The pan tilt position is moved to the position which was stored in the memory when the transition to the STANDBY mode was made POWER ON preset The pan tilt position return to the place just before entering STANDBY mode when returning from STANDBY mode to POWER ON mode If the power ...
Page 23: ...s also supported This unit cannot display H 264 H 265 format images on the Live screen To display H 264 H 265 images use an external device or external software that supports H 264 H 265 images Functions that can be and functions that cannot be controlled simultaneously Power Supply Priority Mode Output terminal HDMI USB LAN RTSP RTMP Web HTTP PoE HDMI 4K 50 Hz 2160 25p 59 94 Hz 2160 29 97p 60 Hz ...
Page 24: ...720 10 fps 360 25 fps 59 94 Hz 60 Hz 720 10 fps 360 30 fps Standard MJPEG 50Hz 1080 25 fps 10 fps 5 fps 720 25 fps 10 fps 5 fps 360 25 fps 10 fps 5 fps 59 94 Hz 60 Hz 1080 30 fps 15 fps 5 fps 720 30 fps 15 fps 5 fps 360 30 fps 15 fps 5 fps YUV 50 Hz 360 10 fps 59 94 Hz 60 Hz 360 15 fps MJPEG 50 Hz 720 10 fps 360 25 fps 59 94 Hz 60 Hz 720 10 fps 360 30 fps USB AC adapter 5 V 1 A or more HDMI 4K 50 ...
Page 25: ...5p 59 94Hz 1080 29 97p 60Hz 1080 30p H264 or H 265 50Hz 1080 50 fps 25 fps 10 fps 5 fps 720 50 fps 25 fps 10 fps 5 fps 360 50 fps 25 fps 10 fps 5 fps 59 94Hz 60Hz 1080 60 fps 30 fps 15 fps 5 fps 720 60 fps 30 fps 15 fps 5 fps 360 60 fps 30 fps 15 fps 5 fps MJPEG 50Hz 720 10 fps 360 25 fps 59 94Hz 60Hz 720 10 fps 360 30 fps ...
Page 26: ...ces The settings can be changed by menu operations The results of the white balance and other adjustments are stored in the memory separately by shooting mode Be absolutely sure to select the shooting mode before making any adjustments Full Auto User can adjust the picture level AGC MaxGain slow shutter Chroma level and white balance Shutter Priority User can adjust the picture level AGC MaxGain s...
Page 27: ...hlight to Scene 6 Press the button 7 Press the or button to select the scene mode Full Auto Shutter priority or Manual and press the button to confirm the selection The selected scene mode has a mark sign within 8 Press to leave from scene mode menu 9 Press the MENU button for 2 seconds to exit from the menu ...
Page 28: ...lly Press the or button and or button at the same time Returning the camera to the reference position Press the HOME button for 2 seconds Zoom In Out Function Zooming in the subject becomes magnified in size Press the T button of ZOOM Zooming out the subject becomes reduced in size Press the W button of ZOOM Switching the Direction or Zoom Speed Changing the direction or zoom at high speed Press t...
Page 29: ...tus display lamp is off or lights up orange it means that the unit s power is not on Refer to Power on the Camera Unit section If the unit s status display lamp does not blink even when the wireless remote control is operated near the unit s wireless remote control signal light sensing area it means that the wireless remote control s batteries have run down Replace the batteries Multiple color ban...
Page 30: ...preset has not been registered is recalled When performing the operations using the wireless remote control Twelve settings preset No 1 to No 12 can be registered and called using the wireless remote control The 1 to 12 buttons correspond to the unit s preset memories No 1 to No 12 Registering the settings in the preset memories 1 Display the picture to be shot on the monitor Operate the pan tilt ...
Page 31: ...ing is entered the previous setting will be erased Note When scene mode Scene on the camera unit is set to Full Auto the white balance cannot be manually adjusted ATW mode is activated For details refer to Selecting the Scene Mode section Automatic Adjustment AWB AWB A or AWB B When performing the operations using the wireless remote control 1 Shoot a white subject such as a white wall or handkerc...
Page 32: ...adjustment is set to ATW the white balance will be corrected automatically even if the light source or color temperature changes This function works when ATW is selected instead of AWB A or AWB B by following the steps for Automatic adjustment in Automatic Adjustment AWB AWB A or AWB B page 30 Note ATW might not function properly when high brightness light ex fluorescent lamp beams into a screen W...
Page 33: ...urning to the previous menu Move the highlight at the Return position press the button Changing the settings With the highlight at the item to be changed press the button to select it Use the and buttons to change the value and press the button to enter the change Canceling the setting change Press the MENU button Exiting the menu operations Press the MENU button for 2 seconds When performing the ...
Page 34: ... button to change the setting The setting can be changed in the same way using the and buttons 8 Press the button The value of the item to be set is entered and it has a mark sing within 9 After the setting has been completed press the MENU button for 2 seconds The menu display is exited ...
Page 35: ... performing more detailed settings Main Menu Screen Camera Select this to open the camera menu relating to the camera images System Display the System menu in which the camera s output image settings are configured Maintenance Display the Maintenance menu which concerns checking the unit s firmware versions checking the IP address and initialize the settings Note The main Menu does not have a Retu...
Page 36: ...utomatically established But user still can adjust the value of Picture Level AGC MaxGain Slow Shutter Chroma Level and White Balance Mode Shutter Priority In this mode user can adjust the value of Picture Level AGC MaxGain Shutter Speed Chroma Level and White Balance Mode Manual In this mode user can adjust the value of Shutter Speed Gain Chroma Level and White Balance Mode ...
Page 37: ...um gain up amount value Slow Shutter Set slow shutter function to On or Off This can only be configured when Scene is set to Full Auto Shutter Speed Adjust the shutter speed When a higher shutter speed is selected fast moving subjects do not become blurred easily but the images will be darker ...
Page 38: ...erence can be recognized subjects can be shot with natural coloring ATW This mode automatically corrects the white balance even if the light source or color temperature changes AWB A AWB B When AWB A or AWB B is selected and the white balance is executed the adjustment results obtained are stored in the memory selected When AWB A or AWB B is then selected the white balance stored in the selected m...
Page 39: ...ents darkening as a result of light striking the backs of subjects and makes it possible to shoot images in shade or shadow more brightly DNR Set the level of the digital noise reduction effect so that light noise free and clear images will be output even at night and in other low brightness environments When Low or High is selected noise can be eliminated However there is an increased possibility...
Page 40: ... images uses the H 264 H 265 video coding format This unit cannot display H 264 H 265 format images on the Live screen To display H 264 H 265 images use an external device or external software that supports H 264 H 265 images Standard HD format video is output to an external monitor connected via an HDMI cable Enables the unit to be used as a Web camera The camera can also be controlled from a per...
Page 41: ...he frequency is switched Format is set as following Frequency 50Hz 59 94Hz 60Hz Format 2160 25p 1080 50p 1080 25p 720 50p 2160 29 97p 1080 59 94p 1080 29 97p 720 59 94p 2160 30p 1080 60p 1080 30p 720 60p When changing the frequency select OK to confirm the changing ...
Page 42: ...4p 2160 30p 1080 60p 1080 30p 720 60p When changing the format select OK to confirm the changing Finally select Yes to accept the changes Install Position Desktop or Hanging is selected here as the method used to install the unit When Hanging has been selected the top bottom left and right of the images will be reversed and up down left right control for panning and tilting will also be reversed ...
Page 43: ...degrades as zoom increases with digital zoom Tally Enable or Disable is set here for the function which turns on or turns off the tally lamp using the tally control signal IR ID Configure the unit s remote control ID The settings for this item correspond to the CAM1 to CAM4 buttons on the wireless remote control ...
Page 44: ...s are received via commands or contacts When the red tally signal releases the menu display will return OSD Status Error display when an error occurs Color Bar Switch between camera images and color bars Color Bar Note Only HDMI can output color bar IP and USB cannot output color bar Mic Turn audio input off on ...
Page 45: ... Maintenance Menu Language The system supports three language English Japanese and Simple Chinese FW Version Display the current firmware version of the unit IP Address Display the IP address of the unit ...
Page 46: ...k Display the subnet mask of the unit Default Gateway Display the default gateway which has been set for the unit MAC Address Display the MAC address of the unit Initialize Reset the unit back to the factory default ...
Page 47: ... Off Low High Low LDC Off On Off SYSTEM Priority mode HDMI 4K USB 4K IP 4K Standard IP Standard Frequency 50Hz 59 94Hz 60Hz China 50Hz Global Japan 59 94Hz Format 2160 25P 1080 50p 2080 25p 720 50p 2160 29 97p 1080 59 94p 1080 29 97p 720 59 94p 2160 30p 1080 60p 1080 30p 720 60p 50Hz 1080 50p 59 94Hz 1080 59 94p 60Hz 1080 60p Install Position Desktop Hanging Desktop Mirror Off On Off Digital Zoom ...
Page 48: ...address as the unit Note If you need to change the IP address and subnet mask be sure to ask your dealer to make these changes for you Unit s IP address and subnet mask factory settings 1 IP address 192 168 0 10 Subnet mask 255 255 255 0 1 The factory default for the private address range is between 192 168 0 1 and 192 168 0 255 If the wireless remote control and web browser are being used at the ...
Page 49: ... HTTP port number has been changed from 80 enter http camera IP address port number in the address bar Example http 192 168 0 11 8080 If the unit is located on the local network configure proxy server settings on the web browser Setup Network so that a proxy server is not used for the local address 3 Display the live screen Live The web screen appears You can switch to the web setup screen Setup w...
Page 50: ... screen is displayed click the Live button to switch to live screen For details on the live screen see Web Live Screen Operation section Note During Standby mode the Setup button is disabled and you cannot switch to the Setup screen If the unit is switched to Standby mode from another terminal while the Setup screen is displayed the display will switch to the live screen after a few seconds ...
Page 51: ...ged It restores the pre change setting Note On screens displays are not displayed on JPEG images on web screens 4 Power Turn the unit on Set the unit to Standby mode In the Standby mode all the buttons on the live screen except for the Power ON button and Standby button are disabled Note If Power ON or Standby is selected too quickly the status selected and the display shown may not correspond In ...
Page 52: ...6 To adjust the image in the horizontal or vertical direction panning or tilting left click the pad and the buttons It is possible to operate with the central grid pattern in the dragged state with the speed of the pan tilt increasing as it approaches the outside of the pad 7 Preset Select the preset number or home position from drop down list Click Move to go to the pre set position Using to adju...
Page 53: ...53 Web Screen Configuration Select the Setup Screen In live screen click the Setup button to switch to setup screen Setup menu Functions settings area Power ON Standby mode switching ...
Page 54: ...ses the H 264 H 265 video coding format This unit cannot display H 264 H 265 format images on the Live screen To display H 264 H 265 images use an external device or external software that supports H 264 H 265 images Standard HD format video is output to an external monitor connected via an HDMI cable Enables the unit to be used as a Web camera The camera can also be controlled from a personal com...
Page 55: ...name appears in the camera title display area Note The factory default setting is the model number of the unit You can enter between 0 to 20 characters The following characters can be displayed Numeric characters 0123456789 Alphabetical characters upper and lower cases ABCDEFGHIJKLMNOPQRSTU VWXYZ abcdefghijklmnopqrstuvwxyz Symbols _ ...
Page 56: ... network environment JPEG Set JPEG image settings Click Set to save the configuration Image capture size Select the resolution 1280 720 or 640 360 for JPEG images Frame rate Set the frame rate 10 or 30 for JPEG images H 264 H 265 Set H 264 H 265 image settings Click Set to save the configuration Note Only JPEG images can be displayed on web screens Stream transmission Whether to transmit images is...
Page 57: ... IP 4K Priority mode 59 94Hz 60Hz 5fps 15fps 30fps 60fps not support in IP 4K Priority mode Max bit rate per client Specify the H 264 H 265 bit rate per client 1024kbps 1536kbps 2048kbps 3072kbps 4096kbps 6144kbps 8192kbps 10240kbps 12288kbps 14336kbps 16384kbps 20480kbps 24576kbps and 32768kbps The default is 14336kbps ...
Page 58: ...d adjustments for the shooting conditions at hand are automatically established But user still can adjust the value of Picture Level AGC MaxGain Slow Shutter Chroma Level and Whit Balance Mode Shutter Priority In this mode user can adjust the value of Picture Level AGC MaxGain Shutter Speed Chroma Level and Whit Balance Mode Manual In this mode user can adjust the value of Shutter Speed Gain Chrom...
Page 59: ...fault is 24dB Chroma Level Set the color intensity Chroma level of the images Move the scroll bar to adjust the value 0 1 2 3 4 5 6 7 8 9 10 The default is 5 White Balance Mode Select the mode when the coloring is not natural because of the nature of the light source or other factors If the white color serving as the reference can be recognized subjects can be shot with natural coloring Click Exec...
Page 60: ...reased noise The default is off Back Light COMP Set backlight compensation function to On or Off Under backlight conditions the function prevents darkening as a result of light striking the backs of subjects and makes it possible to shoot images in shade or shadow more brightly The default is off DNR Set the level of the digital noise reduction effect so that light noise free and clear images will...
Page 61: ...o adjust the image in the horizontal or vertical direction panning or tilting left click the pad and the buttons It is possible to operate with the central grid pattern in the dragged state with the speed of the pan tilt increasing as it approaches the outside of the pad Use this to adjust the zoom magnification to 1 0x Use this to adjust the zoom magnification in the Tele direction Use this to ad...
Page 62: ...et button to save the configuration Format Change the image format The image format can different by the frequency Frequency 50Hz 59 94Hz 60Hz Format 2160 25p 1080 50p 1080 25p 720 50p 2160 29 97p 1080 59 94p 1080 29 97p 720 59 94p 2160 30p 1080 60p 1080 30p 720 60p ...
Page 63: ...ll be reversed and up down left right control for panning and tilting will also be reversed The default is desktop Mirror Set the mirror the image to On or Off The default is off Digital Zoom Set the digital zoom to On or Off Picture quality degrades as zoom increases with digital zoom The default is off Tally Enable or Disable is set here for the function which turns on or turns off the tally lam...
Page 64: ...ars The default is camera Note Only HDMI can output color bar IP and USB cannot output color bar Mic Turn audio input off on The default is on IR ID Configure the unit s remote control ID The settings for this item correspond to the CAM1 to CAM4 buttons on the wireless remote control The default is 1 Value 1 2 3 4 IR Control Turn IR control to on off The default is on ...
Page 65: ...ion fails more than 8 times within a 30 second period from the same IP address personal computer access to the unit will be disabled for a certain period User auth Turn user authentication to off on Click Set button to save the configuration The default is off Authentication Specify the method of user authentication to use Click Set button to save the configuration The default is Digest Basic Use ...
Page 66: ...ssword here 4 to 32 characters Re enter the password to confirm Access level Select the user access level Administrator or Camera control Click Set button to save the configuration The default is Camera control 1 Administrator This access level allows the user to perform all the unit s operations 2 Camera control This access level allows only live screen Live operations to be performed User Check ...
Page 67: ...Input the unit s IP address here when the DHCP function is not going to be used Input an address that will not duplicate an existing IP address which has been set for a personal computer or another network camera The default IP is 192 168 0 10 Note Multiple IP addresses cannot be used even when the DHCP function is used For details on the DHCP server settings consult your network administrator Sub...
Page 68: ...administrator Primary Server Address Secondary Server Address Input the IP address of the DNS server if the Manual setting has been selected for DNS For details on the IP address of the DNS server consult your system administrator Note Multiple IP addresses cannot be used for the default gateway even when the DHCP function is used For details on the DHCP server settings consult your network admini...
Page 69: ...ing field is displayed only when Type1 is set URL Type Select the method for registering the information for the RTMP transmission server The default is tyep2 Type1 Specify to set the server URL and RTMP stream key as a set in Server URL Type2 Specify to individually set the server URL and RTMP stream key in Server URL and Stream Key Server URL Set the URL for the RTMP server to be transmitted to ...
Page 70: ...lization of the unit The Maintenance screen consists of four settings Language Product info and Default reset Click Setup Maintenance Language Set the unit system s language Click Setup Maintenance Language Click Set button to save the configuration The language only supports English Simplified Chinese and Japanese The default is English ...
Page 71: ...l no Display the unit s model number MAC address Display the unit s MAC address Serial no Display the unit s serial number Firmware version Display the overall system version of the unit Operation time Display the hours the unit has been operating OSS license Click Download button to download the OSS Open Source Software file The OSS license file include all OSS license for AW UE4 The download fil...
Page 72: ...ade progress bar appears after you click the Execute button and the process will take about 2 minute Use the personal computer on the same subnet as the camera to upgrade the software version Before using the version upgrading software be absolutely sure to check the precautions to be observed and follow the instructions Use the files specified by Panasonic Corporation as the software used for ver...
Page 73: ...tarted the unit is restarted so no operations can be undertaken for about 2 minutes Note The following setting items will not be returned to defaults All settings under User mng All settings under Network Network AWB adjustment values will not be returned to defaults Reboot When the Execute button is clicked the unit is rebooted After the unit has been rebooted no operations can be undertaken for ...
Page 74: ... are the names used in Windows Furthermore values are shown as decimals indicates the actual function names Image adjust Brightness Picture level This can be set in the same way same way as Picture level of the menus and Web settings Setting range 4 3 2 1 0 1 2 3 4 Chroma level Chroma level This can be set in the same way same way as Chroma level of the menus and Web settings Setting range 0 to 10...
Page 75: ...cable of category 5e or above been connected to the LAN connector for IP control LAN LINK ACT Is the LINK LED of the LAN connector for IP control lit If it is not lit it means that something is wrong with the connection to the LAN or that the network at the connection destination is not working properly Check the LAN cable for defective contacts and check the wiring Is the power on If the unit s s...
Page 76: ... if the USB device is disconnected the HDMI output video may be disrupted Do not disconnect the USB device while using HDMI output The picture is flipped vertically Has the Install Position setting been selected correctly Multiple color bands color bars are displayed Switch to the camera picture The menu screen is displayed Exit the menu It is difficult to view the menu screens Depending on the HD...
Page 77: ...e OK button For Mac Select Safari Empty Cache in Safari Click Empty in the Are you sure you want to empty the cache pop up screen The unit s ports may be filtered by the firewall or other function of the anti virus software Change the HTTP port number of the unit to a port number that will not be filtered If the web browser screen stops reload the web browser screen The RTSP image transmission sto...
Page 78: ...rusions ceiling mount bracket Mass Weight Approx 0 5 kg 1 1 lb Excluding ceiling mount bracket OUTPUT HDMI HDMI Type A HDCP is not supported VIERA Link is not supported INPUT OUTPUT LAN LAN connector for IP control RJ45 USB Type C port FUNCTIONS AND PERFORMANCE Camera unit Image sensor 1 2 5 type MOS Lens F2 4 f 2 21 mm Horizontal Field of view 111 LDC OFF 108 LDC ON Vertical Field of view 75 Mini...
Page 79: ...z 60 Hz SMPTE 50 Hz FULL Scene Full Auto Shutter Priority Manual Microphone Stereo microphone HDMI output format System frequency 59 94 Hz System frequency 60 Hz System frequency 50 Hz 2160 29 97p 1080 59 94p 1080 29 97p 720 59 94p 2160 30p 1080 60p 1080 30p 720 60p 2160 25p 1080 50p 1080 25p 720 50p USB connection Supported devices Equipped with USB2 0 compatible port Video output USB Video Class...
Page 80: ... 265 3840x2160 30 fps 15 fps 5 fps 25 fps 10 fps 5 fps 1920x1080 60 fps 30 fps 15 fps 5 fps 50 fps 25 fps 10 fps 5 fps 1280x720 640x360 1 The frame rate may be lower than the setting depending on the operating conditions Audio compression mode Audio compression format AAC LC 48 kHz 16 bit 2 channels Supported protocol IPv4 TCP IP UDP IP HTTP RTSP RTP RTP RTCP DHCP DNS ICMP ARP RTMP RTMPS IPv6 TCP ...
Page 81: ...nu 33 35 47 Camera title 55 Characteristics 10 Chroma level 38 47 59 74 Codec 56 Color Bar 44 64 79 Contrast 39 47 60 D Default gateway 46 47 68 Default reset 73 Detail 38 47 60 DHCP 67 Digital zoom 43 47 63 Dimensions 78 DNR 39 47 60 DNS 68 Drop prevention wire 11 DRS 39 47 60 E Easy IP setup Software 12 18 F Format 42 47 62 Frame rate 57 79 80 Frequency 41 47 63 Full auto 36 47 58 FW Version 45 ...
Page 82: ...ate 57 Memory 8 Mic 44 47 64 Microphone 79 Mirror 43 47 63 Model no 71 Mount kit 11 N Network 67 80 Network security 9 Network Setting 18 67 O Operating precautions 12 Operating temperature 12 Operation time 71 Operations table 33 Optional Accessories 11 OSD 44 63 OSD Menu 51 OSD off 47 OSD Status 44 47 64 OSS license 71 Output 62 78 P Pan 79 Panning 15 Password 66 Picture 47 Picture Level 37 47 5...
Page 83: ... 46 47 67 System 35 40 47 62 T Tally 43 44 47 63 Tally status indicator 14 Tilting 15 79 Transfer mode 79 80 Tripod screw 11 Troubleshooting 75 U URL 69 Usage restrictions 9 USB 77 78 USB cable 10 11 14 USB connection 79 USB terminal 14 USB 4K 23 40 47 54 User authentication 65 User check 66 User management 65 User name 66 V Video 76 Video compression 79 Video output 79 Video over IP 56 W Web live...
Page 84: ...Web Site http www panasonic com Panasonic Corporation 2019 ...