background image

E-47

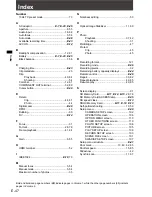
Index

Number

1394 TC preset mode ...................................... 73 

A

AC adaptor .................................

E-7

E-23

E-25

Aperture ....................................................... 6, 55

Audio input ................................................ 18, 68

Auto focus ................................................... 5, 54

Auto mode ....................................................

E-36

Available recording time ...............................

E-23

AVCHD .........................................................

E-14

B

Backlight compensation ............................ 12, 61

Battery ........................................

E-7

E-23

E-25

Black balance .............................................. 7, 56

C

Charging time ...............................................

E-23

Clip metadata .................................................. 23

Clip

Play back ........................................... 40, 84

Shooting .................................................. 54

Color bar .................................................... 12, 61

COMPONENT OUT terminal ..................... 52, 89

Cursor button ................................................

E-30

D

Delete

Clip .................................................... 44, 81

Photo ....................................................... 44

Digital zoom ..................................................

E-38

DPOF .............................................................. 46

Dubbing ........................................................... 90

DV ................................................................

E-14

F

Focus ............................................................... 31

Format ....................................................... 28, 76

Frame-playback ......................................... 41, 84

G

Gain ............................................................. 6, 55

H

HDMI terminal ................................................. 52

I

IEEE1394 ...............................................

E-10

, 73

M

Manual focus ............................................... 5, 54

Manual mode ............................................... 5, 54

Maximum number of photos ............................ 33

N

Nonlinear editing ............................................. 53

O

Optical Image Stabilizer ............................ 11, 60

P

Photo

Playback ............................................ 37, 42

Shooting .................................................. 31

PictBridge ........................................................ 47

Protect

Clip .......................................................... 45

Photo ....................................................... 45

R

Recording format ........................................... 121

Recording mode ...........................................

E-36

Recording pixels .............................................. 32

Remaining battery capacity displays ............

E-24

Remote control .............................................

E-28

Repair ........................................................ 30, 82

Repeat playback ........................................ 49, 85

Resume play ............................................. 49, 85

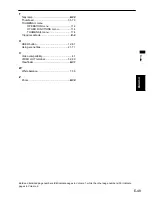
S

Screen display ................................................. 91

SD Memory Card ...........

E-11

E-12

E-13

, 28, 76

SD Memory Card ACCESS lamp .................

E-35

SD speed class ............................................

E-13

SDHC Memory Card .................

E-11

E-12

E-13

Self-portrait shooting ................................. 10, 59

Setup menu ..................................................

E-39

CAMERA SETUP screen ...................... 102

OPERATION screen .............................. 106

OPTION MENU screen ......................... 113

OTHER FUNCTIONS screen ................ 110

PHOTO SETUP screen ......................... 106

PICTURE screen ................................... 105

PLAY SETUP screen ............................. 106

RECORD SETUP screen ...................... 103

SCENE FILE screen ............................. 101

SW&DISP SETUP screen ..................... 107

Setup menu structure ...................................

E-41

Shot mark ...................................... 13, 49, 62, 85

Shutter speed ............................................ 15, 65

Slideshow ........................................................ 42

Synchro scan ............................................. 17, 67

Index

Bold and italicized page numbers (

00

) indicate pages in Volume 1, while the other page numbers (00) indicate 

pages in Volume 2.

Summary of Contents for AVCCAM AG-HMC81E

Page 1: ...al for future use ENGLISH Volume 1 Note that Operation Instructions Vol 1 describes basic operations of the Memory Card Camera Recorder For instructions on advanced operations of the Memory Card Camera Recorder refer to Operating Instructions Vol 2 pdf file contained in the supplied CD ROM This product is eligible for the AVCCAM 3 Year Warranty Repair Program For details see page E 5 ...

Page 2: ...n or fire if battery is mistreated Do not leave the battery in an automobile exposed to direct sunlight for a long period of time with doors and windows closed Do not disassemble the battery or dispose of it in fire Do not store in temperatures over 60 C For Battery Pack Use specified charger Replace only with same or specified type For Battery of Remote Controller Replace battery with part No CR2...

Page 3: ... amp fuse is fitted in this plug Should the fuse need to be replaced please ensure that the replacement fuse has a rating of 5 amps and that it is approved by ASTA or BSI to BS1362 Check for the ASTA mark or the BSI mark on the body of the fuse If the plug contains a removable fuse cover you must ensure that it is refitted when the fuse is replaced If you lose the fuse cover the plug must not be u...

Page 4: ...versely affected by interference if it is being used in an EMC environment such as an area where strong electromagnetic fields are generated by the presence of signal transmission towers cellular phones etc In order to minimize the adverse effects of the interference on the apparatus in cases like this it is recommended that the following steps be taken with the apparatus being affected and with i...

Page 5: ...mers who register as users on the website will receive an extended warranty repair valid for up to three years AVCCAM 3 Year Warranty Repair Program 1 Thank you for purchasing this Panasonic AVCCAM device Register as a user for this device to receive a special service warranty up to three years of free warranty repairs Make sure to save the Registration Notice e mail during the warranty period 1st...

Page 6: ...al and non commercial use of a consumer and no license is granted or shall be implied for any use other than the personal uses detailed below To encode video in compliance with the AVC standard AVC Video To decode AVC Video that was encoded by a consumer engaged in a personal and non commercial activity To decode AVC Video that was obtained from a video provider licensed to provide AVC Video Addit...

Page 7: ...lly lamp E 29 Using the cursor button E 30 Basic operations E 30 Menu screen operations E 30 Playback mode PB mode only E 30 Using the viewfinder E 31 Using the viewfinder E 31 Using as a LCD monitor E 32 Emphasizing outlines E 32 Adjusting the screen display E 33 Setting the calendar E 34 Setting the time zone E 34 Setting the clock E 34 Basic shooting operations E 35 Preparing for recording E 35...

Page 8: ...ntinues to blink even when the battery temperature is normal there may be something wrong with the battery or AC adaptor Contact your dealer The battery takes longer to charge when it is warm The AC adaptor can interfere with radio reception so keep radios at least 1 meter away from it The AC adaptor may make some noise when you are using it but this is normal Take precautions not to drop the came...

Page 9: ...er s LCD monitor if they are displayed for a long time but you can fix this by leaving the camera off for several hours The pixels of the LCD monitor are controlled to obtain high precision with 99 99 of the effective pixels This leaves less than 0 01 of pixels that may not light or may remain on all the time These phenomena are normal and will have no effect on the images you shoot Condensation m...

Page 10: ... material you have recorded for any purpose other than your own personal enjoyment Remember that restrictions apply to the shooting of certain material even if it is intended for private use Media that can be used in this unit SD SDHC Memory Cards can be used in this unit For details refer to page E 11 SDXC Memory Cards cannot be used with this product Tripod receptacle The tripod receptacle is a ...

Page 11: ...vices with an earth terminal should be earthed or connected to a shared GND when using them When connecting this camera to devices with a 4 pin terminal connect this camera s terminal 6 pin in advance The terminal of the IEEE1394 cable has an orientation When connecting the cable to an external device with a 6 pin IEEE1394 terminal connect it as per with the following configuration Correct IEEE139...

Page 12: ... RP SDP16G 32 GB RP SDV32G RP SDW32G RP SDP32G Please see our support page at the following website for the latest information not included in these operating instructions http pro av panasonic net This product is compatible with SD Memory Cards formatted under the SD standard FAT12 and FAT16 formats and with SDHC Memory Cards formatted under the FAT32 format Only SDHC Memory Cards may be used for...

Page 13: ...t This product is compatible with SD Memory Cards formatted under the SD standard FAT12 and FAT16 formats and with SDHC Memory Cards formatted under the FAT32 format Only SDHC Memory Cards may be used for capacities of 4 GB or greater 4 GB or greater memory cards without the SDHC logo are not based on the SD standard Use this product to format the SD Memory Cards to be used Formatting memory cards...

Page 14: ...ard is recommended for SD compatible products this indicates that stable recording operation can be achieved when using SD Memory Cards of class 6 and above Speed class 4 or above is required for recording in AVCHD mode or 6 or above for DV mode when shooting with this camera Cautions for usage Do not allow dirt water or other substances to come into contact with the connector part on the reverse ...

Page 15: ...s Shooting video in DV mode It is not compatible with AV devices fitted with a Panasonic SD Memory Card slot DIGA VERA TV digital video camera Video is recorded in AVI Type 2 file format and can be played back on computers using AVI Type2 compatible media players About AVCHD AVCHD is a standard for the recording and playback of highly detailed high definition video Video is compressed in the MPEG ...

Page 16: ... Prints photos with a printer PictBridge DV mode SD shooting DV IEEE1394 input output AVCHD mode Video shooting CAMERA mode Shooting in auto mode Page E 36 Shooting in manual mode Page 5 of Vol 2 Photo shooting PHOTO mode Shooting photos Page 31 of Vol 2 Playback PB mode Playing back clips Page 40 of Vol 2 Playing back photos Page 42 of Vol 2 Other functions Connecting to a computer USB mode Page ...

Page 17: ...ge 47 of Vol 2 Component cable BNC optional Select AVCHD with the MODE switch and then turn on the camera BARS COUNTER RESET ZEBRA MODE CAMERA PHOTO IN DV AVCHD PB DV mode SD SDHC Memory Card class 6 or above PC Page 122 of Vol 2 IEEE1394 DV cable optional Video cable BNC optional Audio cable RCA optional Component cable BNC optional DV tape device memory card recorder backup dubbing editing Pages...

Page 18: ... shoulder strap Page E 26 CD ROM The following accessories are attached to the unit Lens hood cap Lens hood Lens hood inner Grip belt XLR audio adaptor cap 1 For part numbers for the battery see Optional accessories Page E 18 Please consult a retailer when purchasing additional accessories After removing the package contents discard the packaging materials appropriately Some of the supplied access...

Page 19: ...ns hood inner before attaching an optional VW T4314H tele conversion lens or VW W4307H wide conversion lens For details on removing the lens hood see page E 27 Remove Attach Align the grooves Removing and attaching the lens hood inner Attach the ND filter and MC protector to the front of the lens hood inner Although you can attach both a filter and a conversion lens at the same time such as attach...

Page 20: ...r Page E 38 3 Handle START STOP button Pages 10 59 of Vol 2 4 Shoulder belt installation hole Page E 26 5 REC CHECK PHOTO SHOT button Page E 37 Page 31 of Vol 2 6 Zoom lever Page E 38 7 Remote control sensor Page E 28 8 Tally lamp FRONT Page E 29 9 Viewfinder Page E 31 10 Accessory shoe 11 START STOP button Page E 36 12 POWER switch Page E 29 13 Lock button Page E 32 14 Battery release button Page...

Page 21: ...Page E 31 22 Speakers 23 FOCUS ring Pages 5 54 of Vol 2 24 RING switch Pages 5 54 of Vol 2 25 WHITE BAL button Pages 7 56 of Vol 2 26 USER1 3 button Pages 12 61 107 of Vol 2 27 Memory Card cover Page E 35 28 ACCESS lamp Page E 35 29 SHUTTER button Pages 15 65 of Vol 2 30 SPEED SEL button Pages 15 65 of Vol 2 31 OIS button Pages 11 60 of Vol 2 32 MODE button Page E 30 Pages 30 40 42 90 of Vol 2 33 ...

Page 22: ...et up to the standard gain setting ZOOM S S 2 5 mm super mini jack You can connect a remote control unit to control zoom and start stop of recording 53 DV terminal Page 88 of Vol 2 54 Input audio selection switch Pages 19 69 of Vol 2 55 PHONES headphone terminal Pages 50 86 of Vol 2 56 MIC 48 V ON OFF switch Pages 19 69 of Vol 2 57 XLR input CH1 CH2 terminal Pages 19 69 of Vol 2 58 AUDIO OUT CH1 C...

Page 23: ...Vol 2 Performs only the PHOTO SHOT function of the REC CHECK PHOTO SHOT button on the camera 4 START STOP button Page E 36 5 ZOOM VOL buttons Page E 38 The sound volume of the camera cannot be adjusted using the remote control 6 PLAY button Pages 41 84 of Vol 2 7 SEARCH buttons Pages 40 41 84 of Vol 2 8 PAUSE button Pages 40 41 84 of Vol 2 9 STILL ADV buttons Pages 41 84 of Vol 2 10 STOP button Pa...

Page 24: ...ng If the charging lamp continues to flash there may be a fault with the battery or the AC adaptor Please consult with the place of purchase Charging time and available recording time Approx Battery model Voltage capacity Charging time Maximum continuous recording time VW VBG260 included 7 2 V 2640 2500 typ min mAh Approx 170 min Approx 85 min VW VBG6 optional 7 2 V 5800 5400 typ min mAh Approx 35...

Page 25: ...ons The remaining battery capacity display will momentarily disappear when switching between modes when conducting REC CHECK operations or when changing the LCD brightness since the capacity is recalculated at these times Not displayed when using AC adaptor The maximum time display for the remaining battery capacity is 999 minutes If the remaining battery capacity exceeds 999 minutes the remaining...

Page 26: ...tor 2 Plug the AC power supply cable into the power outlet 3 Insert the DC cable s battery connector until it clicks into place 1 210 06 DC cable s battery connector Removal 1 Set the POWER switch to OFF and check that the mode lamp is off 2 Remove the DC cable s battery connector while pressing the battery release button 3 Disconnect the AC power supply cable from the power outlet Battery cannot ...

Page 27: ...ening the belt please take care so that the belt does not come away from the grip belt stopper Grip belt stopper Attaching the shoulder strap Attach the shoulder strap and use it as a precaution against dropping the camera 1 Thread the belt through the shoulder belt installation hole Shoulder belt installation hole Thread the belt through the fastener after threading through the shoulder belt inst...

Page 28: ... camera Rotate the lens hood clockwise to attach it Be sure to attach the lens hood cap to protect the lens when not in use Lens hood Attaching the lens hood cap The lens can be covered by attaching the lens hood cap provided to the lens hood Lens hood cap Fitting the eye cup To attach the eye cup align the projections on the eye cup holder and eye cup and fit the holder and eye cup together Proje...

Page 29: ...sensor the battery has run out Keep the battery out of the reach of children Remote control usable range The distance between the remote control and the unit s remote control sensor Within approx 5 m Angle Approximately 15 upward approximately 10 downward approximately 15 leftward or approximately 15 rightward Except when optional accessories are attached Remote control sensor The remote control i...

Page 30: ...AVCHD PB Mode lamp POWER switch Set the POWER switch to the ON position while pressing the lock release button The CAMERA lamp lights red and the camera enters recording standby mode Lock release button Tally lamp You can set the tally lamp to light in the following situations by setting the REC LAMP item Page 110 of Vol 2 in the OTHER FUNCTIONS screen to OFF The tally lamp light can be switched t...

Page 31: ...rsor button and enter the selection by pressing the ENTER button Using the cursor button Menu screen operations 1 Press the MENU button to display the menu The thumbnail menu is displayed when in DV or PB mode Press and hold the MENU button to display the normal menu 2 Select an item by pressing the ENTER button Perform the same operation to select additional items or to set numerical values 3 Pre...

Page 32: ... viewfinder can be rotated 180 towards the lens and 90 towards the opposite direction You can record yourself 3 Loosen the left and right position lock ring and adjust the horizontal position When you have decided the position tighten and secure the left and right position lock ring Using the viewfinder 4 Adjust the diopter adjustment lever until images in the viewfinder are clear Diopter adjustme...

Page 33: ...e outlines does not effect the images you shoot 1 Set the POWER switch to ON Page E 29 2 Press the MENU button Menu operation Page E 39 Operations may also be performed using buttons on the remote control that correspond to those on the camera For details see Description of parts Remote control Page E 22 3 Select either the USER1 SW USER2 SW or the USER3 SW item in the setting menu SW DISP SETUP s...

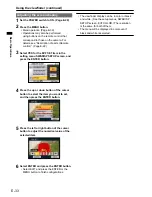
Page 34: ... button 4 Press the up or down button of the cursor button to select the item you want to set and then press the ENTER button 5 Press the left or right button of the cursor button to adjust the numerical value of the selected item 6 Select ENTER and press the ENTER button Select EXIT and press the ENTER or the MENU button to finish configurations Using the viewfinder continued The viewfinder displ...

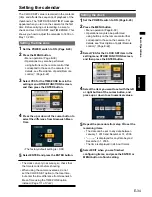
Page 35: ...lock can vary in accuracy so check that the time is correct before shooting When using the camera overseas do not set the CLOCK SET option to the local time but enter the time difference from Greenwich Mean Time using the TIME ZONE option instead Page 111 of Vol 2 Setting the calendar Setting the clock 1 Set the POWER switch to ON Page E 29 2 Press the MENU button Menu operation Page E 39 Operatio...

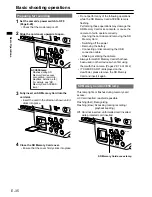
Page 36: ...hese operations may damage the SD Memory Card or its contents or cause the camera to fail to operate correctly Opening the card door and removing the SD Memory Card Switching off the power Removing the battery Connecting or disconnecting the USB connection cable Shaking or striking the camera Always format SD Memory Cards that have been used in other devices when first using them with this camera ...

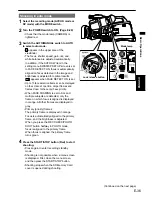
Page 37: ...en at one time Larger frames and frames closer to the center have priority When FACE FRAMING is set to ALL and multiple subjects are detected only the frame on which focus is aligned is displayed in orange All other frames are displayed in gray Primary priority frames The primary frame is displayed in orange Focus is automatically aligned to the primary frame and the brightness is adjusted When yo...

Page 38: ...following shooting conditions When there are complex patterns in the background When the camera is moved in large motions or when it is moved very quickly When a fast moving subject has been recorded and especially when HE has been set as the recording mode DV mode The camera s factory default setting is 576 50i recording The upper limit for the number of clips which can be recorded on a single SD...

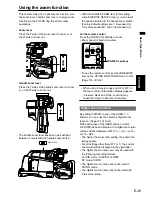
Page 39: ...tion Page 107 of Vol 2 With each press of the USER button to which D ZOOM has been allocated the digital zoom ratio will be switched between OFF x 1 x 2 x 5 x 10 OFF The higher the zoom ratio setting the poorer the image quality For all settings other than OFF x 1 the current zoom ratio will be displayed in the viewfinder The digital zoom function can only be used with the following recording form...

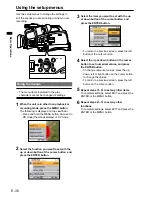
Page 40: ...n of the cursor button and press the ENTER button 3 Select the item you want to set with the up or down button of the cursor button and press the ENTER button To return to a previous screen press the left button of the cursor button 4 Select the up or down button on the cursor button to set numerical values and press the ENTER button To change numerical values press the up down left or right butto...

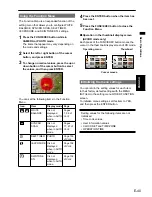
Page 41: ...not displayed when in AUTO mode Pages 17 67 of Vol 2 SELF TIMER PHOTO Page 105 of Vol 2 I EXPOSURE It is not displayed when in AUTO mode Page 102 of Vol 2 SKIN TONE DTL It is not displayed when in AUTO mode Page 102 of Vol 2 4 Press the ENTER button when the item has been set 5 Press the FUNC EXEC button to close the Function Menu Operation in the thumbnail display screen AVCHD mode only Each pres...

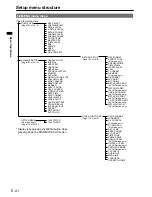
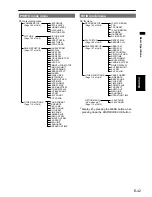
Page 42: ...S 1394 CONFIG Page 113 of Vol 2 Display it by pressing the MENU button while pressing down the DISP MODE CHK button RECORD SETUP REC FORMAT Page 103 of Vol 2 ASPECT CONV DV mode only PREREC MODE TIME STAMP INTERVAL REC TCG TC PRESET UB MODE DV mode only UB PRESET MIC GAIN1 MIC GAIN2 META CARD READ AVCHD mode only META DATA REC AVCHD mode only USER CLIP NAME AVCHD mode only META DATA PROP AVCHD mod...

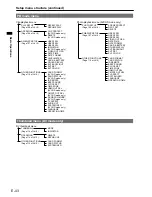
Page 43: ... Vol 2 IR REMOTE REC LAMP BEEP SOUND CLOCK SET TIME ZONE POWER SAVE HDMI OUT SEL CMPNT OUT SEL TV ASPECT MENU INIT LANGUAGE OPERATION TIME DV IN mode menu DV IN menu RECORD SETUP 1394 TC REGEN Page 103 of Vol 2 TCG TC PRESET 1394 UB REGEN UB MODE UB PRESET DV IN PRESET PLAY SETUP REPEAT PLAY Page 106 of Vol 2 RESUME PLAY SW DISP SETUP USER1 SW Page 107 of Vol 2 USER2 SW USER3 SW REC COUNTER VIDEO ...

Page 44: ... only DOWNCON MODE AVCHD mode only TV ASPECT AUDIO OUT SYSTEM INFO AVCHD mode only LANGUAGE OPERATION TIME Photo playback menu AVCHD mode only PHOTO SETUP SCENE PROTECT Page 106 of Vol 2 DPOF SET DELETE SW DISP SETUP USER1 SW Page 107 of Vol 2 USER2 SW USER3 SW VIDEO OUT OSD DATE TIME DATE FORMAT CARD BATTERY OTHER DISPLAY EVF BACKLIGHT EVF SET EVF COLOR OTHER FUNCTIONS CARD FORMAT Page 110 of Vol...

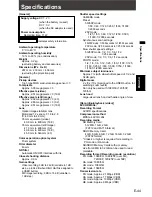
Page 45: ... speed settings CAMERA mode Preset 50i 50P mode 1 50 1 60 1 120 1 250 1 500 1 1000 1 2000 seconds 25P mode 1 25 1 50 1 60 1 120 1 250 1 500 1 1000 1 2000 seconds Synchronous scan settings 50i 50P mode 1 50 0 seconds to 1 250 0 seconds 25P mode 1 25 0 seconds to 1 250 0 seconds Slow shutter speed settings 50i 50P mode 1 2 1 3 1 6 1 12 1 25 seconds 25P mode 1 2 1 3 1 6 1 12 seconds PHOTO mode 1 2 1 ...

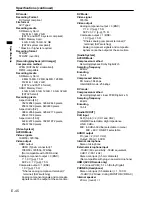
Page 46: ...terminal SW switching Analog component signals and composite signals cannot be output at the same time DV Mode Video signal 576 50i Video output Analog component output 3 BNC Y 1 0 V p p 75 Ω PB PR 0 7 V p p 75 Ω Composite output 1 BNC 1 0 V p p 75 Ω Shares analog component terminal Y terminal SW switching Analog component signals and composite signals cannot be output at the same time Audio Syste...

Page 47: ...SB 2 0 compliant PictBridge compatible CAM REMOTE Super mini jack 2 5 mm diameter ZOOM S S Mini jack 3 5 mm diameter FOCUS IRIS DV DV mode only 6 pin IEEE1394 format compliant digital input output Viewfinder LCD monitor 69 mm 2 7 inch wide type LCD color monitor approx 230 000 pixels AC adaptor Power Source 110 V 240 V AC 50 Hz 60 Hz 22 W Power Output 7 3 V DC 1 75 A Camera recorder 8 4 V DC 1 3 A...

Page 48: ...yback 37 42 Shooting 31 PictBridge 47 Protect Clip 45 Photo 45 R Recording format 121 Recording mode E 36 Recording pixels 32 Remaining battery capacity displays E 24 Remote control E 28 Repair 30 82 Repeat playback 49 85 Resume play 49 85 S Screen display 91 SD Memory Card E 11 E 12 E 13 28 76 SD Memory Card ACCESS lamp E 35 SD speed class E 13 SDHC Memory Card E 11 E 12 E 13 Self portrait shooti...

Page 49: ...114 THUMBNAIL menu 114 Tripod receptacle E 9 U USER button 12 61 Using scene files 21 71 V Video compatibility 41 VIDEO OUT terminal 52 89 Viewfinder E 31 W White balance 7 56 Z Zoom E 38 Bold and italicized page numbers 00 indicate pages in Volume 1 while the other page numbers 00 indicate pages in Volume 2 ...

Page 50: ...For more information about collection and recycling of old products and batteries please contact your local municipality your waste disposal service or the point of sale where you purchased the items Penalties may be applicable for incorrect disposal of this waste in accordance with national legislation For business users in the European Union If you wish to discard electrical and electronic equip...

Page 51: ...E 50 Memo ...

Page 52: ......

Reviews: