– 148 –
Chapter 5 Shooting — Display of the viewfinder status
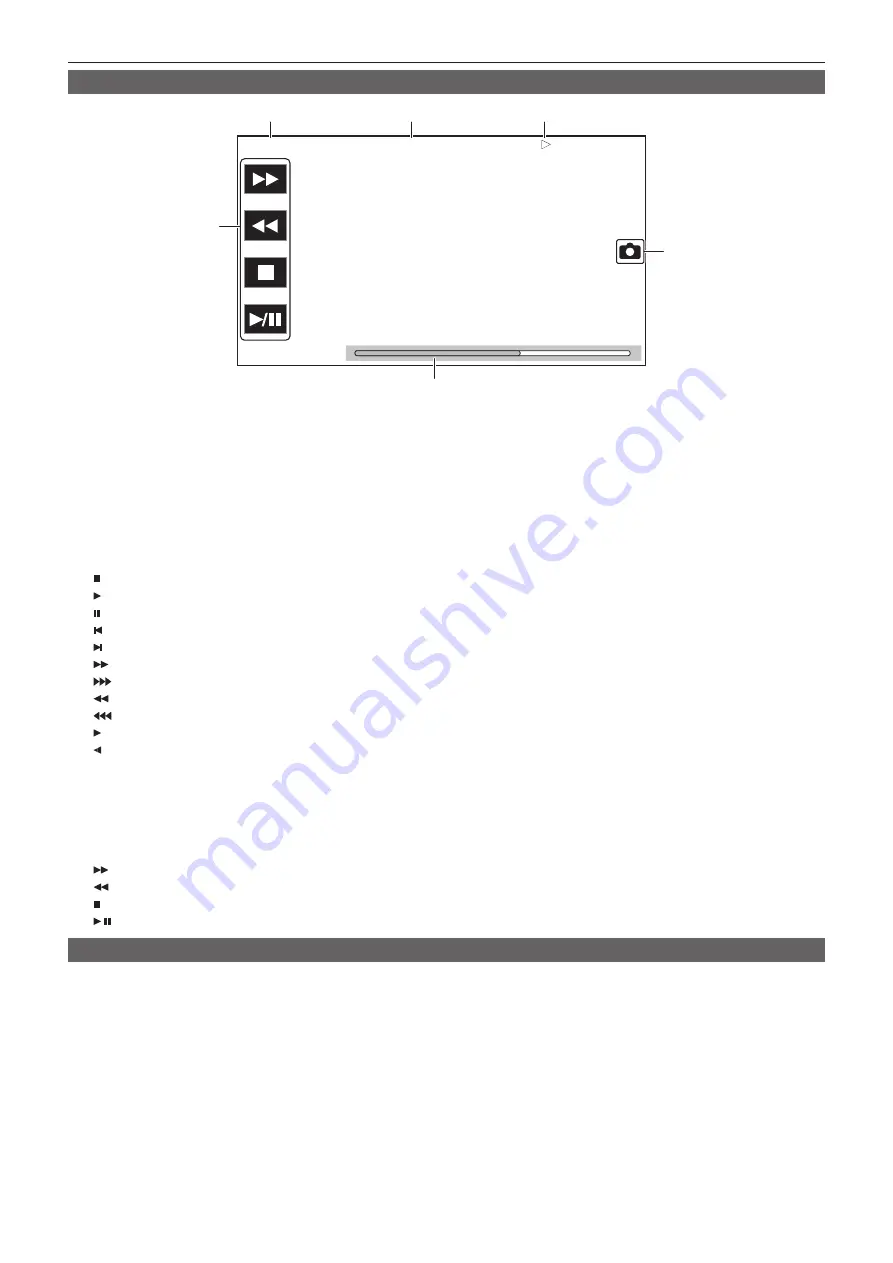
Screen display during playback
TCR 12:59:59:23
A001C001
3
5
6
1
2
4
1
Time code display
Displays the time data selected with the <DISPLAY> switch.
f
[TCR
**
:
**
:
**
:
**
]:
Displays the time code.
f
[UBR
**
**
**
**
]:
Displays the user bits.
f
[CLP
**
:
**
:
**
:
**
]:
Displays the counter value of the clip being played back.
2
Clip name
Displays the name of the clip being played back with up to eight characters from the start.
3
Playback status
Displays the status of playback.
Displays only during playback.
f
:
Stop
f
:
Playback
f
:
Pause
f
:
Starting playback position
f
:
Ending playback position
f
:
Fast-forward playback (10x speed)
f
:
Fast-forward playback (20x speed)
f
:
Fast-reverse playback (10x speed)
f
:
Fast-reverse playback (20x speed)
f
:
Slow playback/frame-by-frame
f
:
Reverse slow playback/frame-by-frame rewind
4
Still picture recording icon
Touching the icon while playing back or while paused records the scene as a still picture.
5
Direct playback bar
Displays the general position that is being played back.
6
Playback navigation icon
Operates by touching the icon.
f
:
Fast-forward playback
f
:
Fast-reverse playback
f
:
Stop
f
/
:
Playback/pause
Checking and displaying shooting status
Setting and status of each function is always displayed in the camera image screen but they can be set to be displayed only when required.
Most of the set values and status will not be displayed when the [VIDEO OUT/LCD/VF] menu
→
[INDICATOR]
→
[INDICATOR SW]
→
[OFF] is
selected.
When there is a need to confirm, push the <MARKER SEL>/<MODE CHECK> towards the <MCK> side while the camera image screen is displayed to
display the STATUS screen of the mode check which show the shooting status.
For details about each item that can be displayed in the mode check, refer to “Mode check display” (page 150).
The following table indicates each item to display/hide in each screen.
f
“
l
” indicates displaying and “—” indicates hiding.
f
You can select to display or hide each item in the [VIDEO OUT/LCD/VF] menu
→
[INDICATOR].
Summary of Contents for AJ-CX4000
Page 12: ...Before using the camera read this chapter Chapter 1 Overview ...
Page 179: ...This chapter describes about the output image Chapter 7 Output ...
Page 204: ...Maintenance of the camera and error message are described Chapter 10 Maintenance ...
Page 223: ...Web Site https www panasonic com Panasonic Corporation 2019 ...


