background image

54

Recording

Use this function when the light is emanating 
from behind the subject and the subject appears 
dark.

¬

Rotate the mode dial to select 

.

1

Press the center of the cursor 
button. Then press the down 
button to display the icon shown 
in the illustration.

2

Press the up button of the cursor 
button to select [

].

The image on the screen will become 
brighter.

To return to normal recording

Select [

] again.

If you turn off the power or operate the mode 
dial, the backlight compensation function is 
canceled.

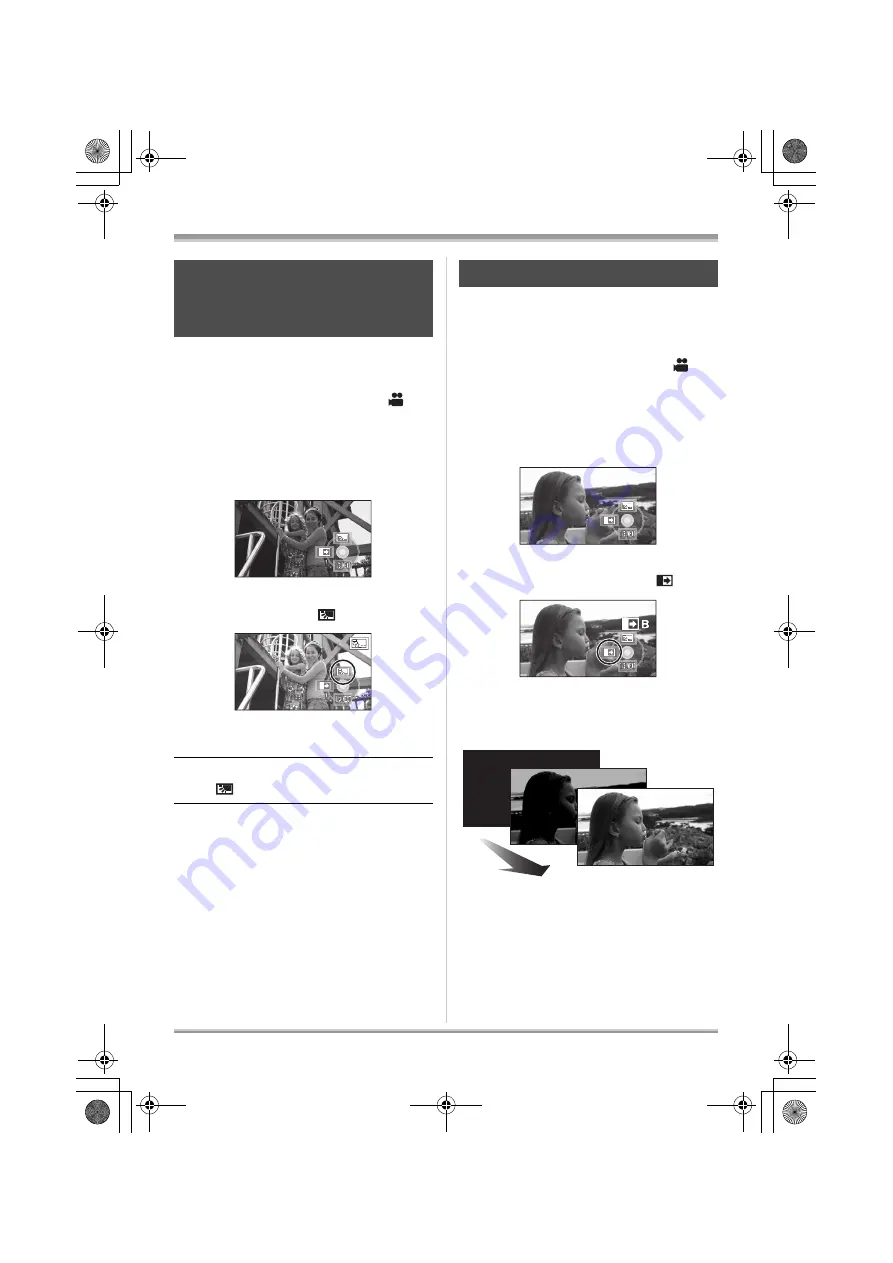
Fade in:

The image and audio gradually 
appear.

Fade out:

The image and audio gradually 
disappear.

¬

Rotate the mode dial to select 

.

1

Press the center of the cursor 
button. Then press the down 
button to display the icon shown 
in the illustration.

2

Press the left button of the 
cursor button to select [

].

3

Press the recording start/stop 
button.

Start recording. (Fade in)

When you start recording, the image/audio 
gradually appears.

Backlight compensation 

function

This is for preventing a backlit subject 
from being darkened.

Fade in/fade out function

VQT1R33(E).book  54 ページ  2008年3月6日 木曜日 午後4時33分

Summary of Contents for AG-HMC71E

Page 1: ... product please read the insructions carefully and save this manual for future use VQT1R33 E Operating Instructions Memory Card Camera Recorder Model No AG HMC71E F0308S0 F ENGLISH VQT1R33 E book 1 ページ 2008年3月6日 木曜日 午後4時33分 ...

Page 2: ...h a moulded three pin mains plug for your safety and convenience A 5 amp fuse is fitted in this plug Should the fuse need to be replaced please ensure that the replacement fuse has a rating of 5 amps and that it is approved by ASTA or BSI to BS1362 Check for the ASTA mark or the BSI mark on the body of the fuse If the plug contains a removable fuse cover you must ensure that it is refitted when th...

Page 3: ...F FIRE OR SHOCK HAZARD AND ANNOYING INTERFERENCE USE THE RECOMMENDED ACCESSORIES ONLY CAUTION In order to maintain adequate ventilation do not install or place this unit in a bookcase built in cabinet or any other confined space To prevent risk of electric shock or fire hazard due to overheating ensure that curtains and any other materials do not obstruct the ventilation CAUTION Excessive sound pr...

Page 4: ...e mains socket outlet shall be installed near the equipment and shall be easily accessible To completely disconnect this equipment from the AC mains disconnect the mains plug from the AC receptacle CAUTION Do not leave the unit in direct contact with the skin for long periods of time when in use Low temperature burn injuries may be suffered if the high temperature parts of this unit are in direct ...

Page 5: ...Press the battery removal button Remote Control Battery Refer to page 25 for the detail 1While pressing the stopper A pull out the battery holder 2Remove the button type battery from the battery holder EU 1 2 Battery removal button A VQT1R33 E book 5 ページ 2008年3月6日 木曜日 午後4時33分 ...

Page 6: ...s of Matsushita Electric Industrial Co Ltd and Sony Corporation Manufactured under license from Dolby Laboratories Dolby and the double D symbol are trademarks of Dolby Laboratories HDMI the HDMI Logo and the High Definition Multimedia Interface are the registered trademarks or trademarks of HDMI Licensing LLC LEICA is a registered trademark of Leica Microsystems IR GmbH and DICOMAR is a registere...

Page 7: ...ncoded by a consumer engaged in a personal and non commercial activity and or was obtained from a video provider licensed to provide AVC Video No license is granted or shall be implied for any other use Additional information may be obtained from MPEG LA LLC See http www mpegla com When any data are recorded on SD memory cards using this product and these cards are distributed to end users for com...

Page 8: ...le time available for the motion picture 46 Recording still pictures JPEG 47 Picture Quality Approximate Number of Recordable Pictures on an SD Card 51 Various recording functions 52 Zoom in out function 52 Recording yourself 53 Backlight compensation function 54 Fade in fade out function 54 Image stabilizer function 55 Guide line function 56 Zebra display 56 Colour bar 57 Input Audio Selection 58...

Page 9: ...eement 90 Operating environment 91 Installation 94 Installing HD Writer Ver2 5 94 Reading the operating instructions of the software applications 95 Software application uninstallation 95 Connection and recognition 96 Connection and recognition procedures 96 About the computer display 97 To disconnect USB cable safely 98 Verifying the unit is correctly recognized by the computer 98 Using HD Writer...

Page 10: ...th the unit for a long time When you use the unit in a sandy or dusty place such as a beach do not let sand or fine dust get into the body and terminals of the unit Also keep the unit away from sea water Sand or dust may damage the unit Care should be taken when inserting and removing a card If sea water splashes onto the unit wipe off the water with a well wrung cloth Then wipe the unit again wit...

Page 11: ...d Prepare spare batteries when going out for recording Prepare batteries enough to last for 3 to 4 times the period during you want to record pictures in In cold places such as a ski resort the period during which you can record pictures is shortened When you travel do not forget to bring an AC adaptor so that you can recharge the batteries at your destination If you drop the battery accidentally ...

Page 12: ...n When the LCD monitor gets dirty wipe it with a dry soft cloth In a place with drastic temperature changes condensation may form on the LCD monitor Wipe it with soft dry cloth When the unit has become very cold for example due to storage in a cold area its LCD monitor will be slightly darker than usual immediately after the power is turned on The normal brightness will be restored when the unit s...

Page 13: ...is unit is in a very humid place where the air is thick with steam e g a heated swimming pool When this unit is taken to a location with a significant temperature difference such as from a cold place to a hot place If for example you have used this unit for recording on a ski slope and are taking it into a heated room place the unit inside a plastic bag remove as much of the air from inside the ba...

Page 14: ...tal About the SDHC Memory Card and the compatibility of the recorded motion pictures About the SDHC Memory Card Be careful about the following It is not compatible with devices other than those that support SDHC If you use the SDHC Memory Card in another device use a device that is SDHC compatible l 27 About the compatibility of the recorded motion pictures They are not compatible with devices oth...

Page 15: ...at does not support high definition the images will be standard quality ª When connecting to a TV that does not have a HDMI terminal Connecting with the component video cable and the AV cable Connecting with the video cable and the audio cable The pictures cannot be played in high definition when using the AV cable They will be played back in widescreen standard definition Watching high definition...

Page 16: ... DVD disc Copy between media You can copy motion picture data from an SD card to a DVD disc or from a DVD disc to an SD card Easy editing You can easily edit split merge delete etc motion picture data that was copied to the hard disk of the computer For details on how to use the software application read the PDF operating instructions Saving the data on the SD card Important note Do not insert a d...

Page 17: ...s HD Writer 2 5E for HDC Shoulder belt SD memory card 2GB Eye cup Lens hood cap Ferrite core Operating instructions Attaching the eye cup To attach the eye cup align the projections on the eye cup holder and eye cup and fit the holder and eye cup together Turning the eye cup after attaching it to its holder may cause the holder to become disengaged Attaching the Lens Hood Cap The lens can be cover...

Page 18: ...te control sensor l 26 64 5 HANDLE ZOOM Switch HANDLE ZOOM l 52 6 Lock ring l 24 7 Grip zoom button W T l 52 8 External microphone input connector l 58 9 Photoshot button l 47 10 Grip belt l 22 The jack cover and cable holder have not been included in illustrations in this manual 1 2 3 4 5 6 8 10 9 7 VQT1R33 E book 18 ページ 2008年3月6日 木曜日 午後4時33分 ...

Page 19: ...ss lamp ACCESS l 34 23 Mode select switch AUTO MANUAL FOCUS l 38 61 24 PUSH AUTO Button PUSH AUTO l 62 25 Power LCD button POWER LCD l 42 26 Menu button MENU l 39 27 Delete button l 73 75 28 Cursor button l 35 11 12 14 15 16 18 17 19 23 25 24 22 27 26 20 21 13 14 19 20 21 22 15 16 17 18 23 25 27 24 26 28 Due to limitations in LCD production technology there may be some tiny bright or dark spots on...

Page 20: ...llation Slot l 30 37 USB terminal l 86 96 38 Input Level Selection Switches CH1 CH2 l 59 39 Recording lamp rear l 104 40 Audio Output Connectors CH1 CH2 l 82 84 85 41 Microphone Attenuation Switch CH1 l 59 42 Audio XLR Input Connector l 59 43 Microphone Attenuation Switch CH2 l 59 The jack cover and cable holder have not been included in illustrations in this manual 29 33 34 35 36 37 41 42 43 38 3...

Page 21: ...icrophone optional etc 46 Handle Recording Start Stop Button l 44 47 Handle Zoom Button W T l 52 48 Visibility Adjustment Lever l 43 49 Status indicator l 33 50 Recording Start Stop Button l 44 51 Mode dial l 33 44 46 47 48 51 45 49 50 VQT1R33 E book 21 ページ 2008年3月6日 木曜日 午後4時33分 ...

Page 22: ...ning the belt please take care so that the belt does not come away from the grip belt stopper A This is for installing the shoulder belt and carrying the camera on your neck or shoulder 1 Thread the belt through the shoulder belt installation hole A Thread the belt through the fastener after threading through the shoulder belt installation hole At least 2 cm of the belt must extend from the fasten...

Page 23: ...ckwise A to remove it In order to attach it place into slot B and then rotate it clockwise C Install the ND filter or the MC protector of the Filter kit VW LF43N optional on the front side of the lens hood piece Do not install anything else except for the lens cap For details refer to the operation manual of the filter kit Install the tele conversion lens VW T4314H optional or the wide conversion ...

Page 24: ... monitor as desired It can be rotated 180 towards the lens A and 90 towards the opposite direction B The brightness of the LCD monitor can be adjusted l 42 The unit may be damaged or fail if the LCD monitor is forcibly opened or rotated Using the finder 1 Adjust the angle 2 Loosen the lock ring 3 Adjust the horizontal position 4 Tighten the lock ring Brightness of the finder can be adjusted l 42 2...

Page 25: ...r back in place Concerning the button type battery When the button type battery runs down replace it with a new battery part number CR2025 The battery should normally last about 1 year however this depends on how frequently the unit is used Keep the button type battery out of the reach of children ZOOM START STOP PHOTO SHOT EXT DISPLAY DATE TIME VOL PLAY STOP SKIP SKIP MENU ENTER PAUSE SEARCH STIL...

Page 26: ...approximately 15 downward approximately 15 leftward or approximately 75 rightward The remote control is intended for indoor operation Outdoors or under strong light the unit may not operate properly even within the usable ranges Please take care so that the grip belt does not hide the remote controller receiver sensor 75 15 10 15 VQT1R33 E book 26 ページ 2008年3月6日 木曜日 午後4時33分 ...

Page 27: ...e used Cannot be guaranteed in operation Refer to About SD cards that you can use for motion picture recording Still picture recording Can be used This unit an SDHC compatible device is compatible with both SD Memory Cards and SDHC Memory Cards You can use SDHC Memory Cards on devices that are compatible with them However you cannot use SDHC Memory Cards on devices that are only compatible with SD...

Page 28: ...n format them on this unit again When the write protect switch A on SD Card is locked no recording deletion or editing will be possible on the card Keep the Memory Card out of reach of children to prevent swallowing A MultiMediaCard cannot be used on this unit ª SD Speed Class Rating Class 2 This indicates a Class 2 rating in the high speed standards SD Speed Class stipulated by the SD Card Associ...

Page 29: ...he battery on the battery mount by aligning the mark and then securely plug it in The output plug of the AC cable is not completely connected to the AC adaptor jack As shown in A there is a gap ª Charging lamp Lights up Charging Goes off Charging completed Flashing Make sure that the terminals of the battery or the AC adaptor are not exposed to dirt foreign objects or dust then reconnect them prop...

Page 30: ...e to set the mode dial to OFF and check that the status indicator is off before removing the battery Inserting the battery Removing the battery CAUTION Danger of explosion if battery is incorrectly replaced Replace only with the same or equivalent type recommended by the manufacturer Dispose of used batteries according to the manufacturer s instructions VQT1R33 E book 30 ページ 2008年3月6日 木曜日 午後4時33分 ...

Page 31: ...C 77 oF the charging time will become longer The charging time shown in the table are approximations 2 h 50 min indicates 2 hours 50 minutes When you charge a battery that has not been used for long time the charging time will become longer ª Recordable time The times shown in the table below are for when the temperature is 25 oC 77 oF and the humidity is 60 These times are approximations The reco...

Page 32: ...f time where the temperature is low or high or if the battery was repeatedly charged The times of remaining battery capacity indication will vary depending on the status of use These times are approximations When turning the mode dial to switch modes the time indication will turn off in order to recalculate the remaining battery capacity time When using batteries made by other companies the remain...

Page 33: ...S and set the date and time l 41 Set the mode dial to OFF The status indicator goes off and the power turns off Do not forcefully rotate the mode dial To turn on the power again after turning it off turn on the power after confirming that the operation indicator lamp is off How to turn on the power PC How to turn off the power Recording mode l 44 47 Use this to record motion pictures and still pic...

Page 34: ...red on the SD card Save important data recorded on this unit to a PC using the HD Writer Ver2 5 etc l 99 We recommend using HD Writer Ver2 5 to acquire data recorded on this unit When using an SD card on which data has been written many times the remaining time left for recording may be reduced l 45 ª Card access lamp When this unit accesses the SD card reading recording playback erasing etc the a...

Page 35: ...ss the center of the cursor button to enter it A Select an item by pressing the up down right or left button of the cursor button B Enter the selection by pressing the center of the cursor button Menu screen operations l 39 Rotate the mode dial to select 1 Press the center of the cursor button and icons will be displayed on the screen The indication disappears when the center of the cursor button ...

Page 36: ... The selected scene is played back on the full screen The operation icon is automatically displayed on the screen 2 Operate by pushing the up down right or left button of the cursor button The operation icon appears or disappears each time the center of the cursor button is pressed Operations during playback VQT1R33 E book 36 ページ 2008年3月6日 木曜日 午後4時33分 ...

Page 37: ...compensation 54 2 Fade 54 In manual mode MANUAL 3 White balance 63 2 Iris or gain value 64 1 Shutter speed 64 In manual focus mode FOCUS 21 Manual focus adjustment 62 Icon Cursor button Function Page 1 3 Playback pause 66 4 Stop playback and show thumbnails 66 6 2 Rewind during playback 66 2 Reverse slow frame playback during pause 67 5 1 Fast forward during playback 66 1 Forward slow frame playba...

Page 38: ... speed is adjusted to a maximum of 1 250 in recording mode Colour balance and focus may not be adjusted automatically depending on light sources or scenes If so manually adjust these settings Scene mode setting l 61 White balance setting l 63 Shutter speed setting l 64 Iris gain value setting l 64 Manual focus setting l 62 Icon Cursor button Function Page 1 3 Slide show start pause 71 4 Stop playb...

Page 39: ...he cursor button 3 Press the right button of the cursor button or press the center of the cursor button The submenu B is displayed 4 Select the Sub Menu by pressing the up or down button of the cursor button C Current settings on menus 5 Press the right button of the cursor button or press the center of the cursor button 6 Select the desired item by pressing the up or down button of the cursor but...

Page 40: ...rations while the menu screen appears The menu screen transition is the same as when the buttons on the main unit are used 1 Press the MENU button 2 Select a menu item Use the direction buttons 3 4 2 1 and ENTER button in place of the cursor button on the main unit 3 Press the MENU button to exit the menu screen Operating with remote control MENU ENTER MENU ENTER MENU ENTER VQT1R33 E book 40 ページ 2...

Page 41: ...g check the date and time display Changing the date and time display style Press the MENU button then select SETUP DATE TIME desired display style and press the center of the cursor button You can also show or change the date and time display by repeatedly pressing the DATE TIME button on the remote control Changing the display style Press the MENU button then select SETUP DATE FORMAT desired disp...

Page 42: ...tems BRIGHTNESS Brightness of the finder To adjust the brightness on the finder close the LCD monitor If the LCD monitor is open the settings for LCD Adjustment are reflected in the finder as well These settings will not affect the images actually recorded ª In order to increase the brightness of the entire LCD monitor Press the POWER LCD button The indication appears on the LCD monitor Press the ...

Page 43: ...he eye cup holder A Then removed the screw B at the center 2Insert a thin tool such as screwdriver in the hole on the bottom of the eye cup holder While pushing the internal tab A remove the eye cup holder ª Eye cup holder fitting method 1Check that the EVF LCD unit A is pulled out as far as it goes If you push in the EVF LCD unit then you may not be able to fit it 2Insert the eye cup holder strai...

Page 44: ...nd the recording Press the recording start stop button again to pause recording and are red during recording Do not move this unit until is green The images recorded between pressing the recording start stop button to start recording and pressing it again to pause recording become one scene Let s suppose that the power save function has been set to 5 MINUTES When the camera is left in pause state ...

Page 45: ...ion pictures do not remove the battery or disconnect the AC adaptor Also do not remove the SD card while the card access lamp is lit If you do either of the above the scene recovery message is displayed and the recovery operation will begin when the SD card is next inserted or the power is turned back on l 109 ª When recording stops suddenly during motion picture recording When using an SD card ot...

Page 46: ... Recordable time using the battery l 31 8 MB and 16 MB SD cards cannot be used for motion picture recording If the write protection switch on the SD card is set to LOCK it cannot be used for recording l 28 If an SD card is recorded on or erased many times it may no longer be possible to record motion pictures even if there is available memory on the SD card In this case after saving the data on PC...

Page 47: ...nly The shutter speed and the iris gain value are fixed and the unit focuses on the subject automatically If you set O I S l 55 to ON then the image stabilizer function will be more effective MEGA optical image stabilizer will be displayed A Focus indication The white lamp flashes Focusing The green lamp lights up When in focus No mark When focusing is unsuccessful B Focus area 4 Press the PHOTO S...

Page 48: ...ern noise may appear on a playback image depending on the picture content While this unit accesses the SD card is displayed the card access lamp is lit do not perform the following operations The SD card or the recorded data may be damaged Turn the unit off Open the card slot cover and remove the SD card Operate the mode dial Other products may degrade or not playback still pictures recorded on th...

Page 49: ...e is a bright part in the scene When the scene is filled with only horizontal lines When the scene lacks contrast When recording motion pictures ª Concerning the focusing area When there is a contrasting object ahead or behind the subject in the focus area the subject may not be focused If so move the contrasting object out of the focus area Even when it is still difficult to focus adjust the focu...

Page 50: ...y when the PHOTO SHOT button is pressed halfway will be displayed l 48 However the remaining number of still pictures will not be displayed The picture quality is different from normal still picture recording because priority is given to the motion picture recording We recommend pausing the motion picture recording to record a still picture with better picture quality About simultaneous recording ...

Page 51: ...ed in normal picture quality ª Picture quality and number of recordable pictures The number of recordable pictures depends on whether and are used together and on the subject being recorded The numbers shown in the table are approximations Picture quality Approximate Number of Recordable Pictures on an SD Card Picture size 1920t1080 Picture quality 8 MB 4 6 16 MB 10 17 32 MB 20 32 64 MB 47 74 128 ...

Page 52: ...een three steps using the handle zoom button 1 Slow 2 Medium 3 Fast If you take your finger off the zoom lever during zoom operation the operation sound may be recorded When returning the zoom lever to the original position move it quietly When zooming in while holding this unit by hand we recommend using the image stabilizer function l 55 When distant subjects are brought closer they are focused ...

Page 53: ...nification the more the image quality is degraded When the LCD monitor is turned to the lens side the right and left of the images displayed on the LCD monitor are reversed as in a mirror The recorded pictures are unchanged Rotate the mode dial to select Rotate the LCD monitor towards the lens side When the LCD monitor is rotated towards the lens side the icon will not be displayed even if you pre...

Page 54: ...e mode dial the backlight compensation function is canceled Fade in The image and audio gradually appear Fade out The image and audio gradually disappear Rotate the mode dial to select 1 Press the center of the cursor button Then press the down button to display the icon shown in the illustration 2 Press the left button of the cursor button to select 3 Press the recording start stop button Start r...

Page 55: ...become black or white Reduces the image shaking jitter due to hand movement when recording Rotate the mode dial to select Press the MENU button then select BASIC O I S ON and press the center of the cursor button To cancel the image stabilizer function Press the MENU button then select BASIC O I S OFF and press the center of the cursor button This function s default setting is ON In still picture ...

Page 56: ...ar on the images actually recorded Parts where white saturation colour saturation is likely to occur extremely brightly lit or shiny parts are displayed with diagonal lines zebra pattern Rotate the mode dial to select Press the MENU button then select ADVANCED ZEBRA ON and press the center of the cursor button A Zebra pattern You can record an image with little white saturation if you manually adj...

Page 57: ... and press the center of the cursor button To cancel the colour bar Press the MENU button then select ADVANCED COLOUR BARS OFF and press the center of the cursor button This function is canceled when the power is turned off The icon will not be displayed even if you press the center of the cursor button Colour bar This is for displaying a colour bar to check the colour tone VQT1R33 E book 57 ページ 2...

Page 58: ... switch to the FRONT position When the external microphone is not connected to the external microphone input connector the built in microphone records audio for the built in microphone right channel R ch When the external microphone is connected to the external microphone input connector the external microphone records audio for the external microphone right channel R ch Input Audio Selection Sett...

Page 59: ... the level is set to OFF the sensitivity increases which may introduce noise into the recording 3 Set the input level select switch to 48V to use a phantom microphone a microphone that requires the 48V power supply 48V When a phantom microphone is connected 48V power is supplied to the XLR CH1 CH2 terminal The battery will discharge faster when a phantom microphone is used When connecting a device...

Page 60: ...he AUTO mode 2 Adjust the recording level with the AUDIO LEVEL knob Adjust the audio recording level with the AUDIO LEVEL knob according to the audio level meter on the bottom of the LCD monitor or viewfinder To select whether to display or not display the audio level meter Press the MENU button then select VIDEO LEVEL METER desired item and press the center of the cursor button If the indicated a...

Page 61: ...ack or playback pause of recorded pictures this mode helps diminish camera shake During normal playback the image movement may not look smooth Avoid recording under fluorescent light mercury light or sodium light because the colour and brightness of the playback image may change If you record a subject illuminated with strong light or a highly reflective subject vertical lines of light may appear ...

Page 62: ...ment Press the AUTO MANUAL FOCUS switch down again to the FOCUS position You can also restore the auto focusing by setting the AUTO MANUAL FOCUS switch to AUTO The subject may not be in focus when zoomed in if focusing with a wide angle First zoom in on the subject and then focus on it The center of the screen is enlarged during manual focus adjustment This allows you to focus on the subject more ...

Page 63: ...ky Manual adjustment mode Mercury vapor lamps sodium lamps some fluorescent lights Lights used for wedding receptions at hotels stage spotlights in theatres Sunrise sunset etc To restore to the automatic adjustment Set the white balance mode to You can also restore the automatic adjustment by setting the AUTO MANUAL FOCUS switch to AUTO 1 Select fill the screen with a white subject 2 Push the up b...

Page 64: ...eviously adjusted is stored Whenever recording conditions change re set the white balance for correct adjustment When setting both the white balance and the iris gain set the white balance first Shutter Speed Adjust it when recording fast moving subjects Aperture Adjust it when the screen is too bright or too dark Rotate the mode dial to select 1 Set the AUTO MANUAL FOCUS switch to MANUAL The icon...

Page 65: ...d manually the gain value will increase automatically depending on how much the sensitivity lowers and the noise on the screen may increase When recording still pictures we recommend setting the shutter speed to 1 500 or less for even more beautiful pictures You may see vertical lines of light in the playback image of a brightly shining subject or highly reflective subject but this is not a malfun...

Page 66: ...ious page can be displayed by pushing the left and right button or pushing the down button of the cursor button selecting by pushing the left and right button and then pressing the center of the cursor button The scene number display switches to the page number when the motion picture playback tab or is selected 4 Press the center of the cursor button The selected scene is played back on the full ...

Page 67: ...s the thumbnails The date time displayed may be different from the recording date time and it may take time to display the thumbnail display when playing back motion pictures not recorded on this unit The remaining time for playback indication will be reset to 0h00m00s each scene Press the or 9 button on the remote control during playback 1 Move the cursor button up during playback to pause the pl...

Page 68: ...e direction they will be shown in intervals of 0 5 seconds ª Operating with the remote control 1 Press the button 2 Press the E or D button The volume of the speaker and the headphone when playback is adjusted Move the MONITOR LEVEL knob to change the volume level Towards r increases the volume Towards s decreases the volume Volume cannot be adjusted with the remote control Frame by frame playback...

Page 69: ...ect the scene to be played back To return to playing back all the scenes Press the MENU button then select PLAY SETUP PLAY MODE VIEW ALL and press the center of the cursor button When PLAY MODE is set to VIEW ALL all recorded motion pictures will be played back in succession is displayed Playing back all the scenes returns if the power is turned off or the mode dial is operated Even if scenes are ...

Page 70: ...e center of the cursor button Even if the power is turned off the repeat playback setting is retained If playback of a scene was stopped halfway the playback can be resumed from where it was stopped Press the MENU button then select PLAY SETUP RESUME PLAY ON and press the center of the cursor button If playback of a motion picture is stopped appears on the thumbnail view of the stopped scene To ca...

Page 71: ...s page can be displayed by moving the cursor button left and right or moving the cursor button down selecting by moving the cursor button left and right and then pressing the center of the cursor button The file number display switches to the page number when the still picture playback tab or is selected 4 press the center of the cursor button The selected file is played back on the full screen Th...

Page 72: ... card the access lamp is lit do not remove the SD card Do not operate the mode dial during the slide show It takes time to display the file depending on the number of pixels of the file Files which cannot be displayed as thumbnails the thumbnails are displayed as cannot be played back If you attempt to play back a file which is a different format or a damaged file an error message appears and the ...

Page 73: ...or button up or down to select ALL SCENES or SELECT and press the center of the cursor button When ALL SCENES is selected the following scenes except the protected scenes will be deleted Proceed to step 5 When PLAY MODE is set to VIEW ALL All the scenes on the SD card When PLAY MODE is set to BY DATE All the scenes selected by date 3 Only when SELECT is selected in step 2 Select the scene to be de...

Page 74: ...t while deleting When you delete scenes use a battery with sufficient battery power or use the AC adaptor If you delete scenes recorded on other products with this unit all the data related to the scenes may be deleted Scenes can be protected so that they are not deleted by mistake Even if you protect some scenes on an SD card formatting the SD card will delete them Rotate the mode dial to select ...

Page 75: ...ect ALL SCENES or SELECT and press the center of the cursor button When ALL SCENES is selected all files on the SD card except the protected files will be erased Proceed to step 5 3 Only when SELECT is selected in step 2 Select the file to be deleted then press the center of the cursor button The selected file is encircled by a red frame When the cursor button is pressed again the selected file wi...

Page 76: ...ufficient battery power or use the AC adaptor If files conforming to DCF standard are deleted all the data related to the files will be deleted Files recorded on an SD card can be protected so that they are not deleted by mistake Even if you protect some files on an SD card formatting the SD card will delete them Rotate the mode dial to select and then select the still picture playback tab 1 Press...

Page 77: ...r of prints to 0 You can also select multiple files in succession To complete the settings Press the MENU button To cancel all DPOF settings Press the MENU button then select PLAY SETUP DPOF SET CANCEL ALL and press the center of the cursor button When the confirmation message appears select YES then press the center of the cursor button ª What is DPOF DPOF stands for Digital Print Order Format Th...

Page 78: ...ton When formatting is complete press the MENU button to exit the message screen Use this unit to format SD cards If an SD card is formatted on other products such as a computer the time spent for recording may become longer and you may not be able to use the SD card Depending on the type of SD card being used it may take time to format During formatting do not turn this unit off When you format t...

Page 79: ... with a 16 9 aspect ratio on a TV with a 4 3 aspect ratio the images on the screen may be squeezed horizontally In this case change the menu setting to play back the pictures in the original aspect ratio Depending on the TV setting the pictures may not be displayed correctly For more information please read the operating instructions of your TV Press the MENU button then select SETUP TV ASPECT 4 3...

Page 80: ...the operating instructions for the TV Check HDMI RESOLUTION l 81 ª Fitting of the ferrite core When an HDMI cable is connected to this camera fit the supplied ferrite core to the cable as close to the camera as possible Unhook the two tabs on the ferrite core to open it Insert the HDMI cable into the ferrite core and close it A Ferrite core supplied B Tab C HDMI cable optional 1 Connecting with a ...

Page 81: ...terlace scan method which scans 1080 scan lines to display a high definition image The 1080 available scan lines are divided in half and scanned on the screen alternatively every 1 50th of a second The number of available scan lines is more than double the 576 scan lines used to display standard images until now so the images have clearer detail and a lot of presence 576p This is a progressive sca...

Page 82: ...nnel etc The name of the channel may differ depending on the connected TV 4 Start playback on this unit The image and audio are output on the TV ª About the setting when connecting the component terminals When this unit is connected to a TV with the component cable the output setting on this unit can be changed Set it to match the terminal on the TV that you connect to Press the MENU button then s...

Page 83: ...ng input switch For more information please read the operating instructions for the TV If the images are not displayed correctly on a wide screen TV adjust the aspect setting on the TV Refer to the operating instructions of the TV for details If the pictures are displayed squeezed horizontally on a regular TV 4 3 change the setting on this unit l 79 VQT1R33 E book 83 ページ 2008年3月6日 木曜日 午後4時33分 ...

Page 84: ...cted terminal Check the TV s input setting input switch For more information please read the operating instructions for the TV When a HDMI cable is connected at the same time priority is given to the output from the HDMI cable When the component cable is connected at the same time priority is given to the component cable for image output If the images are not displayed correctly on a wide screen T...

Page 85: ...el set will differ depending on the terminal to which the unit is connected 4 Start playback on this unit Then start recording on the connected device See the operating instructions of the video device for details To stop dubbing 1 Stop recording on the connected device 2 Then stop playback on this unit If the date and time display and function indication are unnecessary cancel them before dubbing...

Page 86: ...inter SD card and settings on this unit 2 Select a file to be printed then press the center of the cursor button The number of pictures set is displayed 3 Move the cursor button up or down to select the desired number of prints then press the center of the cursor button You can set up to 9 prints To cancel the setting set the number of prints to 0 Up to 8 files displayed can be set in succession b...

Page 87: ...lowing operations during printing These operations disable proper printing Disconnecting the USB cable Removing the SD card Switching the mode dial Turning off the power Check the settings for the paper size print quality etc on the printer The edges of still pictures recorded on this unit with a 16 9 aspect ratio may be cut at printing When using a printer with a trimming or borderless printing f...

Page 88: ...nit What you can do with a computer Data type Can do Software used Motion picture Copy to PC HD Writer Ver2 5 Write data to media Copy between media Play back on a PC Easy editing Convert into the MPEG 2 format Create a DVD video Still picture Playing back on a computer Standard Windows picture viewer or a commercially available picture viewer Copying files to a computer Windows Explorer Refer to ...

Page 89: ... SD card You can also copy motion picture data to a disc Copy between media You can copy motion picture data from an SD card to a disc or from a disc to an SD card Easy editing You can easily edit split merge delete etc motion picture data that was copied to the hard disk of the computer Start Playback Play back high definition images on an SD card Format disc Depending on the type of disc that yo...

Page 90: ...ompiling or Disassembly Licensee may not reverse engineer decompile or disassemble the Software except to the extent either of them is permitted under law or regulation of the country where Licensee resides Matsushita or its distributors or dealers will not be responsible for any defects in the Software or damage to Licensee caused by Licensee s reverse engineering decompiling or disassembly of th...

Page 91: ...dition Service Pack 2 Microsoft Windows XP Professional Service Pack 2 Microsoft Windows Vista Home Basic Microsoft Windows Vista Home Premium Microsoft Windows Vista Ultimate Microsoft Windows Vista Business CPU Intel Pentium III 1 0 GHz or higher including compatible CPU Intel Core 2 Duo 2 16 GHz or higher Intel Pentium D 3 2 GHz or higher or AMD AthlonTM 64 X2 Dual Core 5200 or higher is recomm...

Page 92: ...ible with a multi monitor environment If using Windows XP 2000 an administrative account user only can use this software If using Windows Vista administrative account and standard account users only can use this software An administrative account user should install and uninstall this software Necessary software Windows Vista DirectX 10 Windows XP 2000 DirectX 9 0c If you install the software on a...

Page 93: ...indows Vista Home Premium Microsoft Windows Vista Ultimate Microsoft Windows Vista Business Microsoft Windows Vista Enterprise CPU Windows Vista Intel Pentium III 1 0 GHz or higher Windows XP 2000 Intel Pentium III 450 MHz or higher or Intel Celeron 400 MHz or higher RAM Windows Vista Home Basic 512 MB or more Windows Vista Home Premium Ultimate Business Enterprise 1 GB or more Windows XP 2000 128...

Page 94: ...greement then place a check beside I accept the terms of the license agreement if you agree to them and click Next Continue to follow the on screen messages to install HD Writer Ver2 5 If you do not agree to the terms and conditions of the License Agreement installation is not possible If using Windows 2000 Microsoft DirectX 9 0c must be installed in order to operate HD Writer Ver2 5 Depending on ...

Page 95: ...tions that you no longer require 1 Select start Settings Control Panel Add or Remove Programs Applications or Uninstall a program 2 Select HD Writer 2 5E for HDC then click Change Remove Change or Remove or Add Remove or Uninstall Proceed with the uninstallation by following the on screen instructions After uninstalling the software be sure to reboot the PC The PC must be rebooted for the applicat...

Page 96: ...sert an SD card with recorded images in this unit and then set the mode dial to to turn on the power 3 Connect this unit and a computer A USB cable optional This unit is automatically recognized by the computer Insert the plugs as far as they will go The unit and computer will not operate properly if the plugs are not inserted fully When the unit is connected to a computer the operation mode canno...

Page 97: ...ive so that still pictures on the card can be copied to the computer with Explorer or other programs 1 Set the mode dial on the unit to and connect the unit to the computer Removable Disk is displayed in My Computer 2 Double click the folder that contains the files on the removable disk DCIM 100CDPFP 3 Drag and drop the files onto the destination folder on the computer hard disk Do not use the com...

Page 98: ...es restrictions on the functions has been established Consult the manufacturer or follow the steps in your computer s operating instructions to establish a mode in which all the functions can be used then proceed with operation 1 Select start Settings Control Panel Performance and Maintenance System 2 Click the Hardware tab then click Device Manager 3 Verify the following items are displayed ª If ...

Page 99: ...pplications ª Copying data on an SD card to the hard disk of the computer 1 Install a battery or connect an AC adapter 2 Insert an SD card with recorded images in this unit and then set the mode dial to to turn on the power 3 Connect this unit and a computer A USB cable optional Insert the plugs as far as they will go The unit and computer will not operate properly if the plugs are not inserted fu...

Page 100: ... the SD card 3 Select Start writing to copy the images from the hard disk of the computer to the SD card A confirmation message appears Click Yes and copying starts Refer to the operating instructions of the software PDF file for details on how to use it Do not insert a disc created with HD Writer Ver2 5 in a device that does not support the AVCHD format It may no longer be possible to eject it Al...

Page 101: ...with the driver installed as standard in the OS Supplied CD ROM HD Writer 2 5E for HDC is available for Windows only ª Copying still pictures on PC 1 Connect this unit to the personal computer via the USB cable optional 2 Double click NO_NAME or Untitled displayed on the desktop Files are stored in 100CDPFP folder etc in the DCIM folder 3 Using a drag and drop operation move the pictures you want ...

Page 102: ...ETER l 60 ª PICTURE PICT QUALITY l 51 SHTR EFFECT l 49 ª ADVANCED REC LAMP l 104 ZEBRA l 56 COLOUR BARS l 57 MF ASSIST l 62 ª SETUP FORMAT CARD l 78 DISPLAY l 104 DATE TIME l 41 DATE FORMAT l 41 POWER SAVE l 104 BEEP SOUND l 104 LCD SET l 42 EVF SET l 42 COMPONENT OUT l 82 HDMI RESOLUTION l 81 TV ASPECT l 79 INITIAL SET l 104 Menu list VQT1R33 E book 102 ページ 2008年3月6日 木曜日 午後4時33分 ...

Page 103: ...l 104 BEEP SOUND l 104 LCD SET l 42 EVF SET l 42 COMPONENT OUT l 82 HDMI RESOLUTION l 81 TV ASPECT l 79 Playback menus When the still picture playback tab is selected ª PLAY SETUP SCENE PROTECT l 76 DPOF SET l 77 ª SETUP FORMAT CARD l 78 DISPLAY l 104 DATE TIME l 41 DATE FORMAT l 41 POWER SAVE l 104 BEEP SOUND l 104 LCD SET l 42 EVF SET l 42 COMPONENT OUT l 82 HDMI RESOLUTION l 81 TV ASPECT l 79 V...

Page 104: ...et this to 5 MINUTES When using the AC adaptor When connecting the unit to a computer or printer via the USB cable ª BEEP SOUND This allows operations such as starting and ending recording to be signaled by a beep When OFF is set no beep is heard when an operation such as recording is started or ended 1 Beep When you start recording When you turn on the power When this unit is recognized by the co...

Page 105: ...hutter speed OPEN F2 0 F number 0dB Gain value R30min 30min 0h00m00s 1 100 OPEN 0dB MNL AWB HN MF 15 12 2008 15 30 10 10 W T 10 10 W T MEGA R30min 30min 0h00m00s 1 100 OPEN 100 0dB MNL AWB HN MF 2 1M AUTO MNL Fade White Fade Black Microphone level Zebra display Motion picture recording mode 5 Sports mode Portrait mode Low light mode Spotlight mode Surf snow mode Auto white balance Indoor mode reco...

Page 106: ... with PictBridge is connected 1 DPOF already set to more than 1 Protected still pictures Number of recording pixels for still pictures 1920k1080 The picture size is not displayed for still pictures recorded with other products that have different picture sizes from the sizes shown above Accessing the card When connected to a computer Time display When the date and time are not set l 41 The built i...

Page 107: ...sert a new SD card l 34 73 75 CANNOT RECORD THE NUMBER OF SCENES HAS EXCEEDED THE MAXIMUM LIMIT The maximum number of recordable scenes on 1 SD card has been reached so recording is not possible Delete unnecessary scenes or insert a new SD card l 34 73 75 CANNOT RECORD DATE CAPACITY IS FULL The number of scenes grouped together on a date has reached the maximum number so recording is not possible ...

Page 108: ...nnot be set when the colour bar is set CHANGE MODE TO USE USB The USB cable is connected in recording mode DISCONNECT USB CABLE You are attempting to switch the mode dial from PC Connection mode to another mode with the USB cable connected DISCONNECT USB CABLE The unit cannot correctly establish the connection to the computer or printer Disconnect and then reconnect the USB cable DISCONNECT USB CA...

Page 109: ...apacity of the battery is low PLEASE CONNECT AC ADAPTOR OR CHANGE BATTERY Use a sufficiently charged battery or the AC adaptor Depending on the condition of the data it may not be possible to completely repair the data If the recovery fails you will no longer be able to playback the scenes recorded before the power went off When data recorded on another device is recovered it may not be possible t...

Page 110: ...able the functions Backlight compensation When the iris gain is set Shutter effect While recording motion pictures Zoom When the PHOTO SHOT button is pressed halfway Scene mode When setting the AUTO MANUAL FOCUS switch to AUTO MF assist function When digital zoom 12k or higher is used Change of white balance When digital zoom 12k or higher is used Adjusting the shutter speed iris gain When the sce...

Page 111: ...shaken This is the sound of the lens moving and is not a defect This sound will no longer be heard when the unit s power is turned on Battery runs down quickly Is the battery fully charged Charge it with the AC adaptor l 29 Are you using the battery in an extremely cold place The battery is affected by ambient temperature In cold places the operating time of the battery becomes shorter Has the bat...

Page 112: ...remaining time indication or the elapsed time indication is not shown If you set SETUP DISPLAY OFF indications other than warnings and date indications disappear Recording does not start although power is supplied to this unit and the SD card is correctly inserted Has the SD card s write protect switch been set to LOCK No recording is possible while the write protect switch is set to LOCK l 28 Is ...

Page 113: ...ALITY set at the images may break up into a mosaic like pattern Record with PICT QUALITY set at instead l 51 Sound is not played back from the built in speaker of this unit Is the volume too low The sound volume can be adjusted by moving the MONITOR LEVEL knob during playback l 68 Although this unit is correctly connected to a TV images cannot be seen The images are squeezed horizontally Does the ...

Page 114: ...consult a dealer Use an SD card from 8 MB to 16 GB with this unit If the SD card is inserted in this unit it is not recognized Is the SD card formatted on a computer inserted Use this unit to format SD cards Please be aware that if an SD card is formatted then all the data recorded on the card will be erased l 78 If the SD card is inserted in another device it is not recognized Check that the devi...

Page 115: ... icons a white stripe appears on the right of the screen This is not a malfunction Problem Check points Even if connected by the USB cable this unit is not recognized by the computer Have you set this unit to the correct mode This unit is not recognized in recording playback mode Set it to PC connection mode Select another USB terminal on the computer Check the operating environment l 91 Turn the ...

Page 116: ...ed on the same date When a scene of less than 3 seconds is recorded 2008 1 1 2008 1 2 2008 1 3 SCENE SCENE SCENE SCENE SCENE SCENE Images pause for several seconds when the date changes Scenes with the same date will play back smoothly SCENE SCENE2 SCENE99 SCENE100 SCENE198 SCENE199 Images pause for several seconds where scenes are switching every time 99 scenes are recorded Ninety nine successive...

Page 117: ...NE2 Images pause for several seconds where a scene is deleted Switched scenes without deleting a scene will play back smoothly Delete SCENE1 SCENE2 SCENE1 SCENE2 SCENE1 SCENE2 SCENE4 SCENE3 Delete Recording Images pause for several seconds where a scene is deleted Switched scenes without deleting a scene will play back smoothly VQT1R33 E book 117 ページ 2008年3月6日 木曜日 午後4時33分 ...

Page 118: ...ded by the unit may become bluish or reddish under the influence of certain light sources To avoid such phenomena adjust the white balance White balance adjustment determines the white colour under different light sources By recognizing which is the white colour under sunlight and which is the white colour under a fluorescent light the unit can adjust the balance among the other colours Since the ...

Page 119: ... night views or in scenes involving fireworks or special lights Recording a subject in dark surroundings The unit cannot focus correctly because the light information that comes through the lens decreases considerably Recording a fast moving subject As the focus lens inside moves mechanically it cannot keep up with a fast moving subject When for example recording a sports event with fast moving su...

Page 120: ...2 8 Focal length 4 0 mm to 48 0 mm Filter diameter 43 mm Zoom 12k optical zoom 30k 700k digital zoom Monitor 3 inch wide LCD monitor approx 251 K pixels Finder 0 44 inch Wide EVF approx 183 K pixels Built in microphone Stereo microphone Speaker 1 round speaker 20 mm Head phone 3 5 mm stereo mini jack White balance adjustment Auto tracking white balance system Standard illumination 1 400 lx Minimum...

Page 121: ...PictBridge compliant Dimensions 233 mm W k233 mm H k434 mm D Mass Approx 2 7 kg without supplied battery and an SD card Mass in operation Approx 2 8 kg with supplied battery and an SD card Operating temperature 0 C to 40 C 0 C to 30 C when connected to the computer Operating humidity 10 to 80 Battery operation time See page 31 Recording media SD Memory Card 256 MB 512 MB 1 GB 2 GB FAT12 and FAT16 ...

Page 122: ...HC Memory Card 4 GB 8 GB 16 GB FAT32 system corresponding Compression JPEG Design rule for Camera File system based on Exif 2 2 standard DPOF corresponding Picture size 1920k1080 Power source Power consumption DC output AC 110 V to 240 V 50 60 Hz 22 W DC 7 3 V 1 75 A Unit operation DC 8 4 V 1 3 A Battery charging Maximum voltage Nominal voltage Rated capacitance DC 8 4 V DC 7 2 V 2640 mAh indicate...

Page 123: ...lizer 55 Initial setting 104 Iris 65 ª L LCD monitor 12 24 42 ª M Manual focus 62 Menu 39 Menu list 102 MF assist function 62 Mode dial 33 Motion picture compatibility 67 Motion picture playback 66 Motion picture recording 44 ª N Number of Recordable Pictures on an SD Card 51 ª O Operation icons 37 ª P PictBridge 86 Picture quality 51 Playing back motion pictures by date 69 POWER LCD 42 Power save...

Page 124: ...4 Simultaneous recording 50 Skip playback 67 Slide show 71 Slow motion playback 67 Still picture JPEG playback 71 Still picture JPEG recording 47 Still picture compatibility 72 ª T Tripod receptacle 23 TV aspect 79 ª V Volume adjustment 68 ª W White balance 63 118 ª Z Zebra display 56 Zoom 52 VQT1R33 E book 124 ページ 2008年3月6日 木曜日 午後4時33分 ...

Page 125: ...125 MEMO VQT1R33 E book 125 ページ 2008年3月6日 木曜日 午後4時33分 ...

Page 126: ...e items Penalties may be applicable for incorrect disposal of this waste in accordance with national legislation For business users in the European Union If you wish to discard electrical and electronic equipment please contact your dealer or supplier for further information Information on Disposal in other Countries outside the European Union These symbols are only valid in the European Union If ...

Reviews: