background image

37

2, 4, 5, 6, 7, 8

2

1)

2)

4)

1)

3)

1

3

PHOTO
SHOT

MENU

VOL/JOG

PUSH

r

1

TITLE

USR00002.TTL

TITLE

1

5

2, 4

MULTI/P-IN-P

3, 4

6

TAPE

CARD

PHOTO
SHOT

VOL/JOG

PUSH

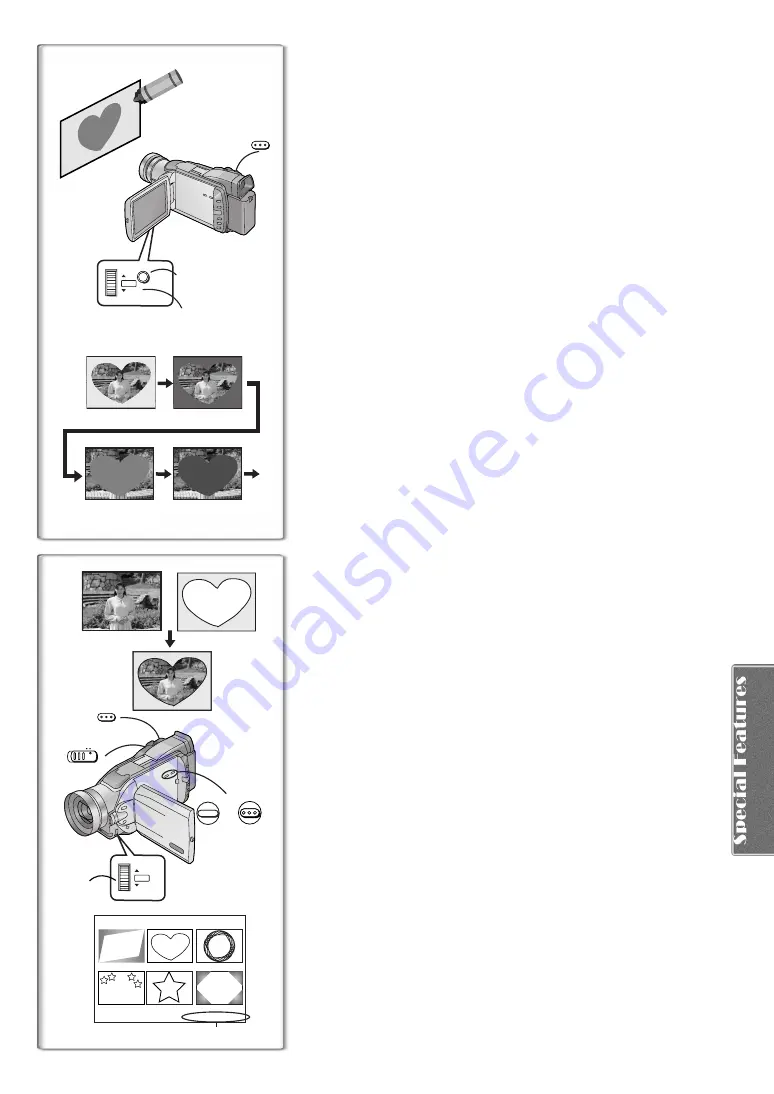
Creating a Title

You can create a title and record on a Memory Card.

1

Camera Mode: 
Set the Lens to the image you want to use for creating a title.
VCR Mode:
Search for the image you want to use for creating a title and 
set the Camera/Recorder to Still Playback Mode.

2

Set [CARD SETUP] >> [CREATE TITLE] >> [YES].

3

Press the [PHOTO SHOT] Button.

To perform Photoshot again, select [RETURN].

4

Rotate the [PUSH] Dial to select [COLOR] and then press it.

5

Rotate the [PUSH] Dial to select desired color and press it.

6

Rotate the [PUSH] Dial to select [LUMINANCE] and press it.

7

Rotate the [PUSH] Dial to adjust the title contrast and then 
press it.

8

Select [RECORD] and then press the [PUSH] Dial.

Selecting Colors

If you make color selection by rotating the [PUSH] Dial when creating a title, 
you can change the color as follows.
1) Original color (the color of the captured image)

Title in the original color in which the dark portion (blackish portion) of 

the captured image is missing.

2) Preset colors (black, blue, green, cyan, red, pink, yellow, and white)

Title in a preset color in which the dark portion (blackish portion) of the 

captured image is missing.

3) Original color (the color of the captured image)

Title in the original color in which the bright portion (whitish portion) of 

the captured image is missing.

4) Preset colors (black, blue, green, cyan, red, pink, yellow, and white)

Title in a preset color in which the bright portion (whitish portion) of the 

captured image is missing.

~~~~~~~~~~~~~~~~~~~~~~~~~~~~~~~~

Inserting a Title

You can select one of your original titles and display it. (It can be displayed in 
Camera Mode, VCR Mode, and Card Playback Mode.)

1

Press the [TITLE] Button.

The title that was created last is displayed. 

2

Press [MULTI] Button.

A list of titles is displayed.

3

Rotate the [PUSH] Dial to select a desired title.

The selected title is marked with a red frame.

4

Press the [PUSH] Dial or the [MULTI] Button.

The selected title is displayed.

5

Using the [TAPE/CARD] Selector, select the recording 
target.

Camera Mode: TAPE or CARD
VCR Mode: CARD 
Card Playback Mode: TAPE

6

Press the [PHOTO SHOT] Button.

A still picture is recorded under the inserted title.

If you record on a Cassette in Normal Recording Mode, set the [TAPE/
CARD] Selector to [TAPE] and press the Recording Start/Stop Button.

1  

File Name

Clearing a Title Display

Press the [TITLE] Button.

For other notes, see page 48. 

Summary of Contents for AG-EZ50

Page 1: ...Digital Video Camera Recorder Operating Instructions Model No AG EZ50UP R Before attempting to connect operate or adjust this product please read these instructions thoroughly VQT9420 Mini ...

Page 2: ... However there is no guarantee that interference will not occur in a particular installation If this equipment does cause harmful interference to radio or television reception which can be determined by turning equipment off and on the user is encouraged to try to correct the interference by one or more of the following measures Reorient or relocate the receiving antenna Increase the separation be...

Page 3: ...plug having one blade wider than the other or 3 wire grounding type plug a plug having a third grounding pin The 2 wire polarized plug will fit into the power outlet only one way This is a safety feature If you are unable to insert the plug fully into the outlet try reversing the plug If the plug still fails to fit contact your electrician to replace your obsolete outlet Do not defeat the safety p...

Page 4: ...AZARD Your Camera Recorder and power supply should not be exposed to rain or moisture Do not connect the power supply or operate your Camera Recorder if it gets wet Your Camera Recorder has been designed for outdoor use however it is not designed to sustain direct exposure to water rain sleet snow sand dust or a direct splashing from a pool or even a cup of coffee This action could permanently dam...

Page 5: ...e Balance 25 Adjusting White Balance Manually 25 Digital Effect Functions 26 VCR Mode Playing Back 28 Finding a Scene You Want to Play Back 28 Slow Motion Playback 29 Still Playback Still Advance Playback 29 Finding the End of Recording Blank Search Function 29 Index Search Functions 30 Playback Zoom Function 31 Playback Digital Effect Functions 31 Playing Back on Your TV 33 Audio Dubbing 33 Speci...

Page 6: ...20 220 240V AC An AC plug adaptor may be required for voltages other than 120V AC Please contact either a local or foreign electrical parts distributor for assistance in selecting an alternate AC plug We recommend using the accessory power plug adaptor in an area which has special AC outlets 2 Battery Pack l 12 Supplies power to the Camera Recorder 3 Remote Controller and Button Type Battery l 10 ...

Page 7: ... Lever to the right and pull down to open the Cassette compartment cover Insert the Cassette Press the PUSH TO CLOSE 3 to load the Cassette Close the lower compartment Cover 5 Start recording l 20 Press the 4 Button Recording starts Press the 4 Button again to pause the recording To watch the Playback Picture 6 Switch to the VCR Mode rewind the tape and play the tape back l 28 Slide the 5 Switch T...

Page 8: ...ing Check Button S l 20 10 Title Button TITLE l 37 11 Multi Picture Button MULTI l 27 32 36 37 Picture in Picture Button P IN P l 27 12 Speaker 13 Microphone built in stereo 14 Focus Ring l 23 15 Lens Hood Always keep the Lens Hood attached to the Camera Recorder so as to shut out unnecessary light 16 Lens LEICA DICOMAR LEICA is a registered trademark of Leica microsystems IR GmbH and DICOMAR is a...

Page 9: ... limitations in LCD production technology there may be some tiny bright or dark spots on the Viewfinder screen However this is not a malfunction and does not affect the recorded picture 43 Upper Cassette Compartment Cover l 13 44 Cassette Eject Lever OPEN EJECT l 13 45 Lower Cassette Compartment Cover l 13 46 Cassette Holder l 13 47 Tripod Receptacle Tripod Mounting Hole Used for mounting the Came...

Page 10: ...unter Reset Button RESET l 52 4 Indication Shift Button COUNTER l 45 5 Multi Picture Picture in Picture Button MULTI P IN P l 27 32 36 37 6 Recording Button REC l 41 42 7 Audio Dubbing Button A DUB l 33 8 Upward Direction Button π for Playback Zoom Function l 31 9 Left Right Direction Buttons for Playback Zoom Function l 31 10 Downward Direction Button for Playback Zoom Function l 31 11 Slow Motio...

Page 11: ...place battery with CR2025 only Use of another battery may present a risk of fire or explosion Caution Battery may explode if mistreated Dispose of used battery promptly Keep away from children Do not recharge disassemble or dispose of in fire ªUsing the Remote Controller 1 Direct the Remote Controller to the Remote Control Sensor on the Camera Recorder and press the desired button Distance from th...

Page 12: ...Lamp lights up and charging starts When the CHARGE Lamp goes off charging is completed 2 Attach the charged Battery to the Camera Recorder Disconnecting the Power Source Set the OFF ON MODE Switch to OFF and while pressing the BATT EJECT Button 1 slide the Battery or DC Cable upward to disconnect it For other notes see page 46 Charging Time and Available Recording Time A Charging Time B Maximum Co...

Page 13: ...he Camera Recorder and pull the Shoulder Strap 2 Fold the tip of the Shoulder Strap pass it through the Shoulder Strap Length Adjuster and pull it Pull it out more than 1 inch 2 cm 2 from the Shoulder Strap Length Adjuster so that it cannot slip off Inserting a Cassette When power is supplied to the Camera Recorder the cassette can be taken out without turning the Camera Recorder on 1 Slide the OP...

Page 14: ...to ON 2 Slide the PUSH OPEN Lever and at the same time bring out the LCD Monitor about 90x in the direction of the arrow The Viewfinder goes off 3 Adjust the LCD Monitor angle according to the desired recording angle The LCD Monitor can rotate a maximum of 180x 2 from the vertical position to the upward direction and a maximum of 90x 3 to the downward direction Forcefully rotating the LCD monitor ...

Page 15: ... 4 on the Remote Controller To select items on the Menu press the ITEM Button 5 on the Remote Controller To set the mode for the selected items press the SET Button 6 on the Remote Controller To Exit the Menu Screen Press the MENU Button again About the Menu Mode Setting The setting selected on the Menu will be retained even when the Camera Recorder is turned off However if the Battery or AC Adapt...

Page 16: ...ge Stabilizer EIS l 22 4 Digital Zoom D ZOOM l 22 5 Recording Mode REC MODE l 21 6 Returning to the Main Menu RETURN DIGITAL EFFECT Sub Menu 7 Digital Effects 1 EFFECT1 l 26 8 Digital Effects 2 EFFECT2 l 26 CARD SETUP Sub Menu 9 Picture Size PICTURE SIZE l 34 10 Picture Quality REC MODE l 34 11 Card Low Brightness LOW LIGHT SHOT l 34 12 Title Creation CREATE TITLE l 37 MULTI PICTURES Sub Menu 13 M...

Page 17: ...io Selector AUDIO OUT l 48 6 Returning to the Main Menu RETURN DIGITAL EFFECT Sub Menu 7 Digital Effect On Off EFFECT l 31 32 8 Digital Effect Selection EFFECT SELECT l 31 32 CARD SETUP Sub Menu 9 Picture Quality REC MODE l 34 10 Title Creation CREATE TITLE l 37 MULTI PICTURES Sub Menu 11 Multi Picture Mode SCAN MODE l 32 12 Strobe Multi Picture Speed SPEED l 32 13 Swing Mode SWING l 32 RECORDING ...

Page 18: ...TURE menu for erasing the displayed picture appears Use this menu after the picture to be erased has appeared 11 FILE LOCK The FILE LOCK menu to prevent the accidental erasure of the displayed picture lock setting appears Use this menu after the picture to be locked has appeared 12 DPOF SETTING The DPOF SETTING menu for performing the DPOF settings for the displayed picture appears Use this menu a...

Page 19: ... lithium battery and reset the date and time Internal Lithium Battery Recharge The internal lithium battery sustains the operation of the clock When the 0 Indication is lit the internal lithium battery is near exhaustion 1 Connect the AC Adaptor to the Camera Recorder with the power turned off and then connect to the AC Jack After charging for 4 hours the built in lithium battery can power the clo...

Page 20: ...tes see page 46 ªTo View the recorded scene while the Recording is paused Camera Search The recorded scene can be viewed by holding down the sSEARCH Button 7 or rSEARCH Button 8 in the Recording Pause Mode The Camera Search function is useful for finding the starting point of a new scene to create a smooth transition from one scene to another When the sSEARCH Button is pressed pictures are played ...

Page 21: ... used For normal recording set REC MODE to NORMAL ªContinuous Photoshot If the PHOTO SHOT Button is held down with the SHUTTER of the Sub Menu OTHER FUNCTIONS set to ON the Camera Recorder will record still images without interruptions every 0 7 seconds until the button is released The screen blinks and at the same time a shutter clicking sound is recorded However this function is not enabled when...

Page 22: ...rtion in these images If the Camera Recorder shakes too much this Function may not be able to stabilize images 1 Set CAMERA FUNCTIONS CAMERA SETUP EIS ON The EIS Indication 1 appears Canceling Optical Image Stabilizer Set EIS on the CAMERA SETUP Sub Menu to OFF For other notes see page 46 Fade In Out Functions Fade In 1 Fade In brings out images and sounds gradually from a black screen at the begi...

Page 23: ...t Mode 2 Focuses on the main subject of the image and leaves the background slightly out of focus 4 Low Light Mode 3 Preserves the mood of dim light settings without altering picture brightness Ω Spotlight Mode 4 Neutralizes the additional brightness created by a spot light º Surf Snow Mode 5 Compensates for excessive illumination from sun glare to produce a clear picture Canceling the Program AE ...

Page 24: ...ected the image becomes darker When a value closer to OPEN18dB is selected the image becomes brighter The value to which dB is attached indicates a gain value If this value is too large the quality of the image deteriorates To Resume Automatic Adjustment Set the Mode Selector Switch to AUTO Or Hold down the PUSH Dial For other notes see page 47 Recording with a Fixed Brightness AE Lock Function Th...

Page 25: ...tion appears after the screen has darkened for a moment When the 1 Indication flashes after turning the Camera Recorder on the previously adjusted white balance setting is still kept To Resume Automatic Adjustment Press the W B Button repeatedly until no Indication appears Or set the Mode Selector Switch to AUTO About White Balance Sensor The White Balance Sensor 1 determines the nature of the lig...

Page 26: ...th a painting like effect Selecting a desired digital effect Set CAMERA FUNCTIONS DIGITAL EFFECT EFFECT1 or EFFECT2 a desired digital effect Canceling the digital effect Set CAMERA FUNCTIONS DIGITAL EFFECT EFFECT1 or EFFECT2 OFF For other notes see page 47 ªWipe Mode and Mix Mode Wipe Mode Like a curtain is being pulled the still picture of the last recorded scene gradually changes to the moving i...

Page 27: ... the Recording Start Stop Button or the PHOTOSHOT Button to record on the Cassette Deleting all the captured Multi pictures While 9 multi pictures are displayed press the MULTI Button If MANUAL has been selected press the MULTI Button after 9 pictures are displayed To Display the Multi Pictures again Press the MULTI Button for 1 second or longer To Delete Multi pictures one by one When pictures we...

Page 28: ...ck press the 5 Button or the 6 Button only briefly As this locks the search function you do not need to keep the button pressed for a long time To resume normal playback press the 1 Button During Cue and Review Playback pictures with fast moving subjects may contain mosaic like noise patterns ªHyper Check Function If you press the 5 Button during fast forwarding of the tape or the 6 Button during ...

Page 29: ...g Dial PUSH Dial 1 of the Camera Recorder in the Still Playback Mode still pictures can be advanced one frame at a time in the forward or backward direction If the Camera Recorder is left in the Still Playback Mode for more than 5 minutes the Camera Recorder switches to the Stop Mode to protect the video heads from excessive wear and tear Finding the End of Recording Blank Search Function The Blan...

Page 30: ...DEX PHOTO 2 Press the 9 Button 1 or the Button 2 on the Remote Controller With each press of the corresponding button still pictures recorded in Photoshot Mode are searched After Pictures with Sounds are played back for 4 seconds the Camera Recorder switches to the Still Playback Mode ªScene Index Search 1 Set VCR FUNCTIONS PLAYBACK FUNCTIONS INDEX SCENE 2 Press the 9 Button 1 or the Button 2 on t...

Page 31: ...selected effect s indication flashes Canceling the Digital Effect Press the SELECT Button on the Remote Controller repeatedly until the Digital Effect Indication is cleared For other notes see page 47 ªPlayback with Wipe Mode and Mix Mode 1 Press the 1 Button to start playback 2 Press the SELECT Button of the Remote Controller and select WIPE or MIX 3 Press the STORE Button at the moment you want ...

Page 32: ... Press the MULTI Button If STROBE is selected 9 screens are automatically captured starting at the point which the Button is pressed If MANUAL is selected press the MULTI Button at each scene you want to capture When 9 screens are captured the tape will stop If PHOTO or SCENE is selected From the point at which the Button is pressed 9 screens of pictures to which index signals are attached are cap...

Page 33: ...was recorded with AUDIO REC on the RECORDING SETUP Sub Menu of the CAMERA FUNCTIONS Main Menu set to 16bit the original sound is erased If you want to preserve the original sound use the 12bit Mode when recording Audio Dubbing cannot be performed onto recordings made in LP Mode l 19 1 Set VCR FUNCTIONS AV IN OUT SETUP AV JACK IN OUT 2 And then select A DUB INPUT MIC or AV IN Set to AV IN when exte...

Page 34: ...rd Photoshot Recording a picture through the Camera Recorder lens CAMERA Mode 1 Slide the TAPE CARD Selector to CARD 2 Set PICTURE SIZE on the CARD SETUP Sub Menu to 1488t1128 or 640t480 If you select 1488t1128 you can take pictures with higher resolution Mega Pixel Recording 3 Press the PHOTO SHOT Button The ø Indication will light in red 1 During Card Photoshot recording the following functions ...

Page 35: ... played back for approximately 5 seconds each from the first to the last recorded picture and the playback then stops To Pause the Slide Playback Press the Button The SLIDE Indication is displayed 5 To restart slide playback press the Button again or press the 1 Button The slide playback starts from the next image and ends at the last displayed picture To Stop the Slide Playback Press the Button T...

Page 36: ...lected number s picture appears The same setting can be performed using the short cut menu l 18 For other notes see page 48 Copying pictures from a Memory Card to a Cassette After setting to the Card Playback Mode l 35 To Copy One Picture 1 Slide the TAPE CARD Selector to TAPE 2 Display a desired picture Please refer to To select a Desired Picture and Play it Back 3 Press the PHOTO SHOT Button It ...

Page 37: ...ue green cyan red pink yellow and white Title in a preset color in which the dark portion blackish portion of the captured image is missing 3 Original color the color of the captured image Title in the original color in which the bright portion whitish portion of the captured image is missing 4 Preset colors black blue green cyan red pink yellow and white Title in a preset color in which the brigh...

Page 38: ...ures recorded on a Memory Card Using the Camera Recorder you can delete the still pictures and titles recorded on a Memory Card After the picture has been deleted it cannot be restored After setting to the Card Playback Mode l 35 To Select and Delete Picture s by selection 1 Set CARD FUNCTIONS DELETE PICTURE TITLE DELETE PICTURE BY SELECTION or DELETE TITLE BY SELECTION 2 Rotate the PUSH Dial to s...

Page 39: ...used with any system that provides DPOF After setting to the Card Playback Mode l 35 1 Set CARD FUNCTIONS CARD EDITING DPOF SETTING YES 2 Rotate the PUSH Dial to select VARIABLE and then press it 3 Rotate the PUSH Dial to select the picture and then press it 4 Rotate the PUSH Dial to set the number of prints 1 and then press it The framed images will be set to DPOF and the 2 will be displayed The ...

Page 40: ...MediaCard s by this Camera Recorder conform with DCF Design Rules for Camera Files Systems universal standard established by JEIDA Japan Electronic Industry Development Association If you attempt to play back images recorded with this Camera Recorder in other equipment or to play back images recorded with other equipment in this Camera Recorder you may not be able to play them back Please check th...

Page 41: ...ther Equipment 3 Insert a recorded Cassette and start playback Camera Recorder 4 While pressing the REC Button press the PLAY Button Both buttons are located on the Remote Controller 5 Press the Button or Button to stop recording Other Equipment 6 Press the Stop Button to stop playback 1 S Video Cable not supplied 2 A V Cable supplied ªAnalogue Digital Conversion When the Camera Recorder is connec...

Page 42: ...mode Playback Unit A 3 Press the 1 Button to start playback Recording Unit B 4 While pressing the REC Button press the PLAY Button Both Buttons are located on the Remote Controller Recording starts Stopping Dubbing Press the Button on the recording unit first and then press the Button on the playback unit to stop dubbing CAUTION Unauthorized exchanging and or copying of copyrighted recordings may ...

Page 43: ...g Speed Mode SP Standard Play Mode l 19 LP Long Play Mode l 19 7 Index For several seconds while index signals are being recorded the INDEX Indication flashes l 30 Search Number S 1 l 30 The figure indicates which number of scene ahead from the present scene is to be played back 8 Tape Run Indications REC Recording l 20 PAUSE Recording Pause l 20 Playback Camera Search in forward direction l 20 28...

Page 44: ... Wind Noise Reduction WIND CUT l 16 Progressive Photoshot Mode æ l 21 18 File Type Display PICTURE TITLE l 35 37 19 File Name Display l 35 36 37 20 Card Picture Indications 1 DPOF setting setting for 1 or more print l 39 Number set DPOF 00 l 39 Picture size l 34 35 When you playback a scene recorded on a Camera Recorder with a picture size specification different from the one stated above the foll...

Page 45: ...this Indication will appear for approximately 5 seconds If this Indication appears return the LCD Monitor to the original position in order to check the specific content of the Warning Alarm Indication AV INPUT RECORDING When you are attempting to record on the Memory Card during dubbing l 41 on the Cassette NO CARD There is no Memory Card inserted PLEASE WAIT When reading the Memory Card playback...

Page 46: ...TO You cannot use the Progressive Photoshot Function in the following circumstances When the zoom magnification is approximately 10 t or higher When the shutter speed is 1 750 or faster When EFFECT1 is set to WIPE MIX STROBE GAIN UP TRAIL MOSAIC MIRROR When the pictures are displayed on a Multi screen or P IN P screen Continuous Photoshot Function Frame Mode The surrounding brightness is not enoug...

Page 47: ...case using the Digital Effect Function including Multi Picture Mode P IN P Mode is not possible Card Photoshot Mode ªWipe Mode and Mix Mode Camera Mode l 26 If either one of the following operations is carried out stored images will be erased and Wipe and Mix Functions cannot be used Use the Camera Search Function Press the CAMERA STILL Button Switch the TAPE CARD Selector Slide the OFF ON MODE Sw...

Page 48: ...n the Card Photoshot mode the Camera Recorder automatically saves the file names Imga0001 jpg etc along with the pictures A file name is recorded with each picture as a running number ªRecording to a Card from other equipment l 34 41 If you set the TAPE CARD Selector to CARD you can use the Card Photoshot Function for externally input signals Not during recording Black streaks may appear at the fo...

Page 49: ...te Care should be taken when inserting and ejecting the Cassette Do not spray insecticides or volatile chemicals onto the Camera Recorder If the Camera Recorder is sprayed with such chemicals the Camera Recorder body may deform and the surface finish may peel off Do not keep rubber or plastic product in contact with the Camera Recorder for a long period of time When cleaning the Camera Recorder do...

Page 50: ...at Steps 1 to 3 Do not use the Head Cleaner for 3 times or more consecutively Notes Do not rewind every time you use the Head Cleaner Rewind only when the tape reaches the end and then use it again from the beginning in the same manner as before If the heads become dirty soon after cleaning the tape may be damaged In this case immediately stop using that Cassette Do not clean the heads excessively...

Page 51: ...itor Viewfinder Lens Hood LCD Monitor In a place with drastic temperature changes condensation may take place on the LCD Monitor Wipe it with soft dry cloth If your Camera Recorder is extremely cold when you turn its power on the image on the LCD Monitor is slightly darker than usual at first However as the internal temperature increases it goes back to the normal brightness Extremely high precisi...

Page 52: ...effect of light on the subject s color what is called White Balance Adjustment becomes necessary White Balance Adjustment White Balance Adjustment recognizes the color of light and makes adjustment so that the white color will become pure white Auto White Balance Adjustment This Camera Recorder stores settings that are optimal for several kinds of general light sources The Camera Recorder determin...

Page 53: ...1 0 Vp p 75 ohm S Video Output Level Y Output 1 0 Vp p 75 ohm C Output 0 286 Vp p 75 ohm Audio Output Level 316 mV 600 ohm Video Input Level 1 0 Vp p 75 ohm S Video Input Level Y Input 1 0 Vp p 75 ohm C Input 0 286 Vp p 75 ohm Audio Input Level Line 316 mV 10 kohm or more Mic Input Mic sensitivity 50 dB 0 dB 1 V Pa 1 kHz Stereo mini jack Digital Interface DV Input Output Terminal i LINK 4 pin Dime...

Page 54: ...Rechargeable Lithium Ion Battery Pack 5300mAh Rechargeable Lithium Ion Battery Pack Figure BN SDCAPU 1B BN SDABPU 1B USB Reader Writer for SD Memory Card compatible with MultiMediaCard SD PCMCIA Adaptor compatible with MultiMediaCard RP SD008 8MB SD Memory Card 16MB SD Memory Card 32MB SD Memory Card 64MB SD Memory Card RP SD016 RP SD032 RP SD064 Camera Recorder Accessory System Please refer to pa...

Page 55: ... The Battery cannot be charged If the DC Cable is connected to the AC Adaptor charging cannot be performed Disconnect the DC Cable Recording does not start although power is supplied to the Camera Recorder and the Cassette is correctly inserted Is the accidental erasure protection slider on the Cassette open If it is open set to SAVE recording cannot be performed Is the tape wound to the end Inser...

Page 56: ...ounds separately The original sound was erased when audio dubbing was performed If you perform audio dubbing on a recording done in 16bit Mode the original sound will be erased If you want to preserve the original sound be sure to select 12bit Mode at the time of recording Sounds cannot be played back Although a Cassette with no audio dubbing is being played is AUDIO on the PLAYBACK FUNCTIONS Sub ...

Page 57: ... Still Picture Recording 34 Memory Card 34 Memory Stop Function 52 Menu Screen 15 Microphone 48 Mirror Mode Digital Effect 26 31 Mix Mode 26 31 Mosaic Mode 26 31 Multi Picture Mode 27 32 N Negative Mode 26 31 O Optical Image Stabilizer 22 P PhotoShot 21 Picture Search Mode 36 Picture in Picture Mode 27 Playback Digital Effect Functions 31 32 Playback Zoom 31 Portrait Mode 23 Program AE 23 Progress...

Page 58: ... W Los Angeles CA 90068 323 436 3500 Government Marketing Department 52 West Gude Drive Rockville MD 20850 301 738 3840 Broadcast PARTS INFORMATION ORDERING 9 00 a m 5 00 p m EST 800 334 4881 24 Hr Fax 800 334 4880 Emergency after hour parts orders 800 334 4881 TECHNICAL SUPPORT Emergency 24 Hour Service 800 222 0741 5770 Ambler Drive Mississauga Ontario L4W 2T3 905 624 5010 Panasonic de Mexico S ...

Reviews: