background image

8

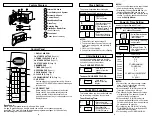
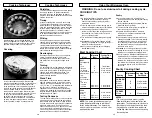
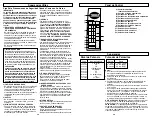
Feature Diagram

Control Panel

Internal Air Vents

Door Safety Lock System

External Air Vents

Control Panel

Identification Plate

Glass Tray

Rotating Ring

Heat/Vapor Barrier Film 
(do not remove)

Menu Label

Cover (do not remove)

e

a

f

d

c

b

g

h

i

j

Beep Sound:
When a pad is pressed correctly, a beep will be heard.
If a pad is pressed and no beep is heard, the unit did not or cannot accept the
instruction. The oven will beep twice between programmed stages. At the end of any
complete program, the oven will beep.

i

e

a

c

h

b

c

f

g

j

d


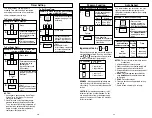
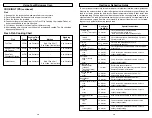
1. DISPLAY WINDOW.
2. AUTO DEFROST PAD 
(Page 12)
3. POWER LEVEL PAD (Page 9)
4. AUTO REHEAT PAD (Page 11)
5. AUTO COOK PAD (Page 14)
6. NUMBER PAD
7. TIMER PAD 
(Page 10)
8. POPCORN PAD (Page 11)
9. QUCIK MIN PAD (Page 9)

10. CLOCK PAD (Page 9)
11. SERVING/WEIGHT PAD (Page 14)
12. START PAD.

One tap allows oven to begin functioning. If door is
opened or STOP/RESET pad must be pressed again
to restart oven.

13. STOP/RESET PAD.

Before cooking: One tap clears your instruction.
During cooking: One tap temporarily stops the
cooking process. Another tap cancels all your
instructions and time of day or colon appears on the
Display Window.

9

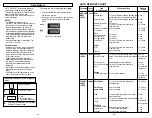
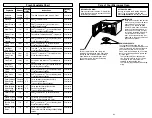
Clock Setting

Child Safety Lock

The oven will operate without setting the
clock.

NOTES:
1. To reset the clock, repeat steps 1-3.
2. The clock will keep the time of day as long

as the oven is plugged in and electricity is
supplied.

3. Clock is a 12 hour display.
4. Oven will not operate while colon is flashing.

NOTES:
1. You can use other power levels, select desired

power level before setting cooking time.

2. After setting the time by Quick Min Pad, you

cannot use Number Pads, and vice versa.

3. Press Quick Min Pad to add more time during

cooking. To verify the additional cooking time,
check the Display Window.

NOTES:
1. For more than one stage cooking, repeat

steps 1 and 2 for each stage of cooking
before pressing Start Pad.

2. When selecting P10 (HIGH) power for the

first stage, you may begin at step 2.

3. Two beeps will sound between each stage

of programming. Five beeps will sound at
the end of the enrire sequence.

4. When selecting P10 (HIGH) power, the

maximum programmable time is 30 minutes.
For other power levels, the maximum time is
99 minutes and 99 seconds.

5. For reheating, use P10 (HIGH) for liquids,

P7 (MEDIUM-HIGH) for most foods and P6
(MEDIUM) for dense foods.

6. For defrosting, use P3 (MEDIUM-LOW).

You can use this safety feature to lock the 
control panel so that children cannot use the
oven when you do not want them.

1.

2.

3.

• Press once.

Colon flashes.

• Enter time of day using

the number pads.

Time appears on the
Display Window: Colon
continues flashing.

• Press.

Colon stops flashing;
time of day is entered.

1.

• Hold until “L”.

appears from the 
display.

Example: To set 11:25 a.m. or p.m.

To set CHLID SAFETY LOCK:

1.

• Hold until “L”.
appears from the 
display.

To cancel CHLID SAFETY LOCK:

Quick Min Function

This feature allows you to set and/or add cook-
ing times easily in multiples of one minute.

1.

2.

• Set cooking time

(up to 10 taps/minutes)

To set Standing Time:

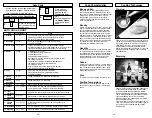
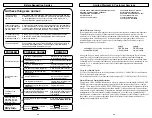
Power & Time Setting

How do I program Power and Time?

1.

2.

3.

• Select Power Level.

(according to the  

chart below)

• Set Cooking Time using

number pads.

Press

once

twice

3 times
4 times
5 times
6 times
7 times
8 times
9 times

10 times

Power Level

P10 (HIGH)

P 9
P 8

P 7 (MEDIUM-HIGH)

P 6 (MEDIUM)

P 5
P 4

P 3 (MEDIUM-LOW)/DEFROST

P 2

P 1 (LOW)

• Press.

Cooking will start. The
time on the screen will
count down.

Example: To cook at P6 (MEDIUM) Power

for 1 minute 30 seconds.

• Press Start Pad.

Cooking will start on
P10(HIGH) power.

Summary of Contents for 3828W5A2260

Page 1: ... 23 29 Feature How to Operate To S et Clock To Cook using Quick Min Pad To S et Power Time To Defrost using Auto Defros t Pad To Use as a K itchen Timer To reheat using Auto R eheat Pad page 11 E nter time of day Press Press up to 10 min Press Press To Cook using Auto Cook Pads QUICK GUIDE TO OPE R ATION Part No 3828W5A2260 S elect recipe S elect serving weight eg To use Child S afety Lock Hold Ò ...

Page 2: ......

Page 3: ... IEC 60705 RATING STANDARD Specifications subject to change without notice 2 Power Source Power Consumption Output Outside Dimensions H x W x D Oven Cavity Dimensions H x W x D Operating Frequency Uncrated Weight 120 V 60 Hz 13 5 Amps 1 600 W 1 200 W 1317 32 x 2219 32 x 17 5 16 344 x 573 5 x 440 mm 10 9 32 x 16 9 16 x 16 11 16 261 x 421 x 424 mm 2 450 MHz Approx 37 2 lbs 16 9 kg MS 164ZF Contents ...

Page 4: ...e surface For proper operation the oven must have suffi cient air flow Allow 4 inches 10 cm of space on both sides and top of oven a DO NOT block air vents If they are blocked during operation the oven may be overheated and damaged When using any cloth over the oven the air intake and exhaust should not be blocked Also should allow space on back and both sides of oven properly b DO NOT place oven ...

Page 5: ...wn package is also available Follow pop corn manufacturers directions and use a brand suitable for the wattage of your microwave oven CAUTION When using pre packaged microwave popcorn follow recommended package instructions Check package weight before using the Popcorn pad see Popcorn Pad section Set the oven for the weight of the popcorn package If these instructions are not followed the popcorn ...

Page 6: ...n Pad to add more time during cooking To verify the additional cooking time check the Display Window NOTES 1 For more than one stage cooking repeat steps 1 and 2 for each stage of cooking before pressing Start Pad 2 When selecting P10 HIGH power for the first stage you may begin at step 2 3 Two beeps will sound between each stage of programming Five beeps will sound at the end of the enrire sequen...

Page 7: ...Kitchen Timer Example To count 5 minutes This feature allows you to reheat 1 to 4 serv ings of precooked room temperature and refrigerator temperature foods without setting power and time When using popcorn pad maybe the weight is not the same as offered By using the number pads or the programs can be adjusted to cook for a heavier or lighter weight 1 tap More 2 taps More Press 1 tap Less 2 taps L...

Page 8: ...ast Rump roast Chuck roast Pork Bacon Hot dogs Sausage links Sausage patties Ribs Roast Lamb Ribs Roasts Auto Defrost AUTO DEFROST thaws frozen food with out entering a cook time or cook power Three defrost categories are preset in your oven Ground Meat Poultry and Steaks Chops See the Auto Defrost Chart on the next page NOTES For added convenience AUTO DEFROST has a built in reminder tone to tell...

Page 9: ...sugar can be used in the recipe in place of granulated sugar or the surface can be sprinkled with dark spices before baking Auto Cook Use this function to cook food without enter ing a cook time or power Refer to the Auto Cook Chart below for more information AUTO COOK CHART Pad 1 Oatmeal 2 Beverages 3 Bacon slice 4 Omelet 5 Soup 6 Frozen Entrees 7 Frozen Pizza single 8 Hot Dog 9 Potatoes 10 Fresh...

Page 10: ... TIPS Meat Using Your Microwave Oven Cooking Techniques Cooking Techniques Shielding Thin areas of meat and poultry cook more quickly than meaty portions To prevent overcooking these thin areas can be shielded with strips of aluminum foil Wooden toothpicks may be used to hold the foil in place Timing A range in cooking time is given in each recipe The time range compensates for the uncontrol lable...

Page 11: ...eat filling Heat bun as directed in chart below without bun Mashed potatoes 1 cup 1 3 minutes COOK covered in microwavable casserole Stir 4 cups 5 8 minutes once halfway through cooking Baked beans COOK covered in microwavable casse role 1 cup 1 3 minutes Stir once halfway through cooking Ravioli or pasta in sauce 1 cup 2 3 minutes COOK covered in microwavable casserole Stir once 4 cups 6 9 minute...

Page 12: ...utes Rearrange halfway through cooking Broccoli Fresh 1Ib 4 7 Place broccoli in baking dish Add 1 2 cup water 2 3 minutes Spears Cabbage Fresh 1Ib 4 7 Add 1 2 cup water in 11 2 qt covered casserole 2 3 minutes Chopped Stir halfway through cooking Carrots Fresh 2 cups 2 4 Add 1 4 cup water in 1 qt covered casserole 2 3 minutes Sliced Stir halfway through cooking Cauliflower 1lb 4 7 Trim Add 1 4 cup...

Page 13: ...s in a hotel office restaurant or other business rental use of the product service by anyone other than a Factory Servicenter or other Authorized Servicer or damage that is attributable to acts of God Limited Warranty Customer Services Before Requesting Service All these things are normal The oven causes Some radio and TV interference might occur when you cook with the interference with microwave ...

Page 14: ...etadores de alambre de las bol sas de papel o plástico antes de colocar la bolsa en el horno c Quite los sujetadores de alambre de las bol sas de papel o plástico antes de colocar la bolsa en el horno d No use la cavidad con propósitos de almace naje No deje productos de papel utensillos de cocina o alimentos en la cavidad cuando no esté en uso Su horno de microondas es un articulo para cocinar y ...

Page 15: ... cualquier otra parte del horno NO quite el panel exterior del horno Las reparaciones deben ser hechas solamente por personal de servicio cali ficado 2 NO opere el horno vacío La energía de microondas se reflejará continuamente a través del horno si los alimentos o agua no están pre sentes para absorber energía Esto puede dañar el horno y resultar en peligro de incendio 3 NO utilice este horno par...

Page 16: ...n ejemplos de alimen tos con pieles no porosas Estos tipos de alimen tos deben ser perforados antes de cocinarlos en Microondas para evitar que Estallen Use papas frescas para hornear y cocinelas hasta que esten listas Cocinar demasiado causa deshidratación y puede producir un incendio Use los pesos recomendados o puede ocurrir un incendio 6 LIQUIDOS Los liquidos pueden sobrecalentarse en el micro...

Page 17: ...tencia y Tiempo que aparece en la página 7 Ejemplo Para cocinar 300g Entradas congelados DESAYUNO ALIMENTOS CANTIDAD PESO SUGERENCIAS Desayuno 1 Avenas 0 5 1 tazas Siga las instrucciones del fabicante para cantidades de liquido cubierta o mesclado 2 Bebidas 1 2 tazas Siga las instrucciones del fabicante para cantidades de liquido cubierta o mesclado 3 Tocino 4 rebanadas Use un plato rigido Cubralo...

Reviews: