background image

Note: The direction is relative to the installed state.

MWJG-5  Assembly Manual

Home&Garden

11/24

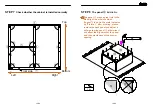
STEP 3  

Panel combination 

②、④、⑤ 

& Panel

 Installation

D

D

D

D

D

D

D

D

D

D

D

D

Left

Right

TOP

Bottom

Behind

Front

D

12x

D

48

54

A

A

A

 (6x)

Step 2

A

After

Step 1

A

A

A

A

A

A

A

A

Left

Right

Behind

Front

Left

Right

Behind

Front

Please pay attention to

the position of this hole
when installing.

A

8x

Note: The direction is relative to the installed state.

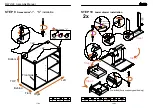
STEP 4  

Panel  


、⑦

 Installation

53

53

48

53

12/24

Summary of Contents for MWJG-5

Page 1: ...bly CONTACT US If you have any issue regarding the product please contact us at pananaus 163 com NOTE 1 Safe carriage multi people are needed 2 Handle with care protective layer is required 3 In case...

Page 2: ...List first Installation Guide Please check the Accessories List first M1 M2 Note The accessories list is classified by the smallest packaging unit and the kit accessories represent the matching access...

Page 3: ...re Open Lock RIGHT TURN UNTIL TIGHT ENSURE THERE IS NO GAP BETWEEN THE PANELS A A A B or C B for cabinet body C mini for drawer D D Cam Lock Nuts Cam Screws Wood Dowel Pins A A Assembly Instructions I...

Page 4: ...tions When installing please make sure that the screws are flat and not skewed otherwise the drawer will not be perfectly assembled E G A L Pre drilled TOP Bottom TOP Bottom Front Behind Front Behind...

Page 5: ...on c A A A 4x Step 2 A After A A A A E E F 1x E 2x A 4x TOP Bottom Front Behind TOP Bottom Front Behind Note The direction is relative to the installed state B B B B B B B 4x Left Right Front Behind T...

Page 6: ...D D D D D D D D D D D D Left Right TOP Bottom Behind Front D 12x D 48 54 A A A 6x Step 2 A After Step 1 A A A A A A A A Left Right Behind Front Left Right Behind Front Please pay attention to the pos...

Page 7: ...T TURN UNTIL TIGHT ENSURE THERE IS NO GAP BETWEEN THE PANELS B B B H H H H H Left Right Front Behind Bottom TOP RIGHT TURN UNTIL TIGHT Note The direction is relative to the installed state Note The di...

Page 8: ...ering please remove the back panel and adjust it before ordering panel otherwise it will affect the alignment of the panel and the smoothness of the drawer opening Home Garden 16 24 STEP 7 Check wheth...

Page 9: ...For accessory positioning MWJG 5 Assembly Manual Home Garden RIGHT TURN UNTIL TIGHT G B L G B R H H H H H H A A A A A A E E E E H M 2x M1 M2 M1 M1 M2 A C C C C C C E E 17 24 18 24 Step 1 Step 2 Step...

Page 10: ...STEP 12 Install the drawer Step 1 Step 2 STEP 11 Active shelf assembly N Step 1 After Step 2 After MWJG 5 Assembly Manual Home Garden 19 24 20 24 O 4x...

Page 11: ...5 Assembly Manual Home Garden 21 24 22 24 STEP 13 Accessories N Installation L 1x step 1 step 2 M 1x M1 M2 L1 L2 L1 L1 L1 L3 L4 L1 L1 L1 L1 L1 L2 L3 M1 M1 M2 Install spring parts on top and bottom P...

Page 12: ...nual Home Garden 23 24 24 24 P 1x Press the spring part with both hands so that the height of the door panel can be put into the cabinet and then align the hole position to move it into place then loo...

Reviews: