background image

1. Press MENU button on the front panel or MENU button on the remote control 
to display the main menu.

2. Press ◄/► buttons on the remote control or VOL

  +

/

button

s on the 

front 

panel to select the Audio Setting menu, then press


OK

 or 


buttons for the 

submenu.

3. Press ▲/▼ buttons on the remote control or CH 

+

/

buttons 

on the 

front 

panel


to select the item you want to adjust.

4. Press OK button on the remote control and press ▲/▼◄/► buttons to 

change the status.
5. Press MENU button to go to the previous menu.
Sub windows info:

Picture Adjustment

Picture Mode 

Press “ OK ” button to enter  Picture Mode, then press 

/▼ but-

tons to select : Dynamic, Standard, Mild, Personal.

Contrast

Press “ OK ” button to enter Contrast, then press 

◄/► buttons to

adjust the contrast of the picture.

Brightness

Press “ OK ” button to enter Brightness, then press 

◄/► buttons 

to adjust the brightness of the picture.

Colour

Press “ OK ” button to enter Colour, then press 

◄/► buttons to

adjust the colour of the picture.

Sharpness

Press “ OK ” button to enter Sharpness, then press 

◄/► buttons 

to adjust the sharpness of the picture.

Colour Temp

Press “ OK ” button to enter Colour Temp, then press 

/▼ buttons 

to select: Cold, Normal, Warm. 

Noise Reduction Press “ OK ” button to enter Noise Reduction, then press ▲/▼ but-

tons to select: off, low, middle, hight, default. 
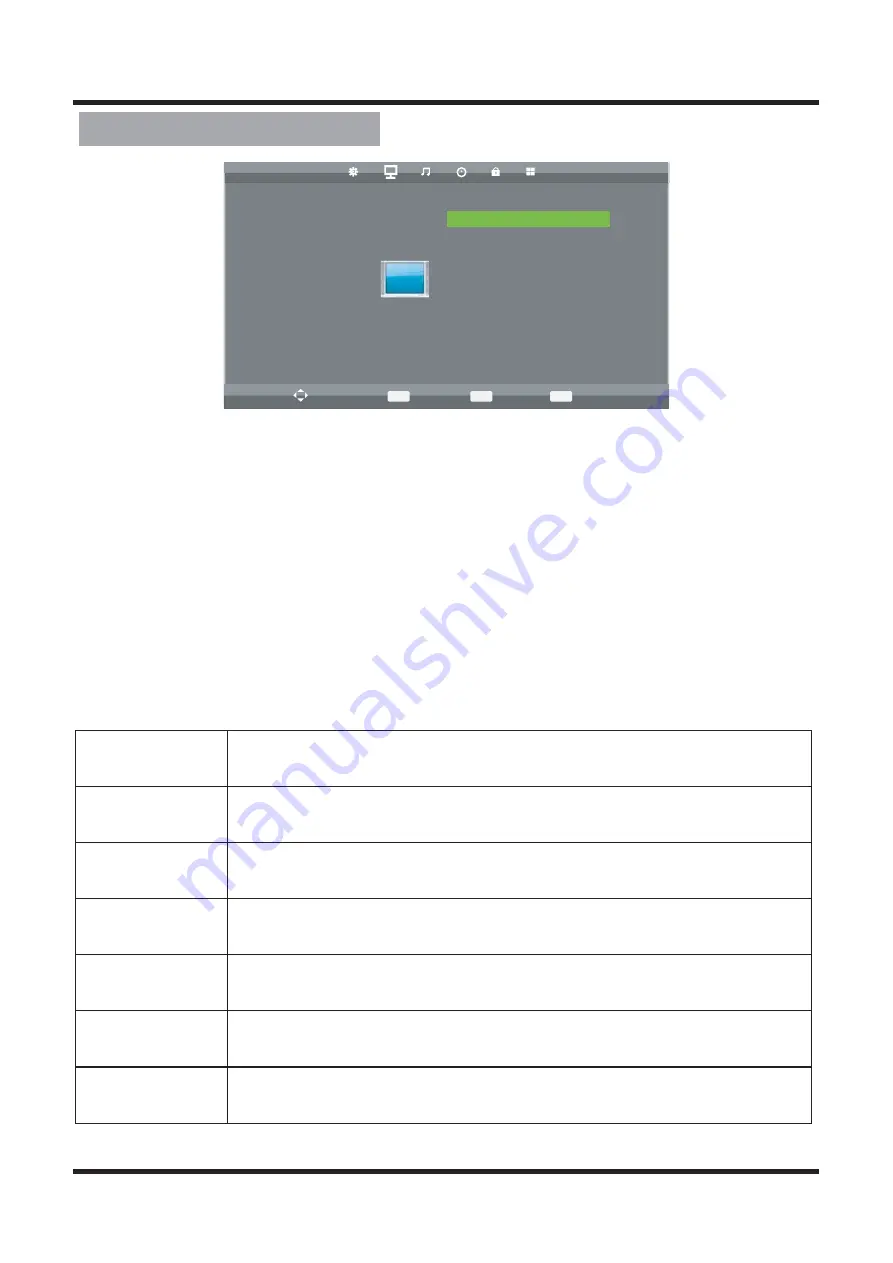
ON

PICTURE

 Picture Mode          Personal

Contrast                       50

Move

MENU

Return

OK

Select

EXIT

Exit

Brightness                    50

Colour                          50

Tint                               50

Sharpness                    50
Colour Temp             Normal
Noise Reduction        Middle

8

Summary of Contents for TFTV8170LED

Page 1: ...8VHU V 0DQXDO 2IIHULQJ XVWUDOLDQV TXDOLW VLQFH _ ZZZ SDOVRQLF FRP DX TFTV8170LED 80cm 31 5 LED TV DVD Combo with DVB T...

Page 2: ...tub washbowl kitchen sink or laundry tub in a wet basement or near a swimming pool Do not place this equipment on an unstable surface stand or cart The television equipment may fall causing serious in...

Page 3: ...ith safety ground wire Do not over load wall outlets and extension cords as this can result in re or electric shock Never push objects of any kind into this television equipment through cabinet slots...

Page 4: ...liquid which is toxic With bare hands that have cuts skin irritation or poisoning may result If any crystalline liquid gets into mouth or eyes rinse thoroughly with and consult your doctor CAUTION IF...

Page 5: ...Function 6 15 15 Channel Adjustment 6 Picture Adjustment Information Functions 15 16 17 18 DVD Player Functions General Setup Adjustment Audio Setup Adjustment Preference Setup Adjustment 8 Sound Adju...

Page 6: ...wide variety of features Color active matrix TFT LED TV with remote control Safe sturdy construction Audio Video support HDMI input PC input PC AUDIO input YPbPr input AV input RF input USB input On...

Page 7: ...CH Increase or decrease channel numbers Switch the input sources MENU Press the button to enter on screen Display OSD POWER Turn theTV on or off Remote Inductor and Power Indicator 2 1 2 3 4 5 6 7 OP...

Page 8: ...ct to the audio output of your PC earphone jack YPbPr Connect to the component output of your component device AV IN Connect to the audio and video output of A V device RF IN SPDIF Connect to the UHF...

Page 9: ...violently shake the remote control Never expose the remote control to high temperature or humidity If the remote is not used for an extended period of time remove the batteries to prevent damage or in...

Page 10: ...optional adjustable setting Display blue screen in TELETEXT Press repeatedly to cycle through the NICAM mode Display yellow screen in TELETEXT SOURCE FAV REVEAL INFO EXIT SIZE HOLD TV R ANGLE OK INDE...

Page 11: ...elect the Channel Setting menu then press OK or buttons for the submenu 3 Press buttons on the remote control or CH buttons on the front panel to select the item you want to adjust 4 Press OK button o...

Page 12: ...0MHz AFC Off Search AFC Off Menu ATV Manual Tuning Programme Edit Press button to select the channel you want to edit Press the red button on the remote control to delete the channel Press the green b...

Page 13: ...Standard Mild Personal Contrast Press OK button to enter Contrast then press buttons to adjust the contrast of the picture Brightness Press OK button to enter Brightness then press buttons to adjust t...

Page 14: ...Sound Mode Press OK button to enter Sound Mode then press buttons to select Standard Music Movie Sports Personal Treble Press OK button to enter Treble then press buttons to adjust the high frequency...

Page 15: ...t 4 Press OK button on the remote control and press buttons to change the status 5 Press MENU button to go to the previous menu Sub windows info Sleep Timer Press OK button to enter Sleep Timer then p...

Page 16: ...remote control and press buttons to change the status 5 Press MENU button to go to the previous menu Sub windows info Lock System Press OK button and press default password 0000 to enter Lock System...

Page 17: ...ows info SETUP Move MENU Return OK Select EXIT Exit OSD Language English TT Language Farsi Hearing Impaired Off PVR File System Aspect Ratio 16 9 Blue Screen Off First Time Installation Off Reset Soft...

Page 18: ...e file you want to watch Press menu button to return back to the previous menu and Exit button to quit Press button to select MUSIC in the main menu then press OK button to enter Select the file you w...

Page 19: ...op recording 2 Press Stop button to stop recording the it will return to normal broadcast television 3 When the storage space of Disk is shortage Tt will produce a warning message then it stops record...

Page 20: ...ance DVD chapter or CD track Press this button skip backward DVD chapter or CD track Repeat section A B To repeat playback a specific section of a disc Rep PressREP button repeatedly to select the rep...

Page 21: ...t GENERAL SETUP option Press 2 Use the Up and Down buttons to highlight an individual GENERAL SETUP option TV Display OSD Ling Sreen Saver Last Memory You can choose the OSD Language You can choose On...

Page 22: ...e the Up and Down buttons to highlight an individual AUDIO SETUP option Speaker Setup Dual Mono Dynamic You can choose the Downmix between LT RT and Stereo To optimize the dynamic sound output high vo...

Page 23: ...are NTSC PAL Multi three modes and choose one mode according your TV mode You can choose the Audio lang You can choose the Subtitle lang You can choose the Disc Menu lang Setting the Default function...

Page 24: ...r of channel 100 Standards B G D K Color system PAL SECAM Other AV User manual Progressive scan Dimensions W H D 3 2 2 2 pull down Noise reduction Packing size W H D 891mm 628mm 162mm 779mm 545mm 205m...

Page 25: ...s and clean them to remove dust Remote control unit does not operate Check if the batteries are inserted with the polarity correctly aligned Check if the batteries are discharged Please replace with n...

Page 26: ...Customer Service Telephone Australia 1300 657 888 Palsonic Corporation Pty Ltd ABN 34 000 474 108 1 Joynton Avenue Waterloo NSW 2017 Australia Telephone 02 9313 7111 Facsimile 02 9697 0655 www palsoni...

Reviews: