background image

Turning the Unit On and Off

16

Turning the Unit On and Off

Turning On

Turning Off

With the power on, Press the 

Power

     button on the remote control to turn off.

Note:

You can also use the 

Power

     button on the Control panel on the main unit.

Viewing the Menus and Displays

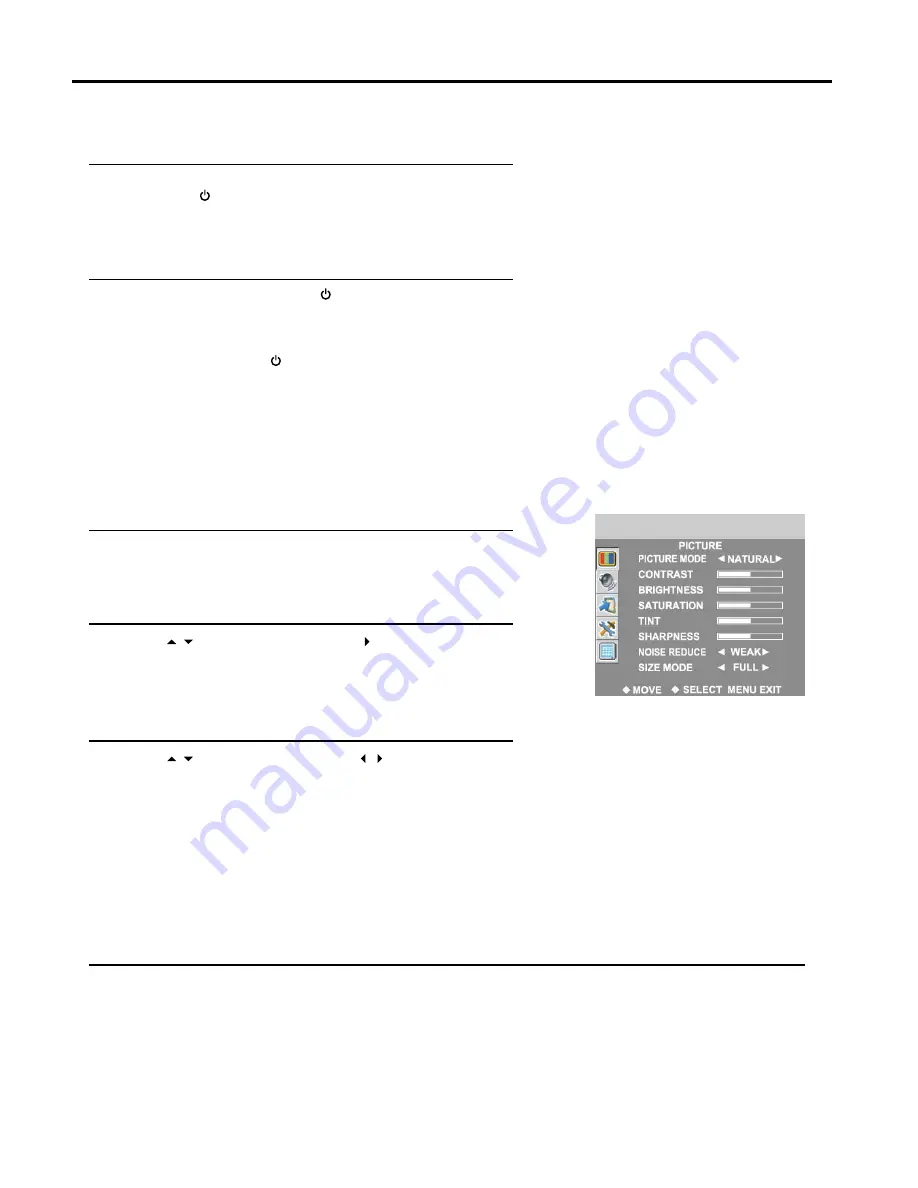
Viewing the Menus

Your LCD TV has a simple, easy-to-use menu system that appears on the screen. This system makes it convenient and fast

To use features on the unit. The unit also lets you display the status of many of your LCDTV features.

With the power on, press the 

MENU

 button on the remote control.

The main menu appears on the screen.

Use the          to select menu item. Use         to adjust value of 

item.

You can press the 

MENU

 button repeatedly to exit the menu

operations.

1

3

Note:

To clearly introduce the menu operations, this operation manual provides a
description based on operation with the remote control.

Displaying Status Information

Press the 

DISPLAY

 button on the remote control,the unit will display current status information such as

channel number, or signal source, etc.

Insert the power cord into the wall outlet.
Press the 

Power

      button on the remote control.

The unit will be turned on and you will be ready to use its features.

Use the          to select menu page. Use    to access the submenu.

2

Summary of Contents for TFTV812U

Page 1: ... 1 JOYNTON AVENUE WATERLOO NSW 2017 AUSTRALIA TEL 02 9313 7111 FAX 02 9313 7555 www palsonic com au PALSONIC CUSTOMER SERVICE TELEPHONE AUSTRALIA 1300 657 888 81CM CORDLESS REMOTE LCD TV MONITOR MODEL TFTV812U OWNER S MANUAL N111 ...

Page 2: ...nd Off Viewing the Menus and Displays Viewing TV Programs Auto Search Manual Search Skipping Channel Exchange Channel Setting AFC Function ON or OFF Manual Fine Tuning Basic Operations Changing Channels Adjusting the Volume Select Input Source Signal Setting Colour System Setting Sound System Setting Picture Customising the Picture Using the Preset Picture Mode Adjusting Screen Aspect Reducing Pic...

Page 3: ...P Operations Viewing and Changing The Position of the PIP Frame Selecting the Signal Source for the PIP Frame Selecting Sound Source for PIP Frame Adjustment in VGA Mode Adjusting Picture Adjusting Image Size Changing the Position of Image Adjusting the CLOCK and PHASE Adjusting the Picture Automatically Troubleshooting Specifications 26 26 26 27 27 27 27 28 28 28 28 29 29 29 30 30 30 31 31 ...

Page 4: ...nvironmental considerations For disposal or recycling information please contact your local authorities or the Electronic Industries Alliance www eia org America only FCC STATEMENT America only FCC Notice LCD TV A CLASS B digital device This equipment has been tested and found to comply with the limits for a Class digital device pursuant to part 15 of the FCC Rules These limits are designed to pro...

Page 5: ...leaners or aerosol cleaners Use a damp cloth for cleaning 7 Ventilation Do not block any ventilation openings Install in accordance with the manufacturer instructions The vents and other openings in the cabinet are designed for ventilation Do not cover or block these vents and openings since insufficient ventilation can cause overheating and or shorten the life of the product Do not place the prod...

Page 6: ... often requires extensive adjustment work by a qualified technician e If the product has been dropped or the cabinet has been damaged in any way f When the product displays an abnormal condition or exhibits a distinct change in performance Any noticeable abnormality in the product indicates that the product needs servicing 20 Safety checks Upon completion of service or repair work request the serv...

Page 7: ...panel is a very high technology product giving you finely detailed pictures Occasionally a few non active pixels may appear on the screen as a fixed point of blue green or red Please note that this does not affect the performance of your product If an outside antenna is connected to the television equipment be sure the antenna system is grounded so as to provide some protection against voltage sur...

Page 8: ...inals corresponding to the and indications in the battery compartment Precautions on battery use Improper use of batteries can result in a leakage of chemicals and or explosion Be sure to follow the instructions below Place batteries with their terminals corresponding to the and indications Different types of batteries have different characteristics Do not mix batteries of different types Do not m...

Page 9: ...equires a good signal and will generally mean that an outdoor aerial must be used The exact type and position of the aerial will depend upon your particular area Note It is recommended that the 75 ohm coaxial cable be used to eliminate interference and noise which may occur due to radio wave conditions The aerial cable should not be bundled with the power cord and the like The illustration is for ...

Page 10: ...ge 4 VOL Press the VOL or VOL button to directly increase or decrease the sound volume level In OSD Menu press these buttons to adjust the value or setting of each item 5 CH Press these two buttons to directly change the TV channel In OSD Menu press these buttons to choose the OSD items Note Functions of VOL CH MENU SOURCE and POWER are also provided to the remote control This operation manual pro...

Page 11: ... such as VCR or DVD player 4 AV Outputs Video Audio L Mono R 5 Headphone jack 6 HDMI input jack 7 VGA input Audio in Connect to the VGA audio output jacks on your equipment 8 COMPONENT Inputs Y Pb Cb Pr Cr Audio L R Connect to the audio and component output jacks of a DVD player or Set Top Box After all the connections are made aim the insertion tabs towards the locating grooves then carefully pus...

Page 12: ... operation To adjust selected menu item in menu operation To confirm your operation or setting or access a submenu S MODE Sound mode select 0 9 number buttons Direct channel select Return To quickly jump between current channel and last selected channel VOL Use to adjust volume SIZE To quickly select SIZE MODE DISPLAY To display channel status or signal information STILL To freeze current picture ...

Page 13: ...utton repeatedly to select AV2 SV Note that the period of two press should be within 2 seconds 3 Turn on your VCR insert a video tape and press the Play button Carefully check the terminals for position and type before making any connections The illustration of the external equipment may be different depending on your model Loose connectors can result in image or colour problems Make sure that all...

Page 14: ...ss Source button repeatedly to select AV1 3 Turn on your camcorder and set it to output mode For details refer to your camcorder owner s manual 4 Insert the tape into the camcorder and press Play button Note The operations of the camcorder may be different and is dependent on your model Please read the owner s manual of your camcorder to confirm operation Yellow VIDEO White AUDIO L MONO Red AUDIO ...

Page 15: ...on the unit and Y Pb Pr or Cb Cr output jacks on the DVD player Connect the Audio cable between the AUDIO input jacks on the unit and AUDIO output jacks on the DVD player To play DVD 1 Turn on your LCD TV press Source button on the remote control 2 Press Source button repeatedly to select YPBPR 3 Turn on your DVD player insert a DVD disc and press the Play button AUDIO VGA VGA IN Y Pr Cr AUDIO R P...

Page 16: ...with DVI displays through the use of a passive cable converter So you may connect product with DVI output jack to the unit Connect a passive cable converter between the HDMI input jack on the unit and DVI output jack on the product Connect an Audio cable between the AUDIO output on your product and AUDIO input jack of VGA IN on the unit To Watch your Product 1 Turn on your LCD TV press Source butt...

Page 17: ...d the VGA input on the unit Connect an Audio cable between the AUDIO output on the PC and AUDIO input jack on the unit To Watch the PC screen 1 Turn on your LCD TV press Source button on the remote control 2 Press Source button repeatedly to select VGA 3 Turn on your PC and check for PC system requirements 4 Adjust the screen resolution and settings on your computer to the preferred settings HDMI ...

Page 18: ...Connect the Audio Video cables between the Audio L R Video jacks on the unit and VCR To record program 1 Turn on your LCD TV select a program you wish to record 2 Turn on your VCR insert a videotape for recording 3 Press the Record button to begin recording Note The AV output terminals output the audio video signal from the Antenna input or AV inputs Yellow VIDEO White AUDIO L Red AUDIO R ...

Page 19: ...ess the MENU button on the remote control The main menu appears on the screen Use the to select menu item Use to adjust value of item You can press the MENU button repeatedly to exit the menu operations 1 3 Note To clearly introduce the menu operations this operation manual provides a description based on operation with the remote control Displaying Status Information Press the DISPLAY button on t...

Page 20: ...able channels During the process of the Auto Search you can press MENU to exit Note Before AUTO SEARCH please set the TV s colour system to AUTO and sound system to your local area s sound system 1 2 3 4 5 Press MENU to display the menu main page Press repeatedly to select SOURCE menu Press to access the submenu Press repeatedly to select MANUAL SEARCH item Press to access the submenu Press repeat...

Page 21: ...sing the CH buttons unless you use the number buttons to input channel number directly 1 2 3 4 5 6 7 8 9 10 Press MENU to display the menu main page Press repeatedly to select SOURCE menu Press to access the submenu Press repeatedly to select MANUAL SEARCH item Press to access the submenu The CURRENT CHANNEL will be highlighted automatically Press to select a channel number as your current channel...

Page 22: ...ct AFC item Press to select ON or OFF Press MENU to exit When the item is set to ON the unit will automatically tune the program frequency to provide the best possible picture and sound 1 2 3 4 5 6 7 8 Press MENU to display the menu main page Press repeatedly to select SOURCE menu Press to access the submenu Press repeatedly to select MANUAL SEARCH item Press to access the submenu Press to select ...

Page 23: ... to input the channel number and the unit goes to the selected channel immediately To select a three digit channel press the 0 9 number buttons to input the channel number and the unit goes to the selected channel Note When you use the number buttons you can directly select channels that were skipped The period of two press should be within 2 seconds Using the Return button Press this button to sw...

Page 24: ...dly to select SOURCE menu Press to access the submenu Press repeatedly to select PICTURE SOURCE item Press to select Press MENU to exit 1 2 3 4 5 6 Setting Colour System Press MENU to display the menu main page Press repeatedly to select SOURCE menu Press to access the submenu Press repeatedly to select COLOR SYSTEM item Press to select Press MENU to exit 1 2 3 4 5 6 Setting Sound System Press MEN...

Page 25: ...e remote control to select picture mode Using the Preset Picture Mode Press MENU to display the PICTURE menu page Press to access the PICTURE submenu The PICTURE MODE will be highlighted automatically Press to select a desired picture mode Press MENU to exit 1 2 3 4 Customising the Picture Press MENU to display the menu main page The picture menu page will be displayed automatically Press to acces...

Page 26: ...u watch a 4 3 picture in this mode the picture will be expanded and some information at the top and bottom will be lost ZOOM2 In this mode the picture is vertically stretched toward upside of the screen so that when viewing programs with title at the bottom the bottom title can be revealed NORMAL In this mode the picture is displayed without modification in its native aspect ratio Sometimes a nois...

Page 27: ... to access Use to set the hour 00 23 and the minute 00 59 use to switch between the hour and minute Press MENU to exit 1 2 3 NOTE Before setting the TIME ON and TIME OFF please set the CLOCK item first With the ON timer the TV will automatically turn on at a preset time Setting ON timer Press MENU to display the menu main page Press repeatedly to select FUNCTION menu Press to access the submenu Pr...

Page 28: ...NU to display the menu main page Press repeatedly to select FUNCTION menu Press to access the submenu Press repeatedly to highlight SLEEP TIMER item Press repeatedly to select Press MENU to exit 1 2 3 4 5 6 Setting Sleep Timer Making use of this function allows you to have the set automatically turn off after a preset time ...

Page 29: ...u Press to access the submenu Press repeatedly to select SOUND MODE item Press to select a desired sound mode 1 2 3 4 5 There are three preset sound modes NORMAL MUSIC and NEWS and one user set sound mode PERSONAL Each preset mode has its own sound settings Bass and Treble NORMAL Set the value of Bass and Treble to middle level MUSIC Set the value of Bass and Treble to higher level NEWS Set the va...

Page 30: ... Press MENU to display the menu main page Press repeatedly to select OSD menu Press to access the submenu Press repeatedly to select TRANSPARENCY item Press to adjust the OSD transparence 1 2 3 4 5 Setting OSD Timeout Press MENU to display the menu main page Press repeatedly to select OSD menu Press to access the submenu Press repeatedly to select DURATION item Press to adjust the value 1 2 3 4 5 ...

Page 31: ...atedly to select SUB PICTURE item Press to select signal source for the PIP frame 1 2 3 4 5 The input signal source are divided into two groups One contains TV AV1 and AV2 SV the other contains YPbPr VGA and HDMI If the input signal source selected for the main frame is one kind from one group you may only allows to select a kind of input signal source for PIP frame from the other group NOTE If yo...

Page 32: ...y to select the item you wish to change Press to adjust the value of the item Press MENU to exit Adjusting the Picture 1 2 3 4 5 Adjusting Image Size Press MENU to display the menu main page Press repeatedly to select SCREEN menu Press to access the submenu The SIZE MODE item will be highlighted automatically Press to FULL or ASPECT Press MENU to exit 1 2 3 4 5 ...

Page 33: ...em Press to adjust the value of the item Press MENU to exit 1 2 3 4 5 6 Adjusting the Picture Automatically Press MENU to display the menu main page Press repeatedly to select SCREEN menu Press to access the submenu Press repeatedly to select AUTO ADJUST item Press to start adjusting 1 2 3 4 5 If you are not satisfied with the picture you may adjust the picture by using this function You may find ...

Page 34: ...ght This may be caused by electrical interference e g hair dryer nearby neon lights etc Turn off the equipment Television not responding to remote control Check whether the batteries are working Replace if necessary Clean the remote control sensor lens on the unit Do not use the remote control under strong or fluorescent lighting The batteries should be inserted with polarity aligned Snowy picture...

Page 35: ... Display Size Diagonal Power supply Power Consumption Dimensions Weight TV System LCD TV 32 AC 100 240V 50 60Hz 140W 937 W x 563 D x 242 H mm 21kg PAL BG NTSC AV Design and specification are subject to change without notice ...

Page 36: ...LSONIC CORPORATION PTY LTD 1 JOYNTON AVENUE WATERLOO NSW 2017 AUSTRALIA TEL 02 9313 7111 FAX 02 9313 7555 www palsonic com au PALSONIC CUSTOMER SERVICE TELEPHONE AUSTRALIA 1300 657 888 604 L32U53 01 V1 0 ...

Reviews: