Palsonic TFTV385Y Owner'S Manual Download Page 20

Setting Picture

18

Using the Preset Picture Mode

Press 

MENU

 to display the menu main page.

The picture page will be displayed automatically.

Press 

ENTER

 or 

VOL+/-

 to access the 

Picture

 submenu.

The Picture Mode item is highlighted automatically.

Press 

ENTER

 or 

VOL+/-

 to select a desired picture mode.

You may also use the 

P.MODE

 button to quickly select picture mode.

There are three preset picture modes (

Bright

Soft

 and 

Normal

) and one user-set picture mode (

User

). Each

preset mode has its own picture settings.

Bright:

 Select for a bright picture.

Soft:

 Select for a finely detailed picture.

Normal:

 Select for a normal picture.

Adjusted settings are stored in User mode.

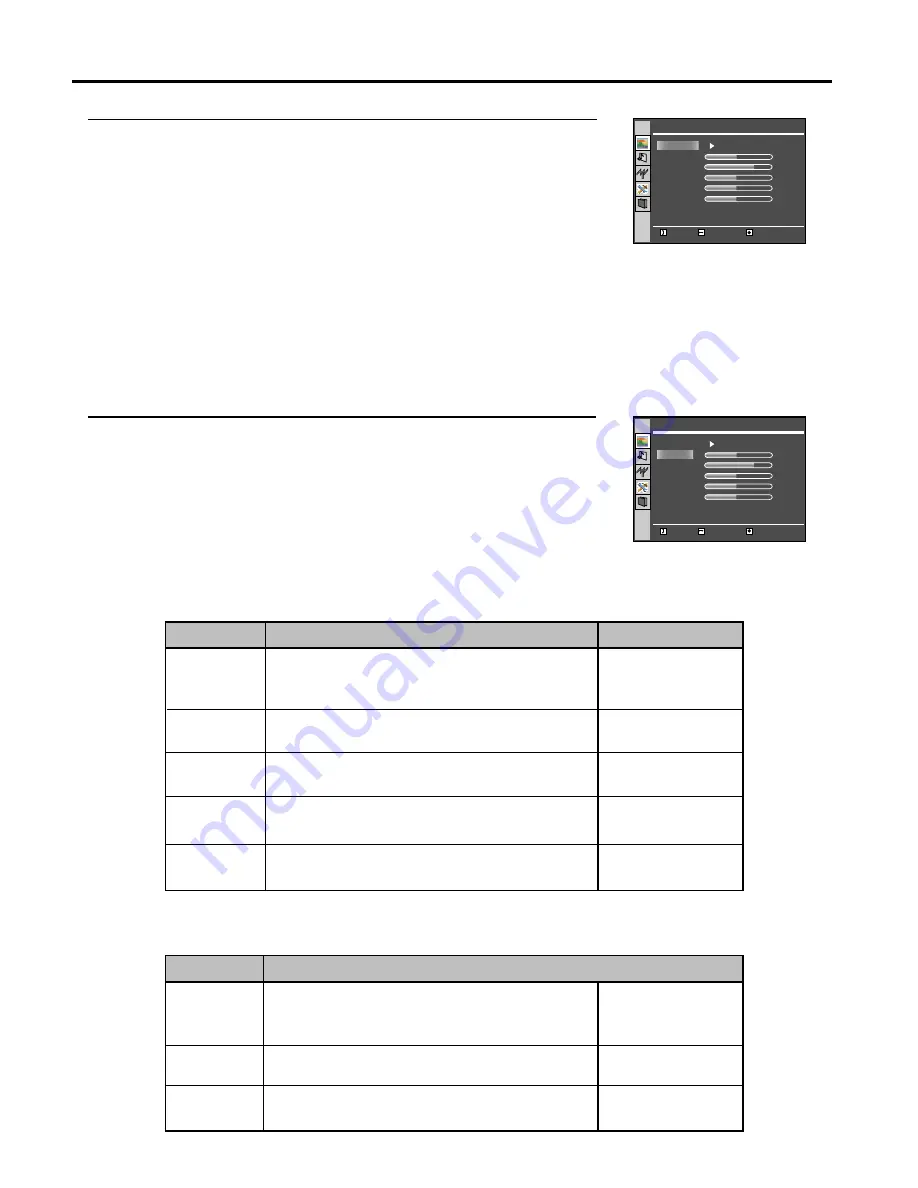
Customising the Picture

Press 

MENU

 to display the menu main page.

The picture page will be displayed automatically.

Press 

ENTER

 or 

VOL+/-

 to access the 

Picture

 submenu.

Press 

CH+/-

 to select the item you wish to change.

Press 

VOL+/-

 to adjust the value of the item.

Press 

Menu

 to exit.

In TV/Video mode

* The Tint is for NTSC only.

In D-Sub mode

Brightness

Contrast

Color

Tint*

Sharpness

Adjusts screen brightness for easier viewing of
dark picture such as night scenes and black
hair.

Adjusts image contrast.

Adjusts colour saturation.

Adjusts tint for image.

Adjusts image sharpness and displays a
sharp image.

Brightness

Contrast

Color

VOL+ lighter
VOL- darker

VOL+ stronger
VOL- weaker

VOL+ deeper
VOL- paler

VOL+ greenish
VOL- purplish

VOL+ sharper
VOL- softer

Adjusts screen brightness for easier viewing of
dark picture such as night scenes and black
hair.

Adjusts image contrast.

Adjusts colour saturation.

VOL+ lighter
VOL- darker

VOL+ stronger
VOL- weaker

VOL+ deeper
VOL- paler

Operation

Function

Option

Option

Function

Operation

1

2
3
4
5

3

2

1

50

75

60

50

12

Move

Select

Menu to exit

Picture Mode

Brightness

Contrast

Color

Tint

Sharpness

Picture

Normal

50

75

60

50

12

Move

Select

Menu to exit

Picture Mode

Brightness

Contrast

Color

Tint

Sharpness

Picture

User

Summary of Contents for TFTV385Y

Page 1: ...1 JOYNTON AVENUE WATERLOO NSW 2017 AUSTRALIA TEL 02 9313 7111 FAX 02 9313 7555 www palsonic com au PALSONIC CUSTOMER SERVICE TELEPHONE AUSTRALIA 1300 657 888 38CM CORDLESS REMOTE LCD TV MONITOR MODEL...

Page 2: ...ns Identification of Controls Connections Turning the Unit On and Off Memorising the Channels Basic Operations Setting Picture Adjusting Image in D Sub mode Setting Sound Other Functions Troubleshooti...

Page 3: ...vironmental considerations For disposal or recycling information please contact your local authorities or the Electronic Industries Alliance www eia org America only FCC STATEMENT America only FCC Not...

Page 4: ...eaners or aerosol cleaners Use a damp cloth for cleaning 7 Ventilation Do not block any ventilation openings Install in accordance with the manufacturer instructions The vents and other openings in th...

Page 5: ...often requires extensive adjustment work by a qualified technician e If the product has been dropped or the cabinet has been damaged in any way f When the product displays an abnormal condition or exh...

Page 6: ...anel is a very high technology product giving you finely detailed pictures Occasionally a few non active pixels may appear on the screen as a fixed point of blue green or red Please note that this doe...

Page 7: ...TV functions replace the batteries in the remote control Open the battery cover Insert two size AAA batteries Replace the battery cover Install two AAA batteries matching the polarities of the batter...

Page 8: ...viewing Optimum reception of colour requires a good signal and will generally mean that an outdoor aerial must be used The exact type and position of the aerial will depend upon your particular area N...

Page 9: ...ess the VOL or VOL button to directly increase or decrease the sound volume level In OSD MENU press these buttons to adjust the value or setting of each item 5 POWER Press this button to turn the unit...

Page 10: ...component output jacks of a DVD player or Set Top Box 4 Earphone jack 5 S Video input Receive a S Video signal from external source such as VCR or DVD player 6 AV inputs Receive video audio signals fr...

Page 11: ...hannel select Turn the unit on or off Sound mute ENTER To confirm your operation CH To switch channels In MENU operation use CH to select menu item VOL To adjust volume In MENU operation use ENTER or...

Page 12: ...nsert a videotape and press the Play button Carefully check the terminals for position and type before making any connections The illustration of the external equipment may be different depending on y...

Page 13: ...n on your camcorder and set it to output mode For details refer to your camcorder owner s manual 3 Insert the tape into the camcorder and press Play button Note The operations of the camcorder may be...

Page 14: ...Y Cb Cr output jacks on the DVD player Connect the Audio cable between the AUDIO input jack on the unit and AUDIO output jacks on the DVD player To play DVD 1 Turn on your LCD TV press SOURCE button r...

Page 15: ...n and settings on your computer to the preferred settings VCR for recording Rear of the VCR How to connect Connect the Audio Video cables between the Audio L R Video jacks on the unit and VCR To recor...

Page 16: ...y of your LCD TV features Viewing the MENUs With the power on press the MENU button on the remote control The main menu appears on the screen The picture menu is selected Use the CH to select submenu...

Page 17: ...ds lower frequency The search stops when a program is found and this program will be stored in current channel Manual Fine Tuning Repeat steps 1 3 in Storing Channels in Memory Automatically to access...

Page 18: ...s broadcasting system Editing Channels The channel editing function is for you to arrange channel order as you wish Repeat steps 1 3 in Storing Channels in Memory Automatically to access the Channel...

Page 19: ...el Note When you use the number buttons you can directly select channels that were erased Using the Return button Press this button to switch between the current channel and the previous channel Adjus...

Page 20: ...m you wish to change Press VOL to adjust the value of the item Press Menu to exit In TV Video mode The Tint is for NTSC only In D Sub mode Brightness Contrast Color Tint Sharpness Adjusts screen brigh...

Page 21: ...the item until the screen is well aligned Adjust the clock frequency of the set s internal clock signal If shimmering or rainbow like noise is apparent in the image try adjusting the clock frequency s...

Page 22: ...igh sounds Adjust Bass low sounds Adjust volume balance left and right volumes Press the VOL or VOL to adjust the bass sound effect Bass Treble Balance Operation Option Function Setting SRS Effect Rep...

Page 23: ...n the motion picture Loading Default Values You may quickly load default values by using the Factory Reset item Repeat steps 1 3 in Adjusting Menu Transparency to access Display page Press CH repeated...

Page 24: ...is may be caused by electrical interference e g hair dryer nearby neon lights etc Turn off the equipment Television not responding to remote control Check whether the batteries are working Replace if...

Page 25: ...by observing the following steps A Reduce the brightness contrast setting to a minimum viewing level B Do not display the fixed image for extended periods of time C Turn the power off when not in actu...

Page 26: ...nnel coverage System PAL B G TV system Speaker Accessories AC 100 240V 50 60Hz 48W Max 38cm 470 W x 171 D x 324 H mm 4kg VHF 2 12 UHF 21 69 CATV X Z 2 S1 S41 PAL BG NTSC AV 3W 8 x 2 Owner s manual x 1...

Page 27: ...SONIC CORPORATION PTY LTD 1 JOYNTON AVENUE WATERLOO NSW 2017 AUSTRALIA TEL 02 9313 7111 FAX 02 9313 7555 www palsonic com au PALSONIC CUSTOMER SERVICE TELEPHONE AUSTRALIA 1300 657 888 604 L15Y33 01 V1...

Reviews: