background image

17

POWER

CH

CH

VOL

VOL

+

-

P.M

AUTO.ADJ

DSP

0

8

7

4

5

1

2

3

6

9

-

/

--

MENU

C.SYS

ZOOM

CLK

SLP

EXIT

Operations

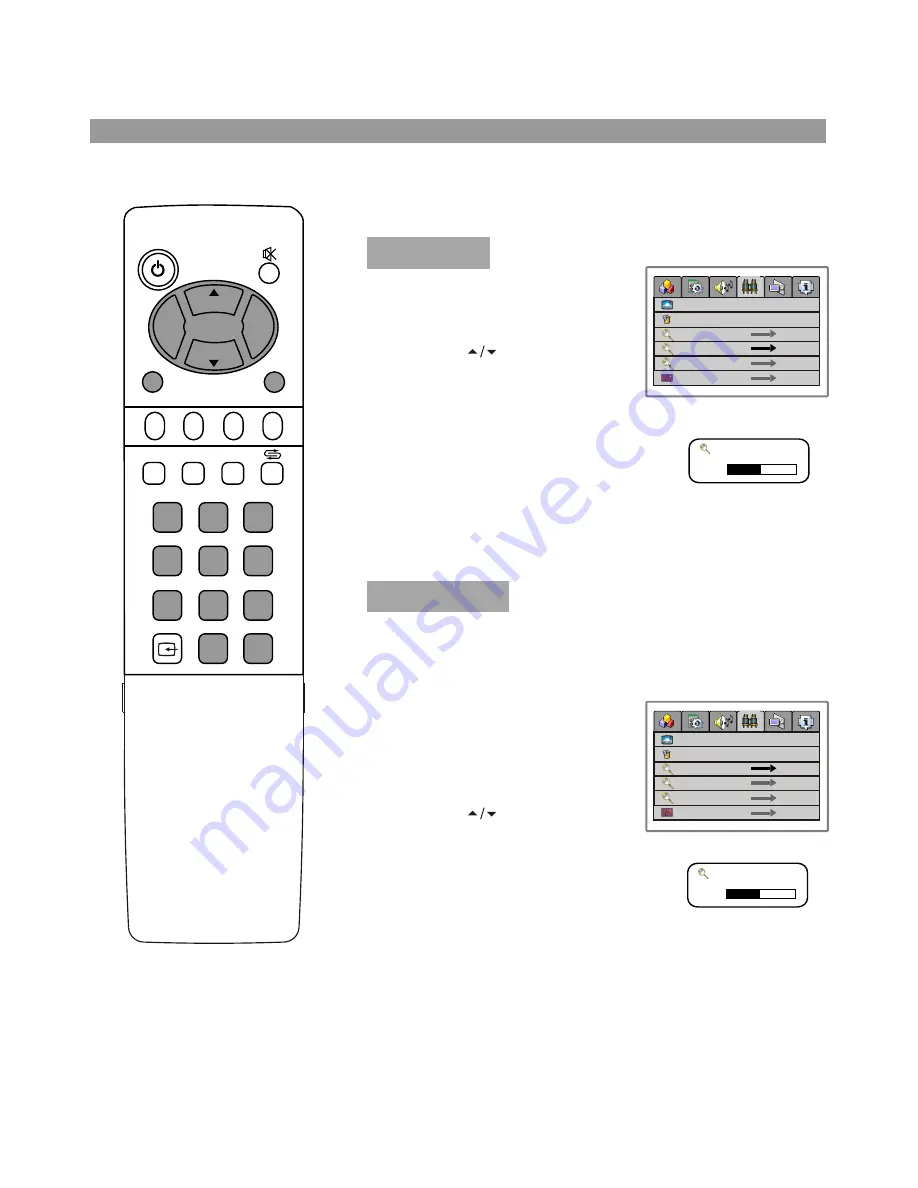
Channel Setting

Press 

CH

         button

repeatedly to highlight 

manual

search

 item and press 

VOL+

 to

enter. 

If Auto Search can not preset the desired channels, or you want
to preset the desired channels one by one with the preferred
channel numbers, please make use of Manual Search.

Auto Search

There are two ways to preset channels: to preset channels
automatically and to preset channels manually. Below we will
describe how to preset the channels by making use of the
menu.

1

Access 

Channel Setting

 menu.

Press 

CH

         button

repeatedly to highlight 

auto

search

 item.

Press 

VOL+/-

 to start Auto

Search.

All active channels will be preset
and stored into the memory
automatically.

During the process of 

Auto Search

, pressing 

MENU 

will stop the

process.

Use channel select buttons to
select a channel number.

2

Access 

Channel Setting

 menu.

3

4

Press 

VOL+

 or 

VOL-

 button to

perform the searching.

When a channel is located, the searching stops, this channel
is then memorised with the preset channel number.

1

2

3

Manual Search

VHFH Searching  20

65MHz

VHFH Searching  15

65MHz

channel number

skip

manual search

auto search 

fine tune

channel edit

off             on

9

channel number

skip

manual search

auto search


fine tune

channel edit

off             on

9

Summary of Contents for TFTV385

Page 1: ...1 JOYNTON AVENUE WATERLOO NSW 2017 AUSTRALIA TEL 02 9313 7111 FAX 02 9313 7555 www palsonic com au PALSONIC CUSTOMER SERVICE TELEPHONE AUSTRALIA 1300 657 888 38CM CORDLESS REMOTE LCD TV MONITOR MODEL...

Page 2: ...displays and illustrations in this manual may differ from the actual model Contents Index Important Safety Cautions Identification of controls Control buttons Back Remote control Installation Basic o...

Page 3: ...other openings in the cabinet are designed for ventilation Do not cover or block these vents and openings since insufficient ventilation can cause overheating and or shorten the life of the product Do...

Page 4: ...k of fire or electric shock High Voltage exists in this TV set Do not remove the cover In case the product needs replacement parts make sure that the service person uses replacement parts specified by...

Page 5: ...imited by observing the following steps Reduce the Brightness and Contrast settings to a minimum viewing level DO NOT display the fixed image for extended periods of time Turn the power OFF when not i...

Page 6: ...djust the value or setting of each item 5 POWER Press this button to turn the unit ON from STANDBY mode Press it again to turn the set back to STANDBY The Power Indicator light will glow yellow when t...

Page 7: ...Connect to the Y Pb Pr or Y Cb Cr and audio output jacks of a Set Top Box or DVD player 4 Headphone 3 5mm jack 5 AV outputs Video Audio L R Connect to the VCR input jacks to record programs 6 AV input...

Page 8: ...wn selector In menu operations used to select item Access the menu Exit the menu Colour system select Setting sleep timer Zoom mode selection Clock setting Auto correct picture Previous channel Select...

Page 9: ...6 7 8 When the remote control will not be used for a long period of time or when the batteries are worn out remove the batteries Do not drop or dampen the remote control Do not disassemble the remote...

Page 10: ...g Optimum reception of colour requires a good signal and will generally mean that an outdoor aerial must be used The exact type and position of the aerial will depend upon your particular area Note It...

Page 11: ...t of the set 3 Connecting the male plug to the wall outlet as illustrated Note Always turn off the Power to the LCD TV when connecting the AC adapter This product should only be operated with the type...

Page 12: ...Installation continued 10 Elevation adjustment You can adjust the angle of the LCD TV as follows The elevation can be adjusted from 50 to 100 average...

Page 13: ...al connection Connect the composite video signal terminal on the TV to the output of AV equipment through composite cable If you select the video signal please set the input signal source of LCD TV to...

Page 14: ...u select PC signal please set the input signal source of LCD TV to RGB mode Not supplied 1 The native display resolution is 1024 x 768 If the signal resolution exceeds this resolution it may not be po...

Page 15: ...ough audio cable How to record the TV program 1 Connect cables as shown above 2 Turn on the LCD TV and select source 3 Turn on the VCR and insert the tape 4 Select the video input from the VCR menu th...

Page 16: ...r picture quality And connect the audio outputs with the corresponding audio input terminals on the TV set If you select YPbPr signal please set the input signal source of the LCD TV to YPbPr mode Not...

Page 17: ...to red If you want to turn off the power completely unplug the power cord from the wall outlet Note Do not switch the on off state of the unit quickly The interval of the turning on and turning off s...

Page 18: ...ystem Setting Menu sleep time back light 20 minutes 6 on off 0 0 0 Audio Setting Menu off SRS bass treble balance AVC System Position Menu 50 50 866 15 h position v position frequency phase System Set...

Page 19: ...se of the menu 1 Access Channel Setting menu Press CH button repeatedly to highlight auto search item Press VOL to start Auto Search All active channels will be preset and stored into the memory autom...

Page 20: ...the keypad buttons to enter the channel then access the Channel Setting menu and select skip press VOL to set skip off When you press CH to change channels the channel will be present Fine tuning is n...

Page 21: ...enu Press CH to select current channel press VOL to select a current channel number Press CH to select exchange to press VOL to select a target channel number Press CH to select exchange channel press...

Page 22: ...ber button then wait for about 2 seconds To select two digit channel numbers Press button to display then input the channel using the 0 9 number button To select three digit channel numbers Press butt...

Page 23: ...Bright Nature Soft and User Bright Select for a bright picture Nature Select for a standard picture Soft Select for a soft picture NOTE Setting the unit to a Bright Picture with high brightness and c...

Page 24: ...the channel is changed Turning AVC On lets you automatically adjust the volume of the desired channel by lowering the sound output when the modulation signal is high or by raising the sound output whe...

Page 25: ...display size 1 2 3 Item Function Choice Range Blue Screen Selects sound system Selects colour system Setting screen display size Adjusts the backlight brightness If you select on the screen will disp...

Page 26: ...m Press VOL to select opaque or translucent If you select Opaque the background of the menu is opaque If you select translucent the background of the menu is translucent Access the OSD Setting menu Pr...

Page 27: ...t time After setting current time press CLK button again to display turn on menu bar Press VOL to select hour minute or status Press CH to adjust turn on time and turn on status off everyday today tod...

Page 28: ...m your PC Video card might distort the image When VGA signal format is changed or when you switch to RGB mode from another source the unit adjusts frequency and phase automatically to obtain the best...

Page 29: ...o change the value of the user mode set color temp to user first then select customer temp setting item and press VOL to access the sub menu Function Adjust the brightness of the picture Adjust the co...

Page 30: ...LUME Check that the unit is not muted Check Whether the sound is output to headphone Good sound but poor colour Poor picture Horizontal dotted line Adjust the contrast colour and brightness settings S...

Page 31: ...olour system Sound output Accessories 100 240V 50 60Hz 48W 1280 x 768 0 297mm x 0 297mm 500 nit 500 1 1200 1000 470 W x 180 D x 324 H with stand 4 38cm PAL BG NTSC AV 3W 8 Operating manual x 1 Power c...

Page 32: ...ONIC CORPORATION PTY LTD 1 JOYNTON AVENUE WATERLOO NSW 2017 AUSTRALIA TEL 02 9313 7111 FAX 02 9313 7555 www palsonic com au PALSONIC CUSTOMER SERVICE TELEPHONE AUSTRALIA 1300 657 888 604 L15H33 01 Ver...

Reviews: