background image

 21

—


Rename


Use 

▲▼

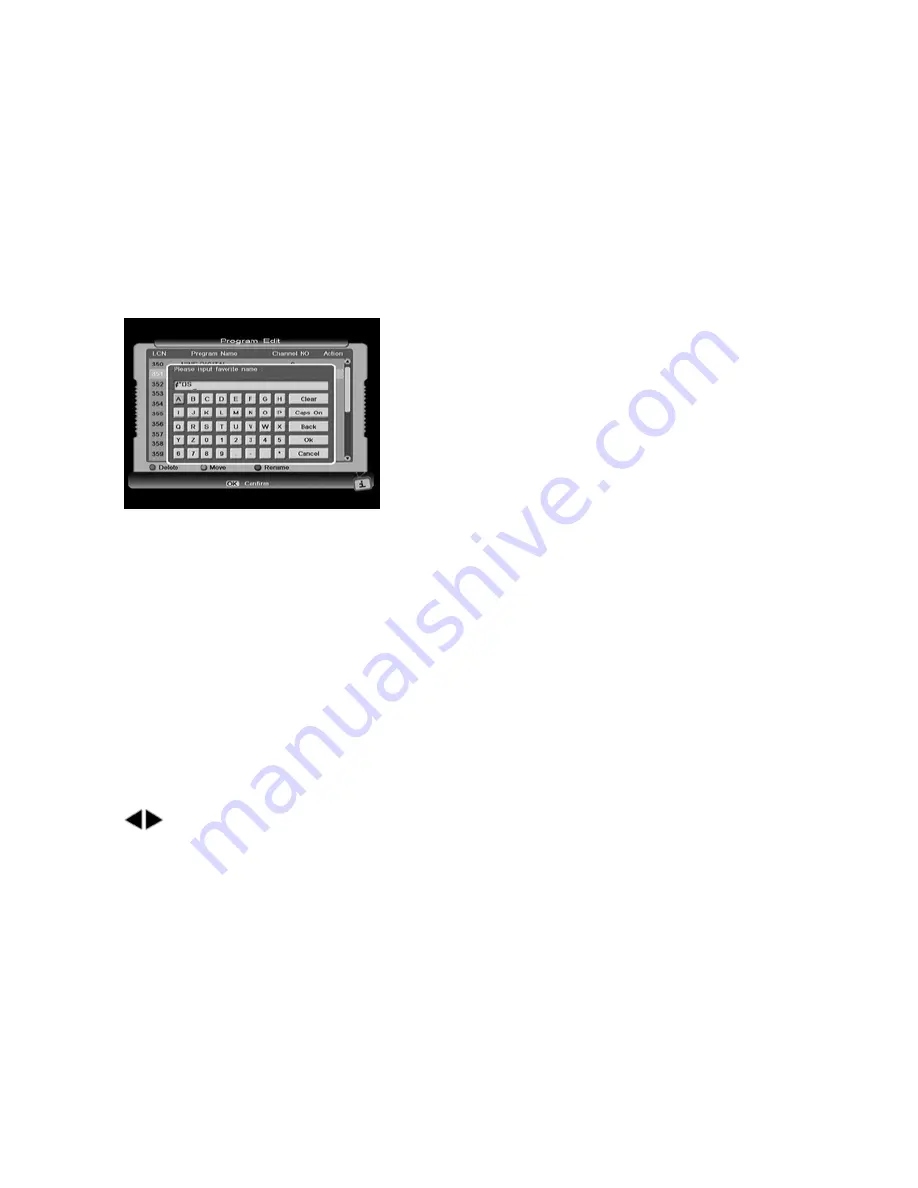
 key to select the program you want to rename, press blue key on the 

REMOTE, and will pop up a keypad window where you can rename the program 

name. 

In this keypad window, select your required character by using direction keys on the 

REMOTE and press OK key. 

Then the selected character will be shown in the 

title bar at the top of this keypad window. To 

switch between capitalization and lowcase, 

please select Caps On command and press OK 

key on the REMOTE. Back command allows 

you to erase the unwanted character in the title 

bar. Move cursor to OK command and press OK 

key. The keypad will disappear and the new 

name will be shown in the program name 

column. You can define several program names 

in the same way. 

3.2 Favorite Edit 

This window includes the three columns of FAV, Selected and Programs. While 

there are no prepared favorite groups in FAV column, you can define and modify 

favorite groups’ name by using corresponding color keys on the REMOTE. And 

more, you can add programs to any favorite group. 

  keys are used to switch among three columns, and Up/Right keys are used to 

select item in each column. Notice that what will be shown in the Selected and 

Programs column varies with the favorite group that you have selected in the FAV 

column. 


How to define a favorite group 

Press 

Red 

key on the REMOTE, and will pop up a keypad window where you can 

define a favorite group name. 

In this keypad window, select your required character by using direction keys on the 

Summary of Contents for HDD320G

Page 1: ......

Page 2: ...n that case turn off the power and turn on after 1 2 hours 3 When you don t use this unit for a long time please pull the power cord from the outlet Also do not use a damaged power cord 8 Install the...

Page 3: ...e The lightning flash with arrowhead symbol within an equilateral triangle is intended to alert the user to the presence of un insulated dangerous voltage within the product s enclosure that may be of...

Page 4: ...anel 8 2 Rear Panel 9 3 Remote Control Unit 10 4 Connection Diagram 13 OPERATION 16 1 Installation 16 1 1 Auto Search 17 1 2 Manual Search 17 1 3 Channel Edit 18 1 4 Factory Default 19 2 Program Guide...

Page 5: ...ormation 28 7 Shortcut Key Explanations 29 7 1 Audio 29 7 2 MUTE 29 7 3 TeleText 29 7 4 Information 30 7 5 EPG and EPG Schedule 30 7 6 Recall the favorite channel 30 7 7 HDD File List 31 7 8 PVR ASSIS...

Page 6: ...trays through this product allows you to watch whatever channel you wish off the digital broadcasting network Throughout this manual you will notice that the operation is easy to use In case you exper...

Page 7: ...472 S P DIF Digital Audio or Dolby AC3 Stream out RTC Real Time Clock Timer 65536 Color Graphic 8 Favorite Channel List Channel Editing Capability Move Delete complied Lock and etc PVR Functions and...

Page 8: ...ur STB guiding you through installation channel organizing viewing and many other functions All functions can be carried out using the buttons on the RCU and some of the functions can also be carried...

Page 9: ...nt Panel NAME FUNCTION MENU Press to display the Main Menu on the screen OK Connect to terrestrial antenna CH When watching change to the previous or next channel or move to the next higher or lower i...

Page 10: ...N Connect to terrestrial antenna R AUDIO Right audio output L AUDIO Left audio output CVBS Composite video output S P DIF Connect to amplifier for digital audio output RS232 Serial port used for softw...

Page 11: ...10 3 Remote Control Unit...

Page 12: ...t EXIT Press to return to the previous menu or escape from the item PVR Functions LIST Press to display the Recorded Program List TEXT Press to enter the teletext window CC Used to turn Closed Caption...

Page 13: ...ator light of the STB RCU flashes three times and it indicates that the STB RCU has received signal from the TV RCU 4 And press corresponding learning keys on TV key window of the STB RCU again such a...

Page 14: ...RF crossover lead from LOOP OUT 1 To ANT IN 2 A Using HDMI Cable HDMI is the recommended connection for your PVR if you have a TV with an HDMI input An HDMI connection will allow you to transmit 1080...

Page 15: ...14 B Connect YPbPr port 1 Connect the antenna to ANT IN of the STB 2 Connect to TV as following figure...

Page 16: ...15 C Using RCA cable 1 Connect the antenna to ANT IN of the STB 2 Connect to TV by using the supplied AV lead as shown...

Page 17: ...ct PVR System Setting Use the keys to move up or down from one item to another Press the OK key on your remote to enter the selected sub menu To escape the menu system at anytime press EXIT on the rem...

Page 18: ...2 Manual Search You can set parameters in Manual Search window if you are familiar with relevant parameters In this mode only one channel whose necessary parameters are set in Manual Search window by...

Page 19: ...Channel window where you can set necessary parameters of the new channel will be displayed on the screen Frequency You can input values referring to above by using the number keys on the REMOTE Bandw...

Page 20: ...sure the default NOTE After restoring default all programs you have searched will be erased and all parameters will return to the factory default Please use this operation with care 2 Program Guide NO...

Page 21: ...o delete one or more unwanted programs permanently First select the program you want to delete and press red key on the REMOTE You can continue to select other unnecessary programs and mark them with...

Page 22: ...own in the program name column You can define several program names in the same way 3 2 Favorite Edit This window includes the three columns of FAV Selected and Programs While there are no prepared fa...

Page 23: ...ow key Then a keypad window will pop up for further operation please refer to the above specification How to delete a favorite group In the FAV column the selected favorite group will be deleted from...

Page 24: ...Favorite Edit say you had setup 2 favorite Groups 1 All HD channels 2 All SD channels You can use the left and right arrow buttons to select how the program list is displayed You can choose between s...

Page 25: ...display the keypad dialog Using the arrow keys on the REMOTE you can edit the file name Lock Press Blue key on the selected file name GroupMgr Press Green key there will show the list of Recorded Grou...

Page 26: ...Play Schedule Start Time Input wanted time by numeric keys or press OK to enter the sub menu to set the date and time FAV key is used to switch between date and time Schedule End Time hh mm Input wan...

Page 27: ...record Time shift Start Mode The available options are Never Always and Pause key New setting can work after playing a new service 5 4 Recording Info When you are recording you can see the light down...

Page 28: ...and press OK key to enter into System Setting menu This menu consists of five items You can access its sub menu by highlighting this item and pressing OK key 6 1 Common Set Transparency The value is...

Page 29: ...6 4 Time Zone Adjust In this menu user can change time zones for different countries Press the keys to change Use keys to select between Daylight Saving On and Daylight Saving Off for daylight saving...

Page 30: ...g service If the service provides several audio languages use keys to select appropriate language and press OK key to confirm 7 2 MUTE By pressing MUTE key on the REMOTE the volume will disappear temp...

Page 31: ...the REMOTE to continue reading the next program information Press INFO key once again to return to the normal view mode During the whole operation press EXIT key to exit from this banner at anytime 7...

Page 32: ...s no information it will display this file has no description Press INFO Key again the info will disappear Press OK key to playback this file 7 8 PVR ASSIST PVR Assist is a quite convenient function i...

Page 33: ...t play new service time shift of old service will be stopped automatically 7 10 REC 7 10 1 Start record Press the RECORD key to start recording A record icon is displayed on the upper left of the scre...

Page 34: ...confirm 7 11 File playback 7 11 1 Change file playback speed Press the REW FF SLOW keys to change file playback speed a speed icon is displayed in the upper left of screen 7 11 2 Change file playback...

Page 35: ...to display Playback progress bar Press OK key twice then there will be a notice named Please add a start or an end mark position then confirm to cut 3 To specify one start point with green key and end...

Page 36: ...ou want to add it into playback process bar You can make the bookmark at maximum 20 positions for one file 7 12 2 Go to a bookmark Press the YELLOW key to jump to the next bookmark in the playback pro...

Page 37: ...6 7 8 Demodulation QPSK 16 and 64 QAM Video decoding Standard MPEG2 4 H 264 MP HL MP ML Aspect Ratio 4 3 16 9 Video Resolution 1920 1080i MAX Audio Decoding Standard ISO IEC 13818 3 and TR101154 Decod...

Page 38: ...nel VOL Rear Panel ANT IN LOOP OUT HDMI YPbPr CVBS Audio L R Video S P DIF Connector RS232 Remote Control Type Infra red Carrier Freq 38 KHZ Battery 2 1 5V AAA Type Power Ambient Input Voltage AC 100...

Page 39: ...modulator and RF OUT Antenna not delivering clear signal Check cable connections or adjust the antenna No signal or weak signal Call an antenna specialist from local paper or similar No picture or sou...

Page 40: ...39 Distorted Menu Screen Brightness or Contrast level of TV set too high Adjust Brightness and Contrast to lower levels Not working Processor stopped Remove the power cord or switch AC OFF and ON...

Reviews: