background image

LED 300A/300CA Marine 

Copyright © 2018 Pahlén AB, Box 728, SE-194 27 Upplands Väsby, Sweden

Tel. +46 8 594 110 50, Fax +46 8 590 868 80, e-mail: [email protected], www.pahlen.com

Manual

User manual

Gerbrauchsanleitung

Инструкция

Manuiale d’usa

Manual de instrucciones

MA50-09 rev

.3

2018-05

Swedish design 

and manufacture 

since 1967

Summary of Contents for LED 300A Marine

Page 1: ... 194 27 Upplands Väsby Sweden Tel 46 8 594 110 50 Fax 46 8 590 868 80 e mail info pahlen se www pahlen com Manual User manual Gerbrauchsanleitung Инструкция Manuiale d usa Manual de instrucciones MA50 09 rev 3 2018 05 Swedish design and manufacture since 1967 ...
Page 2: ...SVENSKA 3 ENGLISH 9 DEUTCH 15 РУССКИЙ 21 ESPAÑOL 27 ITALIANO 33 ...

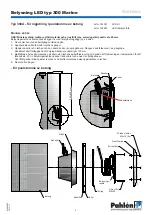
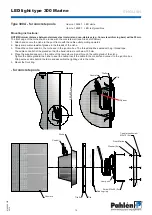
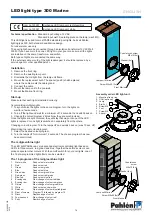
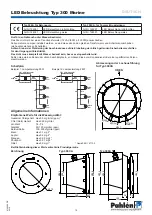
Page 3: ...SO 2768 1 The tolerance class in accordance with this E Box 728 SE 194 27 Upplands Väsby Sweden 124X81 ASA 2011 11 03 TS 2012 03 19 Marine Belysning 300A LED Ø172 Ø160 304 288 22 36 140 Ø288 Ø170 22 140 Ø288 Ø304 Ø160 Ø282 Ø160 25 140 36 Belysning LED typ 300 Marine SVENSKA MA50 09S 2015 11 Typ 300A för ingjutning Typ 300CA poolstomme med liner Art nr 124281 Röd grön blå LED lampa Art nr 124291 Rö...

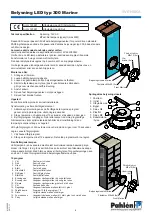
Page 4: ...kabelröret i nischen och den andra änden i kopplingsboxen Gängan skall tätas med t ex gängtape Kabelröret skall förläggas så att böjningsradien ej understiger 100 mm 4 Medföljande hylsa ska placeras på kabeln vid nischens kabelförskruvning Dra sedan åt förskruvningen i lampnischen för att täta kabeln För in belysningsinsatsens kabel i kabelröret och anslut i kopplingsboxen Överflödig kabel lindas ...

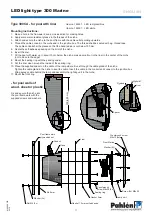
Page 5: ...t i linern mitt i nischen ej för nära kanten 8 Montera tätringen med packningen under 9 Skär rent linern efter tätringens innerkant 10 Medföljande hylsa ska placeras på kabeln vid nischens kabelförskruvning Dra sedan åt förskruvningen i lampnischen för att täta kabeln För in belysningsinsatsens kabel i kabelröret och anslut i kopplingsboxen Överflödig kabel lindas bakom lampan och därefter montera...

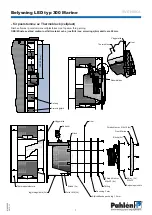
Page 6: ...tfritt material och ej rostfritt t ex armeringsjärn skall vara 50 mm Liner Mursten Kabeldistans Väggmatta Puts Bricka 3x Kabelrör Tätring Front Marine Bricka 6x Försänkt skruv M5x10 6x Självhäftande packning 1 5 mm Skruv 2x M5x20 Belysningsinsats Liner Nisch Väggmatta Mutter M6 3x Ingjutningsfäste 3x Försänkt skruv M6x20 8x Packning 3 mm Polstomme mursten med puts ...

Page 7: ...9S 2015 11 för poolstomme av Thermoblock cellplast Nischen fixeras i poolstommens cellplastblock med fogskum före gjutning OBS Minsta avstånd mellan rostfritt material och ej rostfritt t ex armeringsjärn skall vara 50 mm Liner Thermoblock Kabeldistans Väggmatta Armeringsjärn Betong Bricka 3x Kabelrör Tätring Front Marine Bricka 6x Försänkt skruv M5x10 6x Självhäftande packning 1 5 mm Skruv 2x M5x2...

Page 8: ...erson Montera så här 1 Stäng av strömmen 2 Lossa befintlig belysningsinsats 3 Lossa den gamla lampan från belysningsinsatsens fästram 4 Sätt dit utbyteslampan Hylsan pos 8 skall placeras där kabeln går igenom nischens kabelförskruvning 5 Anslut kabeln 6 Skruva fast belysningsinsatsen mot poolväggen 7 Skruva fast Marine fronten Uppstart Kontrollera att lamporna är korrekt installerade Synkroniserin...

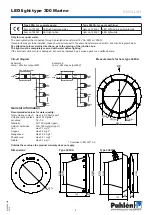
Page 9: ... tolerance class in accordance with this E Box 728 SE 194 27 Upplands Väsby Sweden 124X81 ASA 2011 11 03 TS 2012 03 19 Marine Belysning 300A LED Ø172 Ø160 304 288 22 36 140 Ø288 Ø170 22 140 Ø288 Ø304 Ø160 Ø282 Ø160 25 140 36 Dimensions Type 300CA Type 300A LED light type 300 Marine ENGLISH MA50 09 GB 2018 Type 300A for concrete pools Type 300CA for pools with liner Item no 124281 LED light red gre...

Page 10: ...e threads of the niche 3 Thread the cable conduit in the niche and in the junction box The thread shall be sealed with e g thread tape The cable conduit shall be placed so that the bend radius is not below 100 mm 4 Place the supplied spacer on the cable of the lamp where it runs through the cable gland of the niche Tighten the cable gland in the niche to seal the cable Insert the cable in the cond...

Page 11: ...o about 10 cm below the niche make a small cut in the liner in the center of the niche not to close to the edge 8 Mount the sealing ring with the packing under 9 Cut the liner clean around the inside of the sealing ring 10 Place the supplied spacer on the cable of the lamp where it runs through the cable gland of the niche Tighten the cable gland in the niche to seal the cable Insert the cable in ...

Page 12: ...tainless steel material and non stainless e g Concrete reinforcing bars will be 50 mm Liner Building blocks Spacer Wall mat Plaster Washer 3x Conduit Sealing ring Front Marine Washer 6x Countersunk screw M5x10 6x Gasket 1 5 mm self adhesive Screw 2x M5x20 Lamp unit Liner Niche Wall mat Nut M6 3x Casting bracket 3x Countersunk screw M6x20 8x Gasket 3mm Pool frame work building blocks with plaster ...

Page 13: ...f Thermoblock foam plastic The niches are secured in the pool framework s cellular plastic block block with joint foam filler before casting NOTE Minimum distance between stainless steel material and non stainless e g Concrete reinforcing bars will be 50 mm Liner Thermopool wall Spacer Wall mat Reinforcement bar Concrete Washer 3x Conduit Sealing ring Front Marine Washer 6x Countersunk screw M5x10...

Page 14: ...qualified person Installation 1 Remove the front ring 2 Remove the existing lamp unit 3 Dismantle the old light from the lamp unit frame 4 Mount the replacement bulb The spacer pos 8 shall be placed where the cable meets the cable gland 5 Connect the cable 6 Mount the lamp unit to the poolwall 7 Mount the Marine front ring Start up Make sure that each light is installed correctly Synchronizing mul...

Page 15: ...3 TS 2012 03 19 Marine Belysning 300A LED Ø172 Ø160 304 288 22 36 140 Ø288 Ø170 22 140 Ø288 Ø304 Ø160 Ø282 Ø160 25 140 36 LED Beleuchtung Typ 300 Marine MA50 09 DE 2018 DEUTSCH Typ 300A für Betonpools Typ 300CA für Pools mit Auskleidung Art Nr 124281 LED Beleuchtung rot grün blau Art Nr 124291 LED Beleuchtung rot grün blau Art Nr 124381 LED Beleuchtung weiss Art Nr 124391 LED Beleuchtung weiss Nur...

Page 16: ...schlussdose ein Das Gewinde muss abgedichtet werden z B mit Gewindeband Der Kabelkanal ist so zu platzieren dass der Biegeradius nicht weniger als 100 mm beträgt 4 Bringen Sie das mitgelieferte Distanzstück an der Stelle der Leuchtenzuleitung an an dem diese durch die Kabel verschraubung der Einbaunische verläuft Ziehen Sie die Kabelverschraubung in der Einbaunische an um das Kabel abzudichten Füh...

Page 17: ... am Rand 8 Montieren Sie den Dichtungsring auf die darunterliegende Abdichtung 9 Führen Sie einen passgenauen Schnitt auf der Innenseite des Dichtungsringes durch um überschüssige Auskleidung zu entfernen 10 Bringen Sie das mitgelieferte Distanzstück an der Stelle der Leuchtenzuleitung an an dem diese durch die Kabel verschraubung der Einbaunische verläuft Ziehen Sie die Kabelver schraubung in der...

Page 18: ...reiem Stahl z B Bewehrungseisen muss mindestens 50 mm betragen Auskleidung Bausteine Distanzstück Wandbekleidung Putz Unterleg scheibe 3x Kanal Dichtungsring Frontstück Marine Unterleg scheibe 6x Senkschraube M5x10 6x Abdichtung 1 5 mm selbstklebend Schraube 2x M5x20 Leuchteneinheit Auskleidung Einbaunische Wandbekleidung Nuss M6 3x Gusshalterung 3x Senkschraube M6x20 8x Abdichtung 3 mm Poolrahmen...

Page 19: ...mstoff Die Nische wird vor dem Gießen mit Fugenschaum am Schaumstoffblock des Poolkörpers fixiert ACHTUNG Der Abstand zwischen Edelstahl und nicht rostfreiem Stahl z B Bewehrungseisen muss mindestens 50 mm betragen Auskleidung Thermopool Wand Distanzstück Wandbekleidung Bewehrungsstab Beton Unter legscheibe 3x Kanal Dichtungsring Frontstück Marine Unterlegscheibe 6x Senkschraube 6x M5x10 Abdichtun...

Page 20: ...das alte Licht vom Rahmen der Leuchteneinheit 4 Montieren Sie die Ersatzbirne Das Distanzstück Pos 8 ist dort zu platzieren wo das Kabel auf die Kabelverschraubung trifft 5 Schließen Sie das Kabel an 6 Montieren Sie die Leuchteneinheit an der Poolwand 7 Montieren Sie den vorderen Frontstück Marine Inbetriebnahme Vergewissern Sie sich dass jedes Licht korrekt installiert wurde Synchronisierung mehr...

Page 21: ...A2 LA3 LA6 50W 50W 50W 50W 50W alt alt РУССКИЙ Светодиодный светильник типа 300 Marine MA50 09 RU 2018 Тип 300A для бетонных бассейнов Тип 300CA для бассейна с лайнером Арт 124281 Светодиодная лампа Красный зеленый синий Арт 124291 Светодиодная лампа Красный зеленый синий Арт 124381 Светодиодная лампа Белый Арт 124391 Светодиодная лампа Белый Только для использования под водой Светильник должен по...

Page 22: ...ху 2 Нанесите небольшое количество герметика на резьбу ниши 3 Пропустите кабелепровод через нишу и распределительную коробку Резьба должна быть герметизирована например лентой для уплотнения резьбовых соединений Кабелепровод должен располагаться так чтобы радиус изгиба был не менее 100 мм 4 Вставьте кабель в трубопровод и подключите к распределительной коробке Затяните соединительные элементы ниши...

Page 23: ... уровня на 10 см ниже ниши Сделайте небольшой надрез в лайнере в центре ниши не слишком близко к краю 8 Установите уплотнительное кольцо самоклеющееся уплотнение под ним 9 Аккуратно обрежьте лайнер по кругу внутри уплотнительного кольца 10 Наденьте прокладку на кабель от лампы в том месте где он проходит через кабельную прокладку ниши Затяните соединительные элементы ниши для герметизации кабеля О...

Page 24: ...ими видами металла например с армирующим чугуном должно составлять не менее 50 мм Лайнер Строительные блоки Прокладка Настенная прокладка Штукатурка Шайбa M6 3x Кабелепровод Уплотнительное кольцо Переднее кольцо Шайбa 6x Винт 6x M5x10 Уплотнение 1 5 мм самоклeящeecя Винт 2x M5x20 Осветительный блок Лайнер Ниша Настенная прокладка Гайка M6 3x Кронштейн для заливки 3x Винт 8x M6x20 Уплотнение 3 мм К...

Page 25: ... В полистирольном ячеистопластиковом блоке ниша фиксируется монтажной пеной перед термоплавкой Внимание Расстояние между материалом из нержавеющей стали и другими видами металла например с армирующим чугуном должно составлять не менее 50 мм Лайнер Стенка Thermopool Прокладка Настенная прокладка Aрматyрный стержень Бетон Шайбa 3x Кабелепровод Уплотнительное кольцо Переднее кольцо Marine Шайбa 6x Ви...

Page 26: ...нтируйте старый светильник из каркаса осветительного блока 4 Установите новую лампу Установите прокладку поз 8 в том месте где кабель проходит через кабельное уплотнение 5 Подсоедините кабель 6 Установите осветительный блок в стене бассейна 7 Установите переднее кольцо Marine Включение в работу Запуск светильников Убедитесь что каждый светильник установлен правильно Синхронизация нескольких светил...

Page 27: ...te 124281 Lámpara LED roja verde azul Nº de parte 124291 Lámpara LED roja verde azul Nº de parte 124381 Lámpara LED blanca Nº de parte 124391 Lámpara LED blanca Únicamente para uso bajo agua La lámpara de piscina se deberá conectar mediante un transformador de aislamiento de 12V CA 60W alt 300W Si se instalarán varias lámparas estas se deberán conectar todas al mismo transformador e interruptor ve...

Page 28: ...para cables en el nicho y en la caja de conexiones Deberá sellar la rosca con por ejemplo cinta de sellado El conducto para cables se deberá colocar de forma que el radio de curvatura no sea inferior a 100 mm 4 Coloque el espaciador provisto del cable de la lámpara donde pasa a través del prensacables del nicho Ajuste el prensa cables en el nicho para sellar el cable Inserte el cable en el conduct...

Page 29: ...ento en el centro del nicho no demasiado cerca del borde 8 Monte el aro de sellado con el sellador debajo 9 Corte el revestimiento limpiamente alrededor del interior del aro de sellado 10 Coloque el espaciador provisto del cable de la lámpara donde pasa a través del prensacables del nicho Ajuste el prensa cables en el nicho para sellar el cable Inserte el cable en el conducto y conéctelo a la caja...

Page 30: ...inoxidable y el no inoxidable por ejemplo el hierro del armazón debe ser de 50 mm Revestimiento Bloques de construcción Espaciador Cobertura de pared Yeso Arandela 3x Conducto Aro de sellado Careta Marine Arandela 6x Tornillo avellanado M5x10 6x Junta 1 5 mm autoadhesiva Tornillo 2x M5x20 Unidad de lámpara Revestimiento Nicho Cobertura de pared Tuerca M6 3x Soporte 3x Tornillo avellanado 8x M6x20 ...

Page 31: ... el bloque de espuma plástica del armazón de la piscina con espuma para relleno de juntas antes de efectuar el encapsulado ATENCIÓN La separación mínima entre el material inoxidable y el no inoxidable por ejemplo el hierro del armazón debe ser de 50 mm Revesti miento Cobertura de pared Espaciador Pared de Thermopool Barra de refuerzo Hormigón Arandela 3x Conducto Aro de sellado Careta Marine Arand...

Page 32: ...tire el aro frontal 2 Retire la unidad de lámpara existente 3 Extraiga la lámpara vieja del marco de la unidad de lámpara 4 Monte la nueva lámpara El espaciador pos 8 se deberá colocar en la posición en la que el cable se encuentra con el prensacables 5 Conecte el cable 6 Monte la unidad de lámpara en la pared de la piscina 7 Monte el aro frontal marino Encendido Asegúrese de que cada lámpara esté...

Page 33: ... LED Ø172 Ø160 304 288 22 36 140 Ø288 Ø170 22 140 Ø288 Ø304 Ø160 Ø282 Ø160 25 140 36 Luci piscina LED tipo 300 Marine MA50 09 IT 2018 ITALIANO Tipo 300A per piscine in cemento Tipo 300CA per piscine con rivestimento N articolo 124281 Luci a LED rosse verdi blu N articolo 124291 Luci a LED rosse verdi blu N articolo 124381 Luci a LED bianche N articolo 124391 Luci a LED bianche Da utilizzare esclus...

Page 34: ... scatola di derivazione La filettatura deve essere sigillata ad esempio con nastro in teflon La canalina del cavo deve essere collocata in modo che il raggio di curvatura non sia inferiore a 100 mm 4 Collocare il distanziatore in dotazione sul cavo della lampada che attraversa il passacavo della nicchia Stringere il passacavo nella nicchia per sigillare il cavo Inserire il cavo nella canalina e co...

Page 35: ...cchia Effettuare un piccolo taglio nel centro della nicchia non accanto al bordo 8 Montare l anello di tenuta con la guarnizione sotto 9 Effettuare un taglio pulito del rivestimento all interno dell anello di tenuta 10 Collocare il distanziatore in dotazione sul cavo della lampada che attraversa il passacavo della nicchia Stringere il passacavo nella nicchia per sigillare il cavo Inserire il cavo ...

Page 36: ...e i materiali non antiossidanti come il ferro per armature deve essere 50mm Liner Mattoni Distanziatore Parete Intonaco Rondella 3x Canalina Anello di tenuta Anteriore rondella Marine Rondella 6x Vite con testa svasata M5x10 6x Guarnizione autoadesiva da 1 5 mm Vite M5x20 2x Unità lampada Liner Nicchia Parete Dado M6 3x Staffa di montajo 3x Vite con testa svasata 8x M6x20 Guarnizione da 3 mm Strut...

Page 37: ...Fissare la nicchia nella struttura di blocchi in plastica cellulare estrusa prima della colata di cemento NOTA La distanza minima tra i materiali antiossidanti e i materiali non antiossidanti come il ferro per armature deve essere 50mm Liner Thermoblock Distanziatore Parete Barra di rinforzo Cemento Rondella 3x Canalina Anello di tenuta Anteriore rondella Marine Rondella 6x Vite con testa svasata ...

Page 38: ...llazione 1 Rimuovere l anello anteriore 2 Rimuovere l unità lampada esistente 3 Smontare le vecchie luci dal telaio dell unità lampada 4 Montare la lampadina di ricambio Il distanziatore pos 8 deve essere collocato nel punto in cui il cavo entra nel passacavo 5 Collegare il cavo 6 Montare l unità lampada sulla parete della piscina 7 Montare l anello anteriore Marine Avvio Assicurarsi che ogni luce...

Reviews: