


7
Autocheck 3i
MA70-10E
ENGLISH
29
MD200_1d 03/2013
GB
General notes
#ORRECT¬lLLING¬OF¬THE¬VIAL
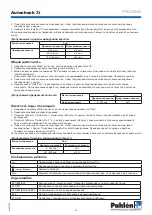
2EPLACEMENT¬OF¬BATTERIES
#ORRECT¬POSITION¬OF¬THE¬VIAL¬¬¬MM
#!54)/.
4O¬ENSURE¬THAT¬THE¬INSTRUMENT¬IS¬WATER¬PROOF
SEAL¬RING¬% ¬MUST¬BE¬IN¬POSITION
s¬
BATTERY¬COMPARTMENT¬COVER¬" ¬MUST¬BE¬lXED¬WITH¬THE¬FOUR¬SCREWS
s¬
If the batteries are removed for more than one minute the date and time menu starts auto-
matically when the photometer is switched on the next time.
(D) batteries
(E) seal ring
(C) notch for
IR
data transfer
(F) instrument back
(B) battery compart-
ment cover
(A) screw
Product description
Autocheck 3i (Pahlén item no. 212994) is a piece of manual testing equipment that photometrically determines the level of
chlorine, pH, cyanuric acid, total alkalinity and calcium hardness of water using test tablets or liquid reagent.
The unit is powered by 4 AA/LR6 batteries.
General information
The ambient conditions should be 5–40ºC and 30–90% relative humidity. Protect the meter from water as the electronics inside
may be damaged.
Dirt on the window over the light source and photo sensor inside the meter may cause inaccurate readings. Check on a regular
basis and clean carefully using a damp cotton cloth.
Do not use the photometer in direct sunlight in order to avoid measurement errors as the result of stray rays of light.
Zero point calibration must always be carried out prior to measurement. Zero point calibration and measurement shall always be
done using the same measurement glass.
Make sure that the cover is screwed on and that the outside of the measurement glass is dry and free from dirt and fingerprints
when the measurement glass is placed in the meter.
The measurement value may be inaccurate if the water sample is bubbles.
Different tests should not be carried out in the same measurement glass. Always use one measurement glass for pH tests, one
for chlorine tests, etc. Measurement glass, cover and crossbar shall be cleaned thoroughly after each test. Use only water when
cleaning measurement glasses, do not use detergent.
All test tablets used shall be designed for photometers and have black text. Do not touch the test tablets with your fingers.
The test shall be conducted immediately after the tablet has been dissolved. The test tablets must be kept out of the reach of
children.
The photometer will shut off automatically 10 minutes after the last time a button is pressed.
Battery replacement
If the battery is removed from the unit for longer than one minute,
the date and time menu will automatically appear the next time
the photometer is switched on. Make sure that the instrument is
watertight by ensuring that the seal (E) is correctly seated and
that the battery compartment cover (B) is securely screwed
down (A).
How to use
The meter is started/stopped using the “On/Off”
button.
To select the test you want, press the “Mode” button.
Select the test method by making repeated presses
on the “Mode” button.
Press the “!” button to turn the display background light on/off.
Press the “!” button and keep it pressed for more than 4 seconds
in order to access the previous measurements menu.
Menu options
Press the “Mode” button and keep it pressed.
Turn the unit on using the “On/Off” button. Only release the “Mode” button once the decimal point is shown in the display.
The “!” button is used to choose between the following options:
1) show previous measurements, 2) set date, 3) set time, 4) user calibration.
1a. Show previous measurements (diS)
The photometer stores the last 16 measurements. These are shown on a scrolling basis in three-second intervals in the follow-
ing order: no. (1–16), year, month/day, time, text type, result. The “Zero/Test” button repeats the current data. The “Mode” button
scrolls through all stored data. Exit display mode by pressing the “!” button.
1b. Transfer saved measurements to a printer or PC (Prt)
Requires the IRiM (Infrared Interface Module) accessory, item no. 212995. The IRiM module and the connected printer/PC must
be ready, and the right hand end of Autocheck 3i and the receiver section of IRiM must be pointing at each other.
Press the “Mode” button to start the transfer; the instrument shows “PrtG” (printing) for 1 second, followed by the number of the
first item of data. All data items are sent one at a time. Once the transfer is complete, the instrument returns to test mode.
The transfer can be interrupted by pressing the “On/Off” button.
In the event of a communication error with IRiM, a time-out error - “E132” - will be shown in the display and the instrument will
return to test mode.
B. Cover
E. Seal (o-ring)
A. Screw (4 pcs)
C. Window for IR data transfer
F. Instrument
back
D. Batteries
Summary of Contents for Autocheck 3i
Page 2: ......