background image

5

LED light type 300 Classic

MA50-06 GB 2018

ENGLISH

Pahlén AB

Box 728, S-194 27 Upplands Väsby, Sweden, Phone +46 8 594 110 50, Fax +46 8 590 868 80

BELYSNING

TYP 300 CA

Art. nr. 12270

LIGHTING

BELEUCHTUNG

File: R10198-3.cdr

Art.no.

Rev.no.

Scale

Designed by:

Approved by:

Revised by:  Date

Drawn by:  Date

Drawing number

Assembly drawing no.

Surface treatment

part of ISO 2768 

The tolerance class in accordance with this

E

Box 728, SE-194 27 Upplands Väsby, Sweden

Phone +46 8 59411050, Fax +46 8 59086880

1:2

OA 2006-04-26

OA

2007-09-20

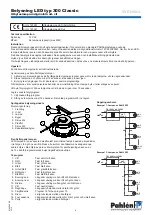
belysning typ 300 CA vinyl

Håltagningsmall för

M10112 2

Th

is

do

cu

m

en

ta

nd

its

co

nt

en

ts

ar

e

th

e

ex

cl

us

iv

e

pr

op

er

ty

of

Pa

hl

én

s

an

d

m

ay

no

tb

e

co

pi

ed

,

re

pr

od

uc

ed

,t

ra

ns

m

itt

ed

or

co

m

m

un

ic

at

ed

to

a

th

ird

pa

rty

,o

ru

se

d

fo

ra

ny

pu

rp

os

e

w

ith

ou

tw

rit

te

n

pe

rm

is

si

on

.

n

240

45°

22,

22,5°

22,5°

45°

45

°

22

,5

°

22,5

°

22

,5°

45

°

45

°

n

12(3x)

n

14(8x)

UP

Ø257

·--,

___ 

_. 

-----......._· 

'--. 

�. 

__ 

__


---·--._ -

c..o 

---·--·-·

---

140 

� 

CX) 
CX) 

B-

300-800

··· 

.  ·

-

'• 

  . 

.. 

·

·

-

�- . 

.. 

-. 

-

... . 

·

'• 

.·.•· 

·:  ·•.  ·.

·.· 

,,,

·

•, 

. .. 

·


·.. . 

·

.

.·.· . 

:

.

· 

. .. 

·

·

·

.,. 

_

.

--

�. 

;:�: 

_

·


..

, --< 

'° 

..--i 

"& 

<J 

<J 

. Ll

<J 

,1 

<J  Ll 

� 

______ 

--

......_ 

_______ 

<J 

.6 

<l· 

.  Ll 

,1 

<J 

_____ 4_ 

--

10 

200 

 .. 

· .. ·. .

. ·

• . 

...... 

...... 

<JL'.i/:/: 

,1 

·:::::.

:::::: 

<J 

'\:/: 

:::::: 

,1  .. :::::: 

:::::: 
:::::: 

·-·-. 

---

35 

'& 

25-30

OC) 
OC) 

'& 

tj-

300

-800

� 

300-800

--

� 

<1

· 

Ll 

_. Ll 

<1 

.Ll 

Ll 

<I· 

CX) 

CX) 

"0-

Ll. 

CD 

Ll 

..--

<1 

"0-

<1 

..--

Ll 

"0-

<I 

Ll

<1 

Ll 

----

i------1 40 

------<-1 

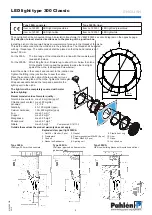
Type 300A, concrete:

Type 300CA, liner:

Item no 123281

LED light red/green/blue

Item no 123291

LED light red/green/blue

Item no 123381

LED light white

Item no 123391

LED light white

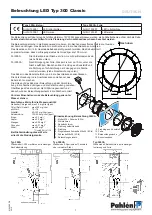
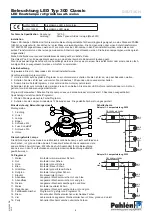
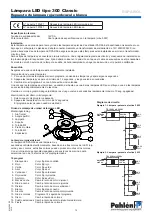
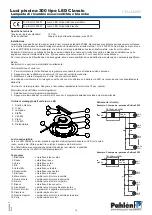
The pool light shall be connected through an isolation transformer 12V 60W/300W, see circuit diagram on the opposite page.

Pay attention to local electric directions as to the placing of the junction box.

Install the niche in the pool wall. Apply some waterproof grease in the threads of the niche.

Thread the cable conduit in the niche and in the junction box. The thread shall be sealed  

with e.g. thread tape. The cable conduit shall be placed so that the bend radius is not  

below 100 mm.
For the 300A:   The front edge of the niche shall be in line with the concrete wall  


(see sketch below).

For the 300CA:   After fitting the liner, fill water up to about 10 cm below the niche.


Fit the plastic front ring and the gaskets to make the liner tight  


against the niche, (see exploded view below).

Insert the cable in the conduit and connect to the junction box.  

Tighten the fitting in the junction box to seal the cable.

Place the socket on the cable of the lamp where it runs  

through the cable gland of the niche. Tighten that cable gland.

Wrap excess cable behind the lamp and assemble the  

lighting unit in the niche.

The light must be completely covered with water 


before lighting.
Recommended values for water quality:

Total chlorine content:   max 3.5 mg/liter (ppm)*

Chloride (salt) content:  max 250 mg/liter

pH-value:  


7.2–7.6

Alkalinity:  


60–120 mg/liter (ppm)

Calcium hardness:  

100–300 mg/liter (ppm)

Iron:  


max 0.1 mg/l *

Copper:  


max 0.2 mg/l *

Manganese:  


max 0.05 mg/l *

Phosphorus:  


max 0.01 mg/l *

Nitrate:  


max 50 mg/l *


Complies to EN 16713-3

Outside these values the product warranty does not apply.

Type 300A

Wall type: 200 mm tiled concrete

Type 300CA

Wall type: building blocks with insulation and liner

Type 300CA

Wall type: plywood on frame work or 

galvanized steel

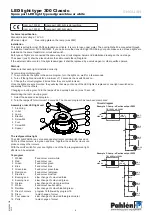
  1.  Nut M6 + Washer (3 pcs)

  2.  Framework

  3.  Conduit

  4.  Gasket self-adhesive

Exploded view pool light 300CA

  5.  Gasket

  6.  Countersunk screw M6x20 (8 pcs)

  7.  Screw M5x20 (2 pcs)

  8.  Lighting unit

  9.  Plastic front ring

10.   Liner

11.  Niche

12.  Junction box

Summary of Contents for 300CA Classic

Page 1: ...8 SE 194 27 Upplands Väsby Sweden Tel 46 8 594 110 50 Fax 46 8 590 868 80 e mail info pahlen se www pahlen com Manual User manual Инструкция Gerbrauchsanleitung Manuiale d usa Manual de instrucciones MA50 06 rev 2 Swedish design and manufacture since 1967 ...

Page 2: ......

Page 3: ...en Applicera lite vattenfast fett i nischens gängor Gänga i kabelröret i belysningsnischen och kopplingsdosan Gängan skall tätas med t ex gängtape Kabelröret skall förläggas så att böjningsradien ej understiger 100 mm För typ 300A Belysningsnischens framkant skall ligga i liv med färdig betongvägg se skiss nedan För typ 300CA Efter linerläggning fyll vatten till ca 10 cm under belysningsnischen Dä...

Page 4: ...n bytas ut av en servicetekniker eller annan behörig person Uppstart Kontrollera att lamporna är korrekt installerade Synkronisering av flera flerfärgade lampor 1 Aktivera synkroniseringen av de flerfärgade lampornas program genom att slå på lamporna vänta några sekunder 2 Slå av lamporna och vänta minst 12 sekunder slå sedan på dem igen 3 Byt program två gånger Nu är alla lampor i samma programlä...

Page 5: ...y some waterproof grease in the threads of the niche Thread the cable conduit in the niche and in the junction box The thread shall be sealed with e g thread tape The cable conduit shall be placed so that the bend radius is not below 100 mm For the 300A The front edge of the niche shall be in line with the concrete wall see sketch below For the 300CA After fitting the liner fill water up to about ...

Page 6: ...the light is damaged it shall be replaced by a service agent or other qualified person Start up Make sure that each light is installed correctly Synchronizing multiple lights 1 To synchronize the lights to the same program turn the lights on wait for a few seconds 2 Turn off the lights and wait for a minimum of 12 seconds then switch back on 3 Change the colour program 2 times Now they are synchro...

Page 7: ... Anschlussdose montieren Das Gewinde soll mit z B Gewindeklebeband dicht gemacht werden Das Kabelrohr soll so plaziert werden dass der Biegungsradius nicht niedriger als 100 mm ist Für 300A Die Vorderkante der Nische soll in Linie mit der Betonwand sein siehe Skizze unten Für 300CA Nach Einlegung der Folie Wasser bis zum ca 10 cm unter die Nische auffüllen Danach soll der Frontring aus Kunststoff ...

Page 8: ... Inbetriebsetzung Vergewissern Sie sich dass jedes Licht korrekt installiert wurde Synchronisierung mehrerer Lichter 1 Um die Lichter auf das gleiche Programm zu synchronisieren schalten Sie die Lichter an ein paar Sekunden warten 2 Schalten Sie die Lichter aus und warten Sie mindestens 12 Sekunden dann wieder einschalten 3 Ändern Sie die Farbe Programm 2 mal Jetzt sind die Lichter synchronisiert ...

Page 9: ...вите кабельный канал в нише и распределительной коробке Уплотните резьбу например с помощью уплотняющей ленты Кабельный канал должен устанавливаться таким образом чтобы радиус изгиба не был меньше 100 мм Для тип 300A Передний край ниши не должен выступать за плоскость бетонной стены см схему Для тип 300CA После установки облицовки заполните бассейн водой до уровня примерно на 10 см ниже ниши Устан...

Page 10: ...ель кабеля Если имеется повреждение внешнего кабеля или провода светильника то агент по обслуживанию или другой квалифицирован ный специалист должен их заменить Включение в работу Убедитесь что каждый светильник установлен правильно Синхронизация нескольких светильников 1 Для синхронизации светильников на одну и ту же программу включите напряжение и подождите несколько секунд 2 Выключите напряжени...

Page 11: ...la pared de la piscina Aplique grasa impermeabilizante en las roscas del nicho Enrosque el conducto para cables en el nicho y en la caja de conexiones Deberá sellar la rosca con por ejemplo cinta de sellado El conducto para cables se deberá colocar de forma que el radio de curvatura no sea inferior a 100 mm Para el 300A El borde frontal del nicho deberá alinearse con la pared de hormigón ver esque...

Page 12: ...rá reemplazarlo un agente de servicio u otra persona calificada Encendido Asegúrese de que cada lámpara esté correctamente instalada Sincronización de varias lámparas 1 Para sincronizar las lámparas al mismo programa encienda las lámparas y espere algunos segundos 2 Apague las lámparas y espere un mínimo de 12 segundos y luego vuelva a encenderlas 3 Cambie el color programa 2 veces Ahora están sin...

Page 13: ...le filettature della nicchia Far passare la canalina del cavo nella nicchia e nella scatola di derivazione La filettatura deve essere sigillata ad esempio con nastro in teflon La canalina del cavo deve essere collocata in modo che il raggio di curvatura non sia inferiore a 100 mm Per 300A Il bordo anteriore della nicchia deve essere allineato alla parete in cemento vedere il disegno di seguito Per...

Page 14: ... il cavo esterno dell illuminazione è danneggiato deve essere sostituito da un addetto alla manutenzione o personale qualificato Avvio Assicurarsi che ogni luce sia installata correttamente Sincronizzazione di varie luci 1 Per sincronizzare le luci sullo stesso programma accendere le luci e attendere qualche secondo 2 Spegnere le luci e attendere un minimo di 12 secondi quindi riaccenderle 3 Modif...

Reviews: