background image

7

1.

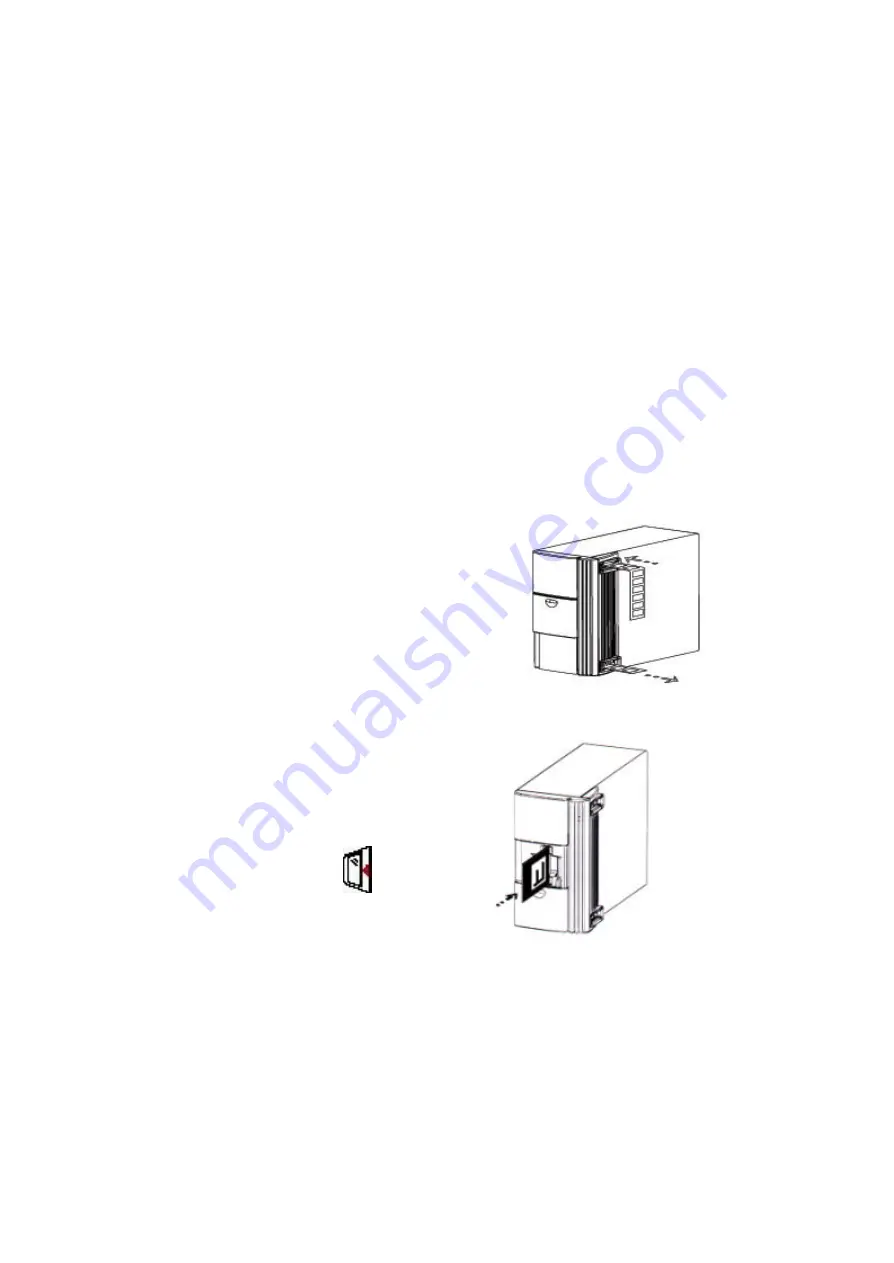
Please use single mounted 35mm 
slides. 

2.

Push the front sliding door down 
until it locks into the position.

3.

Hold the slide vertically with the 
image side facing left and longer 
side to slot.

4.

Push slide gently and completely 
into the scanner.

5.

To remove, push the Eject button 
next to the slot and pull slide out 
from the scanner.

v

MAKE SURE THERE IS NO FILMSTRIP INSIDE THE SCANNER 
BEFORE YOU INSERT THE SLIDE

.

LOADING THE SCANNER…

… with a filmstrip/roll film

Please use 35mm filmstrips at least 3 frames long (recommend 4 
frames long)  The scanner will load the filmstrip automatically when 
you insert 3 frames film.You can use color negatives, color slide 
film, or  black and white negative films.

1. Turn on the scanner and the computer.
2. Clean the film strip with a blower or a soft 

brush.

3. Make sure there is no slide inside the scanner. 
4. Make sure the image of the film is right up.
5. Feed the filmstrip gently from the upper side 

until the film is pulled into the scanner.

… with a slide

WE RECOMMEND THAT  IF YOU HAVE FILMSTRIPS 
LESS THAN 3 FRAMES, PLEASE CUT IT INTO SINGLE 
PIECES PUT IT INTO PROVIDED SLIDE MOUNTS THEN 
SCAN IT.

Summary of Contents for PF1800Lab

Page 1: ...EXHIBIT C User Manual...

Page 2: ...1 Getting Start Quick Installation Guide User s Guide Registration Card E N G L I S H...

Page 3: ...tune Color Color Balance and Level Curve Tab 14 4 Technical Support 16 5 Warranty Registration 17 CAUTION TO REDUCE THE RISK OF ELECTRIC SHOCK DO NOT REMOVE COVER NO USER SERVICEABLE PARTS INSIDE REFE...

Page 4: ...iver CyberView 35 in CD Application Software Adobe Photoshop Elements in CD User s Manual including Quick Installation Guide and Warranty Card Slide Mount x 2 Optional Accessory IEEE1394 Interface Car...

Page 5: ...etup Click Install to start the installation and follow the instruction on the screen Make sure the scanner power is OFF Plug the DC jack with the scanner AC DC Plug the AC adapter with power source v...

Page 6: ...rt 1 Attach the appropriate USB cable end to the computer 2 Attach the other end to the scanner If the scanner comes with IEEE 1394 port 1 Attach the appropriate IEEE1394 cable end to the computer 2 A...

Page 7: ...er end to the scanner to a USB port to a IEEE1394 port 1 Set the switch to point at on your scanner before power on 2 Attach the appropriate IEEE1394 Cable end to the computer 3 Attach the other end t...

Page 8: ...lease use 35mm filmstrips at least 3 frames long recommend 4 frames long The scanner will load the filmstrip automatically when you insert 3 frames film You can use color negatives color slide film or...

Page 9: ...8 FILM SCANNER USER S GUIDE 5 28 4 10 14 1 7 8 11 12 13 30 29 27 26 2 3 2 23 22 21 20 19 18 17 16 15 6 9 24 25...

Page 10: ...p the previewed image 8 Black pointer gray pointer and white pointer use these buttons to set the black gray and white points of the previewed image 9 CMYK or RGB value these fields display the color...

Page 11: ...units preference 25 Tab Position for filmstrip only use these tabs to move the frame to its proper position in case the scanner mis positioned the frame 26 Film Type Negative Reversal B W and Film Te...

Page 12: ...with power 2 Turn on other devices if necessary 3 Open Adobe Photoshop Elements 4 Launch the scanner driver CyberView 35 on your Macintosh or PC compatible as follows Macintosh Choose CyberView 35 fr...

Page 13: ...rse and Forward buttons in the Film Motion area of the software after you preview the films From left to right the buttons below are Reverse Eject Reverse Forward and Forward Eject 2 Prescan the singl...

Page 14: ...mbnail of the image you intend to scan a red border surrounds the thumbnail and the image appears in the preview image window in the center of the screen 4 To select multiple frames for scanning hold...

Page 15: ...on of the current image appear on this tab 2 Adjust the values for Brightness Contrast and Saturation by dragging their sliders or by entering an integer from 100 to 100 into the field next to the sli...

Page 16: ...e choices apply to your Channel selection 3 Create up to 4 new points on the tone curve by clicking in the grid or Control clicking Windows or Command clicking Macintosh on the desired position on the...

Page 17: ...www scanace com For products purchased in the United States of America Telephone 1 310 618 9935 Fax 1 310 618 8200 E mail support scanace com For products purchased outside US TEL 886 2 2698 0369 Fax...

Page 18: ...il the end of the one 1 year period or 30 days whichever is longer This warranty shall not apply if customer 1 abuses or modifies Product or Software 2 operates the system in an environment with exces...

Page 19: ...ill not occur in a particular installation If this equipment does cause harmful interference to radio or television reception Which can be determined by turning the equipment off and on the user is en...

Reviews: