


280514-24
SUPER-SD1 7
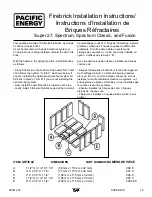
22"
559mm
12"
305mm
18"
457mm
30"
762mm
25"
635mm
11"
279mm
11"
279mm
18"
457mm
4"
102mm
4"
102mm
16"
406mm
16"
406mm
28"
711mm
10"
254mm
20"
508mm
14"
357mm
26"
660mm
16"
406mm
18"
457mm
22"
559mm
28"
711mm
8"
203mm
8"
203mm
8"
203mm
5"
127mm
15"
381mm
Minimum
Clearance to
Combustibles
Procedure:
CAUTION: THE STRUCTURAL INTEGRITY OF THE MO-
BILE HOME FLOOR, WALL AND CEILING/ROOF MUST
BE MAINTAINED.
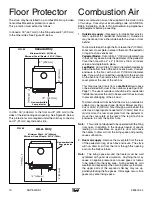
Note: See "Combustion Air" section on page 10.
1. Position stove and fl oor protection with hole for combus-
tion air in accordance with the clearances as stated on
the label and in Figure #1.
2. Mark the position for the hole in the ceiling and roof by
using a string and plumb-bob.
3. Check that the intended location will not interfere with fl oor
joists, ceiling joists or rafters before proceeding further.
4. Cut a hole in the ceiling and roof to suit the chimney
system and frame in the sides. The chimney support is
mounted to the framing.
5. Assemble chimney sections so the fi nished length is rest-
ing on the support and protruding through the roof. Avoid
having joints between ceiling and roof. Install radiation
shield. Assemble fl ashing and storm collar and be sure to
maintain the vapour barrier at this point. (Seal securely.)
Attach rain cap and check fl ashing for leaks.
6. Install connector as per manufacturer's instructions.
7. Attach stove to fl ooring using two 1/4" x 2" or longer lag
screws.
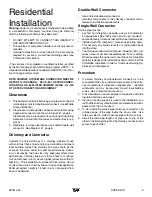
Mobile Home
Installation
Warning:
Under no circumstances is this heater to be installed
in a makeshift or "temporary" manner. It may be fi red only
after the following conditions have been met.
-
DO NOT CONNECT THIS UNIT TO A CHIMNEY FLUE
SERVING ANOTHER APPLIANCE.
-
DO NOT INSTALL IN A SLEEPING ROOM.
- Outside air supply must be used for Mobile Home installa-
tions see Figure #2, Page 8.
- The services of a competent or certifi ed installer, (certifi ed
by the Wood Energy Technical Training program (WETT) - in
Canada, Hearth Education Foundation (HEARTH) - in U.S.A.,)
are strongly recommended.
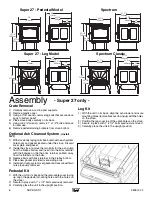
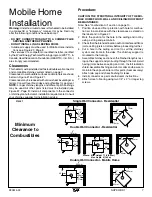
Clearances
This heater must be installed with listed double-wall connector
and compatible chimney system listed on page 7.
Clearances to combustible surfaces and materials are shown
below in Figure #1 and Figure #1.
Clearances may be reduced with various heat insulating ma-
terials. Consult local fi re codes and authorities for approval.
NOTE:
Longer chimney lengths and different pitch fl ashings
may be used. All other parts listed must be installed (see
Figure #2, Page 8). Install all components to the connector
or chimney manufacturer's installation requirements. Consult
your chimney supplier for installation advice.
FIG. #1
Double Wall Connector - Residential
Single Wall Connector - Residential
Alcove: Min. Height 7 1/2'(2.29m)
Max. Depth 4'(1.22m)
Double Wall Connector - Mobile Home
Summary of Contents for SPECTRUM
Page 20: ...20 SUPER SD1 280514 24...
Page 21: ...280514 24 SUPER SD1 21...
Page 22: ...22 SUPER SD1 280514 24...