8
VISTA and CLASSIC-C
111206-16
COMBUSTION AIR
Intake or combustion air can be supplied to the stove in one
of two ways.
1
.
Outside air supply
-(Necessary for mobile home installa-
tion, optional for residential installation) To draw
outside air through the fl oor on pedestal and leg models, leave
the
4"
knockout in the rear of the pedestal or leg kit enclosure
in place.
Pedestal Model:
Cut or drill a
4"
diameter or larger hole
in the fl oor anywhere inside the perimeter of the pedestal. Staple
a rodent screen in place.
Leg Kit Model:
Cut or drill a
4"
diameter hole directly below
the bottom knockout hole of the bottom enclosure. Connect
enclosure to fl oor with a short
4"
diameter pipe.
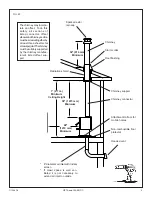
This hole must get its air from a ventilated crawl space or
be extended with duct to the outdoors (see Figure #
2
, Page
6
).
The use of outside combustion air for residential installa-
tion requires the unit to be secured to the structure to prevent
dislodging of the air duct. On pedestal and leg models,
outside air may also be ducted through the
4"
diameter hole in
the rear of the pedestal or bottom enclosure.
Note:
This unit is not designed to be operated with the fi ring door
open. In addition to the obvious hazard of sparks landing on
combustibles, an open fi re door will cause the heater to draw
air from the living space and possibly cause suffocation.
2
.
Room air supply
-On pedestal and leg models, remove the
4"
plug from the rear of the pedestal or bottom enclosure. The
stove will now draw its air from the room through the pedestal
and into the fi rebox intake. Consult your local building
code.
Note:
The living space around the heater must be ventilated
with good air circulation. Anything that may cause a negative
pressure can cause gases or fumes to be pulled into the living
area. During extremely cold weather, and especially when
burning at very slow rates, the upper parts of the exposed
chimney may ice up, partially blocking the fl ue gases.
WOOD SELECTION
This heater is designed to burn natural wood only. Higher ef-
fi ciency and lower emissions generally result when burning
air-dried and seasoned hardwood, as compared to softwood or
to green or freshly cut hardwood.
Wood should be properly air-dried (seasoned) for six months or
more. Wet wood will cause the fi re to smoulder and produce
large amounts of creosote. Wet wood also produces very
little heat and tends to go out often.
DO NOT BURN :
Salt water wood *
Treated wood
Wet or green wood
Coal
/
Charcoal
Garbage
/
Plastic *
Solvents
* These materials contain chlorides which will rapidly destroy
metal surfaces and void warranty.
Do not burn anything but wood. Other fuels, e.g.. charcoal,
can produce large amounts of carbon monoxide; a tasteless,
odourless gas that can kill. Under no circumstances should
you attempt to barbecue in this heater.
HOW TO TEST YOUR WOOD
Add a large piece of wood to the stove when it has a good large
bed of coals. It is dry if it is burning on more than one side
within one minute. It is damp if it turns black and lights within
three minutes. If it sizzles, hisses and blackens without igniting in
fi ve minutes it is wet and should not be burnt.
MORE WOOD, MORE HEAT
Seasoned wood has approximately
7500
BTU's per pound. If
you put
10
pounds of wood in your stove for an eight hour burn
the wood will be producing
9375
BTU's per hour. (
7500
BTU x
10
lbs.
/8
hrs.=
9375
BTU's per hr.) If you put
20
lbs of wood
in your stove for eight hour burn you will get
18
,
750
BTU's
per hr. (
7500
BTU x
20
lbs.
/8
hr.=
18
,
750
BTU's per hr.). This is
only an example and is based on
100
% effi ciency. In reality,
your stove should perform in the
70
% effi ciency range.
Experience will give you the right settings for proper combus-
tion and effi cient burning. Remember that the proper air inlet
setting is affected by variables such as type of wood, outside
temperature, chimney size and weather conditions. With practice,
you will become profi cient in operating your heater and will
obtain the performance for which it was designed.
OPERATING
CAUTION:
Never use gasoline, gasoline type lantern fuel,
kerosene, charcoal lighter fl uid or similar liquids to start or
"
freshen up
"
a fi re in this heater. Keep all such liquids well
away from the heater while it is in use.
WARNING: Do not use grates or andirons to elevate the
fuel. Burn directly on the fi re bricks. Replace broken or
missing bricks. Failure to do so may create a hazardous
condition.
Your PACIFIC ENERGY heater is designed for maximum
overall effi ciency at a moderate fi ring rate. Overfi ring is haz-
ardous and a waste of fuel. Too slow a burn contributes to
creosote buildup and lowers combustion effi ciency.
LIGHTING FOR THE FIRST TIME
CURING OF THE PAINT FINISH
To achieve the best fi nish the paint on your stove must be
baked on. When burning your stove for the fi rst
2
-
3
times it
is very important that the room be well ventilated. Open all
windows and doors. Smoke and fumes caused by the curing
process may cause discomfort to some individuals.
LIGHTING A FIRE
WARNING: Never use chemicals or any other volatile liquid
to start a fi re.
1
. Adjust air control to
"
H
"
(high) position and open door.
2
. Place crumpled newspaper in the centre of the heater and
criss-cross with several pieces of dry kindling. Add a few
small pieces of dry wood on top.
3
. Ignite the paper and close the door.
4
. After the fi re has established itself, open the door and add
a few small logs. Close door.
5
. Begin normal operation after a good coal base exists and
wood has charred.
NORMAL OPERATION
1
. Set air control to desired setting. If smoke pours down
across the glass (waterfall effect), this indicates you
have shut the control down too soon or you are using


