

504-0413900
SOLVING PROBLEMS
If the installed system does not seem to be working properly,
first make sure that all the cables are securely connected
, then carry out the following checks, in the order shown.
Check
Suggested solution
Further checks, if there is still a problem
Is anything lighted on
your set-top’s front
panel?
YES
D
NO
R
Power may not be reaching your set-top. Make
sure that the power cord is properly plugged in.
power cord is properly plugged in.
is properly plugged in.
If there is a switch by the wall AC power outlet,
switch it to ON.
Make sure your set-top is fully on by pressing
the
power
button on your remote control.
Check that the wall AC power outlet is working (for example by plugging in a lamp).
Does the remote control
operate your set-top?
YES
D
NO
R
Check that nothing is blocking the path from
your remote control to the front panel.
Check that your remote control is currently set to operate your set-top (consult the
instructions supplied with your remote control).
If your remote control will still not operate your set-top, replace the batteries in your
remote control.
Can you see a picture on
your TV screen?
YES
D
NO
R
Your TV and other equipment may not be turned
on. Check that they are plugged into AC power
outlets and turned on.
If your stereo TV is connected by baseband AV cables, check that you have selected the
appropriate baseband input on your TV.
If your TV and VCR are connected by RF coaxial cables, they must be tuned to your set-
top’s output channel. This is channel 3 or channel 4 (contact your cable operator to find
out which it is). Tune your TV and VCR to this channel.
If the video path between your set-top and your TV loops through other equipment (such
as a VCR) you may need to turn off this equipment for the loopthrough to work.
Is the picture distorted
or too small?
NO
D
YES
R
Your TV and/or VCR may not be tuned to your
set-top’s output channel.
Make sure that the TV/VCR switch on your VCR is switched to “TV”.
Is there any sound?
NO
R
Check that the audio cables are securely and
correctly connected.
Check that you have not muted the sound on your set-top, TV and/or any attached audio
equipment. Adjust the volume control on your set-top and/or TV.
If you can hear only mono sound, first check that the program is likely to have stereo
sound (an old movie, for example, may not be in stereo).
If the TV is mono, you will only hear stereo sound if you have a stereo audio amplifier and
speakers or home theater connected to the stereo VCR or set-top. This is also the case if
the stereo TV has only an RF input.
4. CONNECTING TO THE AC POWER
SUPPLY
Connecting the power cord to your set-top
Before you connect your set-top to a wall outlet, connect the polarized
plug on the power cord into the socket labeled “POWER INPUT” on
your set-top’s rear panel.
Connecting equipment to the wall AC outlets
Connect the polarized plugs on the power cords from your set-top,
VCR and any other equipment into wall AC outlets. If these outlets have
switches, switch them to ON.
Disconnecting
Disconnect your set-top from the power supply before you disconnect
any other equipment from its rear panel.
The only way to disconnect your set-top from the power supply is to
remove the power cord from the wall socket-outlet. Your set-top must
therefore be installed near to the wall socket-outlet, which should be
easily accessible.
5. TURNING YOUR SET-TOP ON AND OFF
After you have connected your set-top to the wall AC outlet (and
switched this outlet ON, if it has a switch), wait for a few seconds until
the POWER light illuminates.
If it does not, press the
power
button on your remote control. The
POWER light is illuminated green to show that your set-top is fully on.
If the POWER
light will not illuminate, there is a problem (see Solving
Problems, below).
ANTENNA IN
TV / RF
OUT
ANTENNA/
RF IN
VCR
TV
R
AUDIO IN
VIDEO IN
L
CABLE
INPUT
DC100X
SET-TOP
WALL AC OUTLET
INFRA-RED
REMOTE “EYE”
2. CONNECTING TO A TV AND OPTIONAL VCR
Before starting, choose a suitable position for your set-top, observing the ventilation requirements set out in the safety information on the other side of this sheet.
Refer to the rear-panel connection diagram below, which shows a typical connection set-up for a TV and VCR.
1. Connect the cable service to the connector marked
CABLE IN
on your set-top.
2. Connect your set-top to your TV via a video baseband cable, as shown.
3. Connect audio baseband cables to your TV, as shown.
4. Connect RF cables to your set-top, VCR and TV as shown. These connections are optional.
A further optional connection to an infra-red remote “eye” is shown with a dashed line.
5. After you have made the connections between your set-top and your TV and VCR, connect all the equipment to the AC power supply following the instructions
on this page.
POWER
INPUT
Make this
connection
last of all
VIDEO OUT
Video baseband out
AUDIO OUT
Audio baseband
outputs
(stereo, L and R)
TO TV
RF output
CABLE IN
From cable
service provider
IR IN
Infra-red input from a remote “eye”
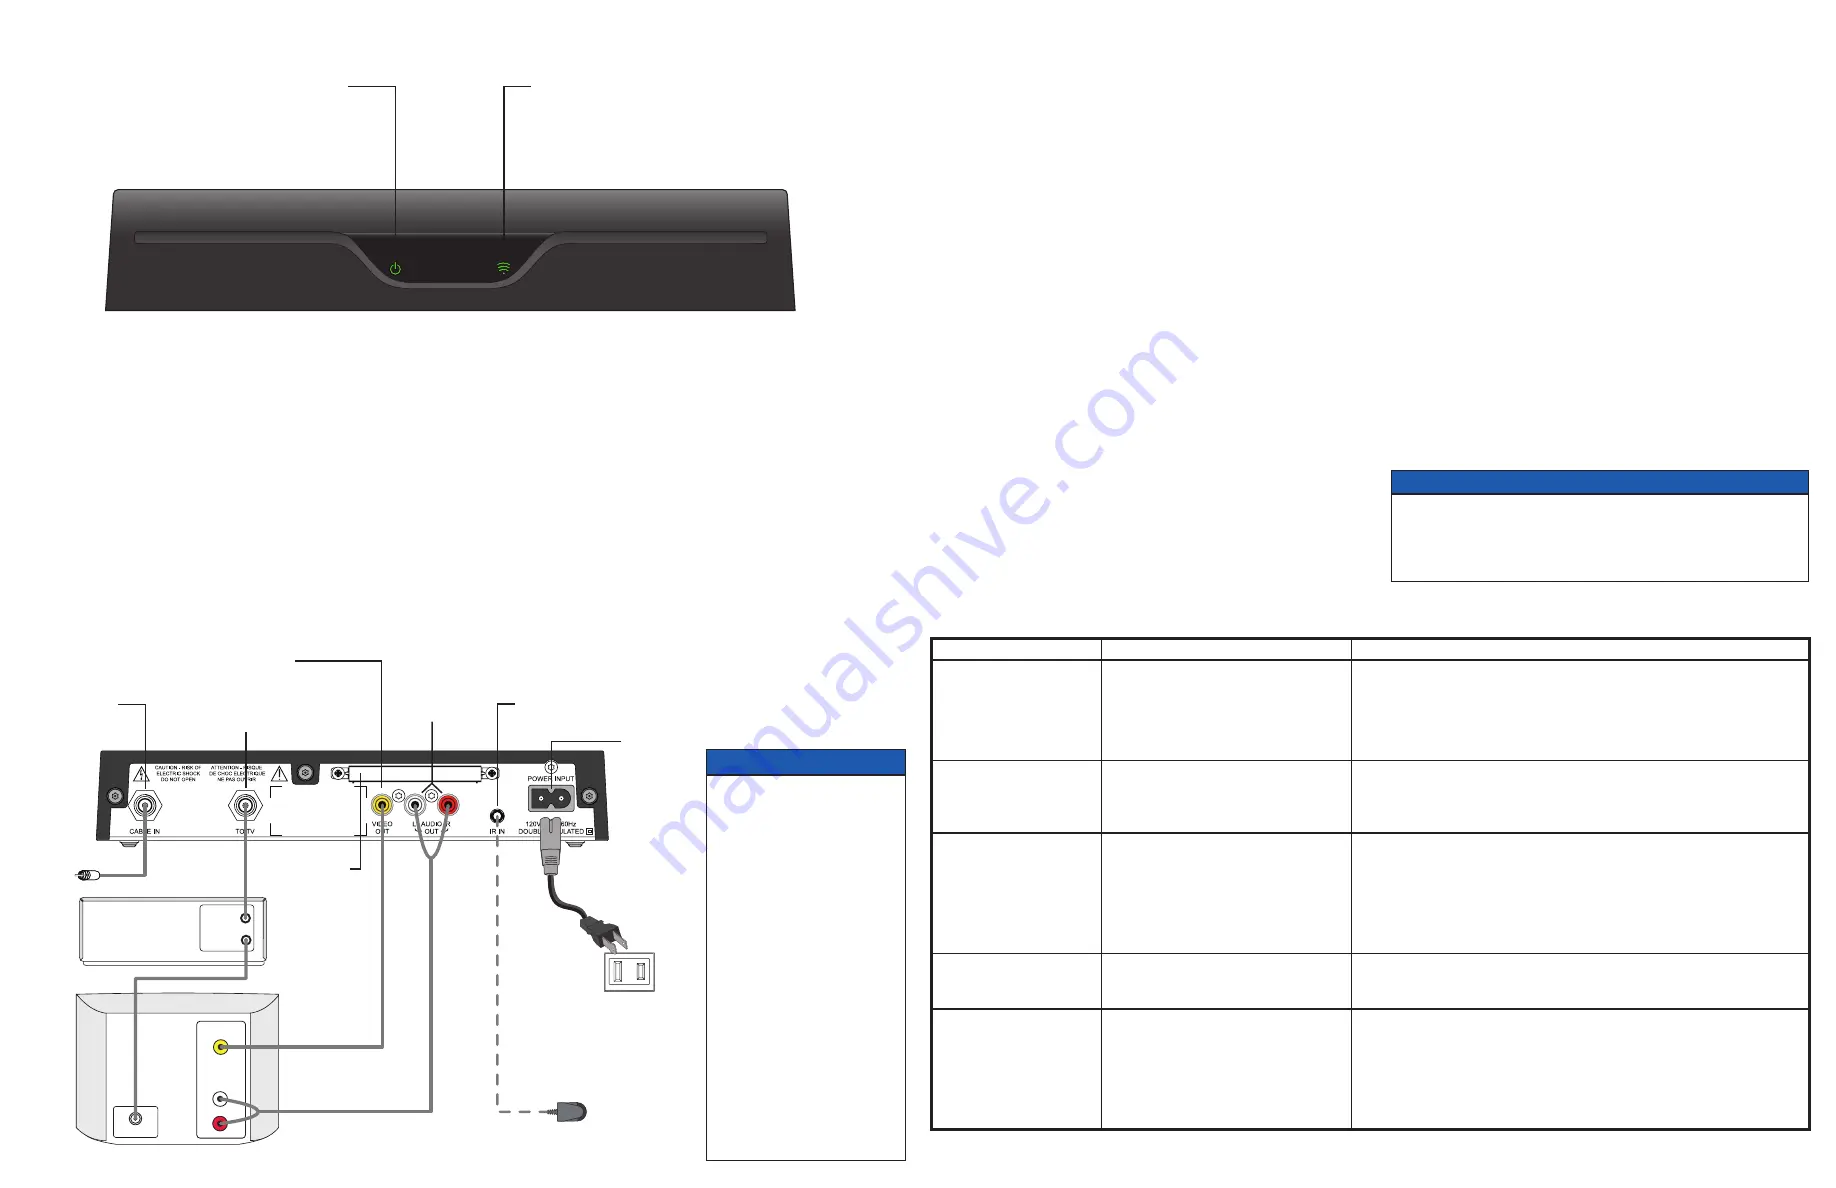
1. YOUR SET-TOP’S FRONT PANEL
ACTIVE
Flashes green when your set-top receives an
infra-red signal from the remote control
POWER
Lights green only
when your set-top
is fully on (i.e. not
in standby)
WARNINGS
Do not connect your set-top (or
any other equipment such as a TV
or VCR) to the AC power supply
until you have properly connected
all the other cables.
Disconnect your set-top from
the AC power supply before you
disconnect any other equipment
from its rear panel.
Do not defeat the safety purpose
of the polarized plugs on power
cords. A polarized plug has two
blades with one wider than the
other. This plug fits into the
outlet in only one way; match
the wide blade of the plug to the
wide slot of the outlet.
The cable input is designed for
connection to a cable network
only. You must not connect any
other equipment, such as a VCR,
to this input.
3. REAR-PANEL CONNECTIONS
NOTE
It is important that, unless there is a lightning storm or you will be away
from your home for a long time, you do not unplug your set-top at the
wall AC outlet (or do not switch it off there, if the outlet has a switch).
Your set-top cannot be updated with new features, through the cable, if it
is disconnected from the AC power supply.
To turn your set-top on or off at any time, press the
power
button on
your remote control (first making sure your remote control is set to
control your set-top).
Never turn off your set-top by simply disconnecting it from the power
supply. If you need to disconnect your set-top, turn off the set-top
by pressing the
power
button on your remote control, so that the
POWER light on the front panel is off.
6. USING YOUR REMOTE CONTROL
Your cable TV service-provider determines the digital channels, services
and screen information that you see on your TV when you use your
set-top and its remote control.
The ACTIVE light flashes green when your set-top receives an infra-
red signal from the remote control.
Consult the information supplied by your cable service-provider for
details on how to make the most of the digital cable services. Also read
the operating instructions that are supplied with your remote control.
SEPARABLE
SECURITY
MODULE
(behind cover)
Removal will
interrupt your
service


