


Pacific Accessory Corporation
®
| Santa Ana, California 92705 | Ph. 866-931-8021 | [email protected]
©2013 Pacific Accessory Corporation
www.pac-audio.com
Rev. 012014
Pacific Accessory Corporation
SWI-CP5
Universal Steering Wheel Control Retention Interface
TM
Steering Wheel Control Interface
Page 2
Page 3
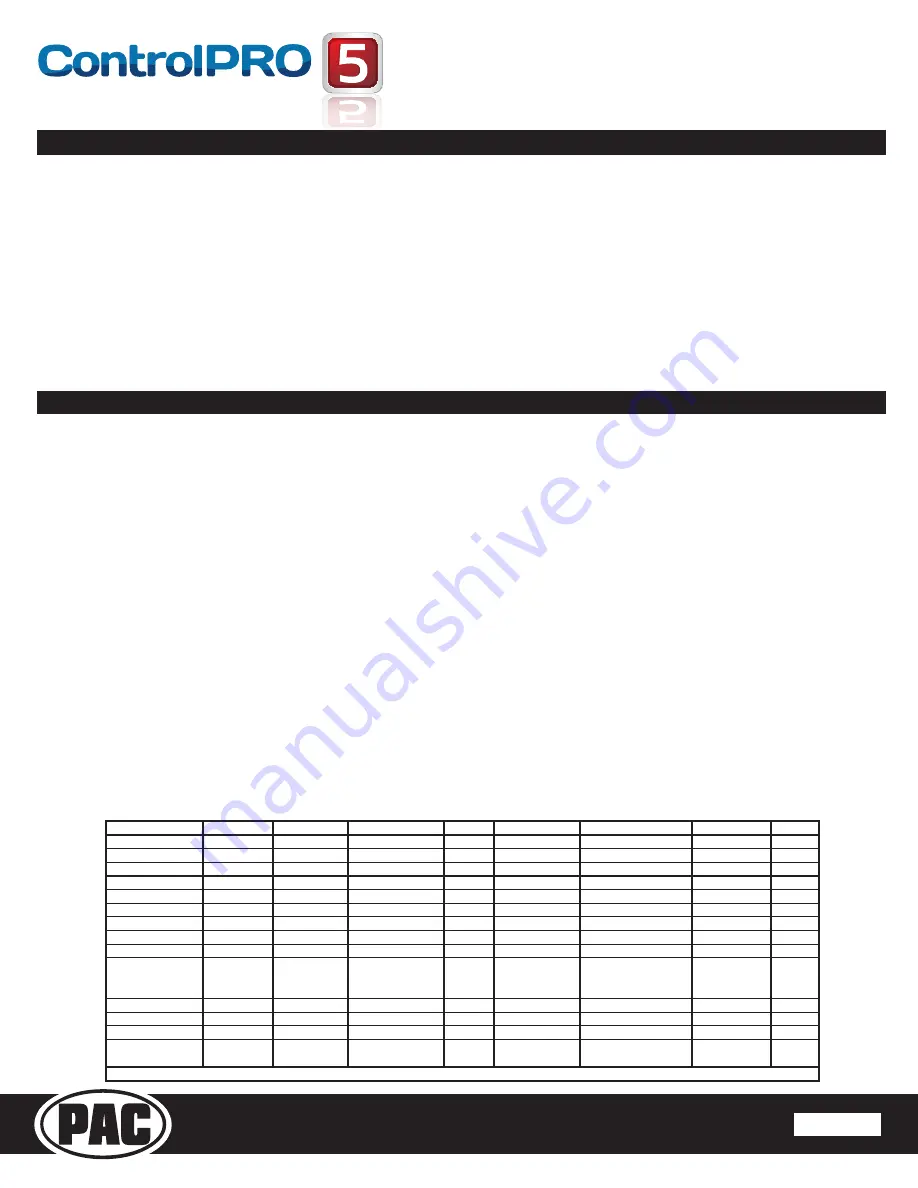
Radio
Alpine
JVC
Kenwood
Clarion
Other*
Sony
Pioneer
Fusion
1
2
Volume -
Volume -
Volume -
Volume -
Volume -
Volume -
Volume -
Volume -
3
Mute
Mute
Mute
Mute
Mute
Mute
Mute
Mute
4
Source
Source
Source
Source
5
Preset -
Track +
Play
Preset -
Preset -
Preset -
Track +
6
Source
Track -
Track +
Search -
Source
Source
Source
Track -
7
Track +
Band/Disc +
Track -
Band
Track +
Track +
Track +
Audio
8
Track -
Preset/Disc -
Disc/FM +
Send/End
Track -
Track -
Track -
Power
9
Power
Select
Disc/AM -
Send
Band
Band
Band
10
Enter/Play
Attenuation
Answer
End
Reject Call/Source
(Bluetooth equipped
radios only)
Phone Menu
11
Band/Program Phone Receive
Voice Dial
Answer/End Call
Answer Call
12
Receive
Phone Reject
On Hook
End Call
13
End
Voice Dial
Off Hook
Voice Activation
14
Power
Mute (Multimedia
units only)
*Other = Advent, Boyo, Dual, Lightning Audio, Rockford Fosgate, & Visteon
PLEASE NOTE: This section only applies to button programming in manual programming mode. If you are using the CP5
in manual configuration mode (specific vehicle dipswitch settings) and wish to re-assign button functions, please follow
the “SWC Button Re-assignment Procedure” on page 4.
Please read each of the following steps to familiarize yourself with the process before beginning. The interface must be programmed
in the specific order shown in the chart below
1. Turn the key to the ignition position. The LED will illuminate red.
2. Press and hold the programming button on the side of the interface until the LED illuminates green and you hear ascending
chimes. Release the programming button.
3. Within 7 seconds, press the button that is to be learned on the steering wheel.
At this point you have two options:
a. For short press functionality:
Hold the button on the steering wheel until a single chime is heard. The LED will
change to red once the button is learned. Release the button.
b. For long press functionality:
Continue to hold the button until a long chime is heard. The LED will flash between
red and amber once the button is learned. Release the button.
4. If you need to program more buttons, repeat step 3 for each additional audio function on the steering wheel.
5. If you come across a function in the chart that your steering wheel does not have, or you do not want to program, press
and release the program button on the side of the interface to skip that function. The LED will go off and you will hear two
chimes when it is done successfully.
6. Once programming is completed, wait seven seconds. The LED will flash green 3 times and you will hear descending
chimes indicating the end of programming.
7. Test the interface for proper functionality. Whenever a SWC button is pressed the LED on the interface should blink green.
Manually Mapping the SWC Buttons
Radio Function Mapping Order
Configuring/Programming (cont)
USB Flash Drive
With this method, the CP5 can be configured using a USB flash drive and the supplied USB adapter. This will assign both a vehicle
and SWC button functionality. The dipswitches on the side of the interface must all be set to down which is the default position.
When using this method, it is not required to manually program the SWC buttons.
1. Visit www.pac-audio.com/controlpro/app to download your device specific application. (PC, Apple or Android).
2. Create and save a configuration file with your application. Follow the instructions in your specific application for this procedure.
3. Place the configuration file on the root directory of a USB flash drive (formatted to FAT32, it is best that this file be the only
thing on the flash drive)
4. Connect the flash drive to the supplied USB adapter then connect the supplied USB adapter to the SWI-CP5
5. Connect the main harness to the SWI-CP5
6. LED will flash green while updating. If the file on the flash drive is the same the green LED will only flash once.
7. Interface will chime when configuration is complete


