


Radio Replacement and
Steering Wheel Control Interface
for Select Toyota Vehicles
RP4.2-TY13
© 2022 AAMP Global. All rights reserved. PAC is a Power Brand of AAMP Global.
PAC-audio.com
Pacific Accessory Corporation
Page 5
Rev: V3
Date:032222
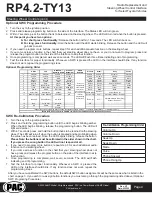
1.
Turn the ignition on. The LED on the interface will turn on and the +12v accessory wire will turn on.
2. Turn on the radio and check volume, balance and fade. If you do not hear any audio you may need to cycle the ignition to
initialize the factory amplifier.
3. If the overall volume is too low, use the gain adjustment on the side of the RP4.2 interface to set it to the desired level. The
best way to do this is to turn the volume on the radio to 3/4 volume, then turn the gain on the RP4.2 until some distortion is
heard, then back it down a little.
4.
If you have a JBL system and there is no audio, please make sure the Blue / White wire in the radio connector is hooked up
properly. If there is still no audio, reset the interface according to the procedure in the next section.
5. If fading is acting inconsistent, please ensure that all speakers are connected to the proper polarity.
6. Verify that all SWC are functioning properly. If any of the SWC are not functioning properly you may need to reset the
interface or follow the re-calibration procedure above.
7.
The LED and radio will turn off when the ignition is turned off.
Restoring Factory Settings
You can restore the interface to factory default settings by pressing and holding the programming button on the side of the module
until the status LED starts blinking red. Once the LED starts blinking red, release the button. You must release the button while
the LED is blinking red in order to perform the reset. Please note, the LED will go through two stages before it starts blinking red.
First it will blink green, then amber, then red.
This reset will restore the following settings to their factory defaults:
•
SWC Mapping
•
Factory Amplifier Settings
• Real Time Fade will be reset to on
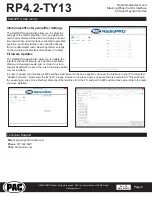
Testing and Verification
RadioPRO App
Use of the RadioPRO App allows
you to do the following:
•
Configure User Interface Options:
•
Factory amplifier settings (Bass,
Mid, Treble, Gain, Fader and
Balance)
• Real Time Fading
• Update Product Firmware
•
Read Firmware/Hardware Versions
PLEASE NOTE:
The interface must be connected to the vehicle when using the following features of the Radio PRO App:
•
Factory Amplifier Settings
The interface does not need to be connected to the vehicle when using the following features of the Radio PRO App:
• Firmware Updates
•
Reading firmware/hardware versions