12
Myriad / Line Channels (Channels 5-8) |
Copyright © P Squared Ltd 2013
Myriad / Line Channels (Channels 5-8)
Channel Layout & Function
Channel Layout
Description
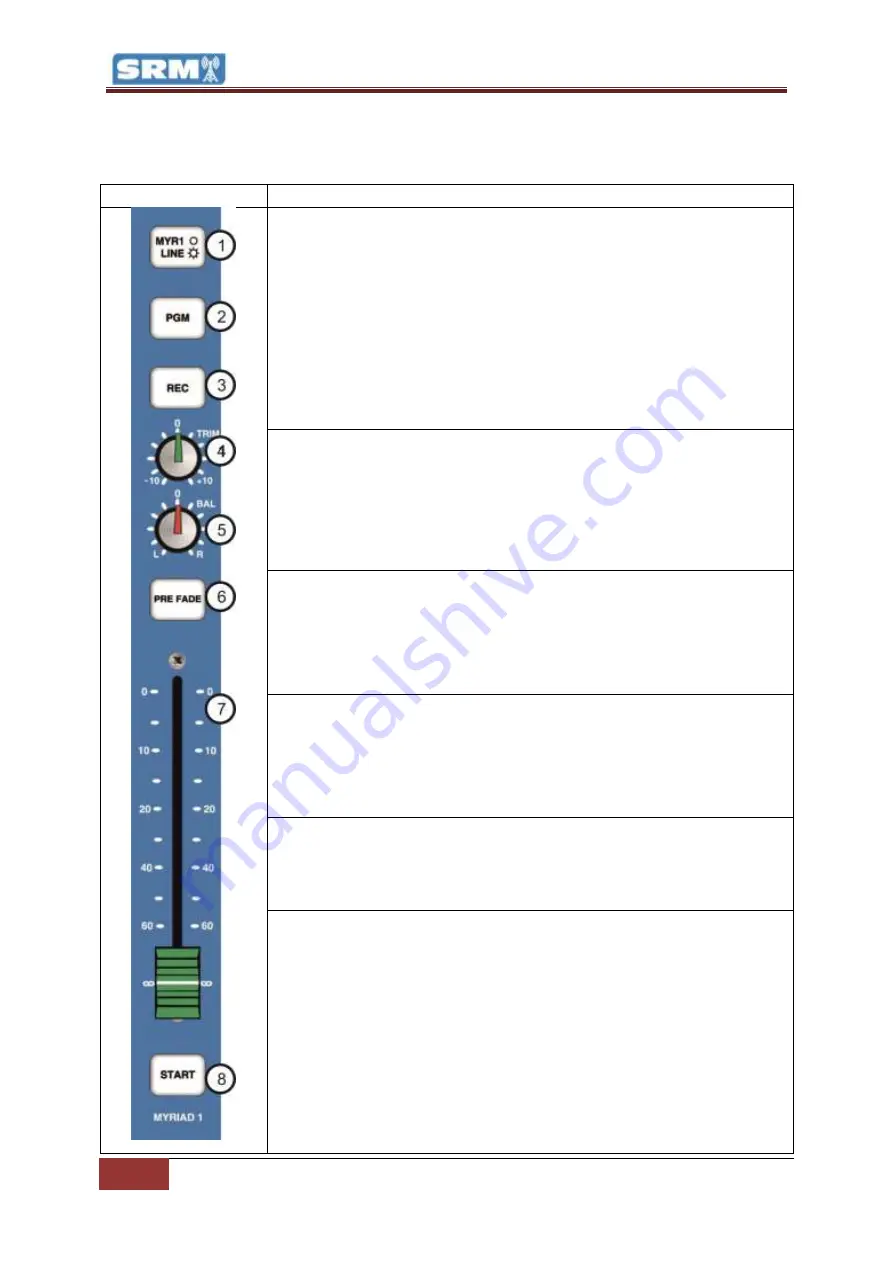
1 - MYR / Line Button:
This button allows you to switch the channel
between the Myriad input and the stereo line level inputs (see rear of the
channel below). In addition, when in MYR (Myriad) mode, the channel will
also interact with a correctly configured Myriad playout system via the
Myriad Intelligent Interface (USB) connection. This will alter the Start
button functionality to allow you to Play / Pause the corresponding Cart
Player in Myriad. The status of the Cart Player in Myriad will also be
displayed as colour changes on the Start button.
Button is illuminated when in Line Mode. Please note that this button can
be disabled using the SRM Setup Mode.
2 – PGM Button (Program Bus) –
This button allows you to select whether
the output of the channel should be mixed into the Program Bus Output.
The Program Bus Output is the main mixing desk output which would
normally be connected to your transmission or encoding system. The
reason for this function is to allow you to de-select channels to be included
in main Program Bus Output but still use the channels (for recording etc).
Button illuminates when selected.
3 – REC Button (Record Bus) –
This button allows you to select whether the
output from the channel should be mixed to the Record Bus Output which
would normally be connected to your Myriad system (or other playout
system). This function allows you to select which channels Myriad should
record, which is very useful when, voice tracking or recording telephone
calls (when live on air etc). Button illuminates when selected.
4 - Trim:
The Trim control allows you to adjust the overall volume level for
the channel when the fader is in the upmost position. Basically, this allows
you to set how loud the channel should be when the fader is fully up. This is
very useful for setting relative levels between channels with different
source volumes.
5 - BAL (Balance):
This control allows you to alter the bias for the channel
between the left and right inputs. When central, both left and right inputs
will be equal but turning the knob to either the left or the right will alter the
bias for the channel in favour of the selected direction.
6 - Pre Fade:
The button allows you to select the Pre-Fade mode for the
channel. The Pre-Fade mode allows you to listen to the channel without it
actually being sent to the PGM or REC outputs (see above) which is
essential if you want to check something prior to it going ‘on-air). To use
this feature, first pull the fader right down (otherwise it will be broadcast
anyway), then press the Pre-Fade button. You will now be able to hear
anything playing through your headphones (providing the Auto-Prefade
option in the monitor section is set – see Monitor Section) but it will not be
heard ‘on-air’.
This is an essential tool for radio. Let’s say you have a guest in the studio.
You need to check that their mic levels are ok and adjust the Trim on their


