


4
MAN 9036663 EN V2
P. Lindberg A/S
Sdr. Ringvej 1
www.p-lindberg.dk
Tlf: 70212626
DK-6600 Vejen
e-mail: [email protected]
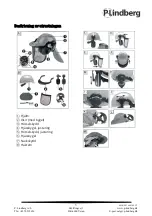
Assembly
•
Put the shawl
⑦
into head strap
⑥
(see fig. K & L).
•
Insert the head strap
⑥
with all 4 tabs into the inner mountings of the helmet
①
until
they engage (see fig. A).
•
Insert the mounts of the ear protectors
③
into the lateral slots on the helmet
①
until
they click into place (see fig. C).
•
Attach the visor
②
with the mesh. To do this, insert the mesh into the screen from
below until it clicks into place.
•
Now slide the assembled visor
②
into the slots of the ear protectors (see fig. D). Flip
the visor
②
forwards (see fig. E).
•
Now slide the visor
②
into the slots of the ear protectors
③
as far as it can go (see fig.
F).
•
Insert the chin strap to head strap (see fig. M).
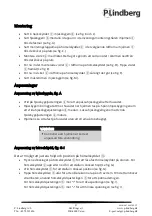
Adjustments
Adjusting the head strap, fig. A
•
Turn the head strap adjuster
④
to adjust the head strap to fit your head.
•
The headband should fit your head snugly when you put on the helmet.
Tighten the headband by turning the head strap adjuster
④
clockwise.
Loosen the headband by turning the head strap adjuster
④
anticlockwise.
•
The helmet must sit firmly on your head without exerting uncomfortable pressure.
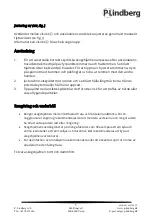
Adjusting the ear protectors, fig. G–I
You can adjust the height and position of the ear protectors
③
.
•
Push down the bracket of the ear protectors
③
to lock the ear protectors onto your
ears. Slide the ear protectors
③
up or down to set them to the required height (see
fig. G).
•
Turn the ear protectors
③
to set them to the required position (see fig. G).
•
Flipping the ear protectors
③
outwards makes it easier to put them on or take
them off. If this causes the tension to decrease, use the ear protector adjuster
⑤
to
retighten it. Slide the ear protector adjuster
⑤
towards the "+" to increase the
tension (see fig. I). Slide the ear protector adjuster
⑤
towards the "–" to decrease
the tension (see fig. I).
Always make sure that the helmet is
adjusted correctly when using it.
CAUTION
!