background image

ONLINE MANUAL

Scan this QR Code with your 

mobile device to take you to 

the online manual.

4

KNOW YOUR PRODUCT

SETUP & PREPARATION

1.  BATTERY & CHARGING

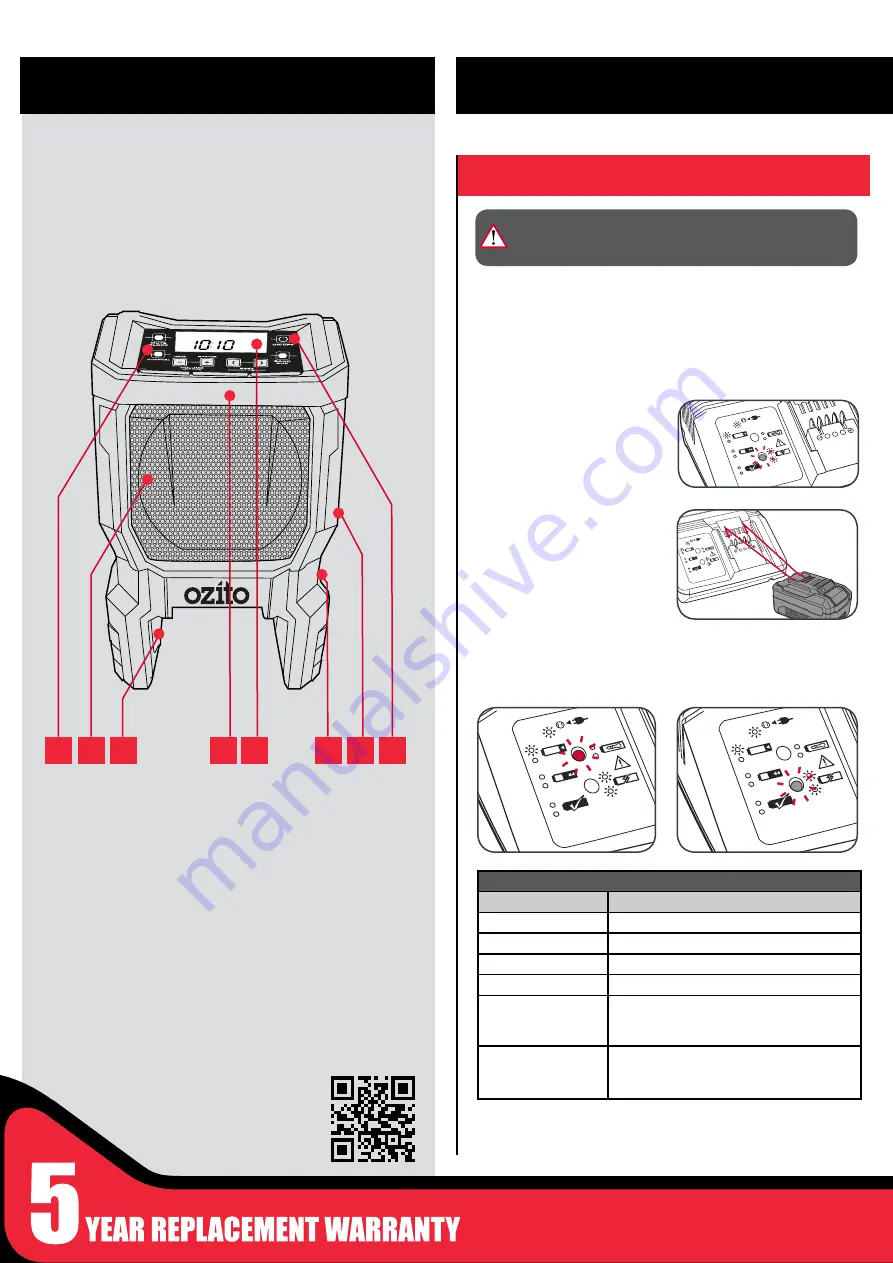
1  Control Panel
2 Speaker
3  Battery Compartment
4  Carry Handle 

5  LCD Display Screen
6  Auxiliary Jack
7  Rear MP3 Player/Phone 

  Belt Holder
8  On/Off Button

CORDLESS RADIO

1

2 3

5

6 7 8

BATTERY & CHARGER (sold separately)

Compatible chargers

Eco charger 

PXCSCH-120

 “ 

“ 

PXCG-120

Fast charger 

PXCFCH-030

 “ 

“ 

PXCG-030

Compatible battery packs

1.5Ah PXCBAT-015
 “ 

PXBP-150

3.0Ah PXCBAT-030
 “ 

PXBP-300

5.2Ah PXCBAT-052
 “ 

PXBP-520

The purchased battery will be shipped in a low charge condition, and 

requires charging prior to use. Allow several cycles of charging and 

discharging (through use of the tool) for the battery to reach its optimum 

performance / runtime.

CAUTION:


THE CHARGER fOR THIS PRODUCT SHOULD 

BE PROTECTED BY A RESIDUAL CURRENT DEvICE 

(RATED AT 30MA OR LESS).

1    Connect the charger into a mains power outlet.

4  The charger LED will 

illuminate red signifying that 

the battery is charging.

3   With the charger sitting on a 

flat surface, align the raised 

ribs on the battery with 

the recess in the charger 

and slide onto the charger 

ensuring a firm connection.

2   The charger LED will flash 

green showing power 

is being supplied to the 

charger.

5  The charger LED will 

illuminate green once the 

battery is fully charged.

Charging your lithium ion battery - fast Charger

Charger LED Indicator 

LED Indicator 

Situation

GREEN (Flashing) 

Stand By (no battery pack is inserted) 

RED (Flashing)

Battery is charging (low charge)

RED (Illuminated)

Battery is charging (mid charge)

GREEN (Illuminated)

Battery is fully charged

BOTH(Illuminated)

Battery pack is too hot or too cold (charging 

will begin automatically when battery reaches 

correct charging temperature).

BOTH (Flashing)

Defective battery. Never charge a defective 

battery pack!
Remove battery pack from charger.

Summary of Contents for PXRDS-300

Page 1: ... INSTRUCTION MANUAL SPECIFICATIONS Input 18V AM Frequency 522 1620KHz FM Frequency 87 5 108MHz Auxiliary Jack 3 5mm Speaker Output 3W Weight 0 6kg WHAT S IN THE BOX Cordless Radio ozito com au CORDLESS RADIO PXRDS 300 ...

Page 2: ...rotected by a residual current device rated at 30mA or less 1 Connect the charger into a mains power outlet 4 The charger LED will illuminate red signifying that the battery is charging 3 With the charger sitting on a flat surface align the raised ribs on the battery with the recess in the charger and slide onto the charger ensuring a firm connection 2 The charger LED will flash green showing powe...

Page 3: ...reen showing power is being supplied to the charger 5 When removing the charger from the battery first press the battery release tab then slide the charger from its position Charging your lithium ion battery Eco Charger Charger LED Indicator LED Indicator Situation GREEN Flashing Stand By no battery pack is inserted RED Illuminated Battery is charging low charge GREEN Illuminated Battery is fully ...

Page 4: ...2 To turn off press the on off switch again 2 To find a station scroll through a frequency by pressing the Seek buttons On off Switch Volume Mode Tuning FM MEM MHz FM MEM MHz 3 To mute the sound press Mute button 4 To return sound to previous volume press Mute button again or either of the volume buttons FM MEM MHz Note The time will still be shown on the LCD display even when radio is switched of...

Page 5: ...el button once to open the first memory setting Mem 1 7 Using the Seek buttons find the next radio station to save 8 Press and hold the Channel button until the memory number flashes Press Channel button again to save this station 9 After programming stations to memory press the Channel button to search through the saved radio stations 1 Turn the radio off 2 Press and hold the Clock button until t...

Page 6: ...wall outlet Check the battery is firmly connected to the charging cradle Check that the charging jack is securely connected to the charging cradle The battery has a short run time Ensure the battery is properly charged It will take 4 5 charging cycles before the battery reaches optimum charge and run time Sparking visible through the housing air vents A small amount of sparking may be visible thro...

Page 7: ...y pack is not fully charged out of the carton First read the safety instructions and then follow the charging notes and procedures 13 The longest life and best performance can be obtained if the battery pack is charged when the air temperature is between 18 24ºC Do not charge the battery pack in an air temperature below 10ºC or above 40ºC This is important and will prevent damage to the battery pa...

Page 8: ...uce the risk of personal injury and electric shock do not expose to water or rain Do not use the radio or listen to music or other audio programs while operating machinery Doing so may cause distractions that could result in personal injury This radio is capable of producing sound levels that can be dangerous to long term hearing Listening to music at a high volume for any period of time may cause...

Page 9: ...d or replaced if the goods fail to be of acceptable quality and the failure does not amount to a major failure Generally you will be responsible for all costs associated with a claim under this warranty however where you have suffered any additional direct loss as a result of a defective product you may be able to claim such expenses by contacting our customer service helpline above 0415 WARNING T...

Reviews: