background image

CUTTERS

DEPTH GUAGE

BODY

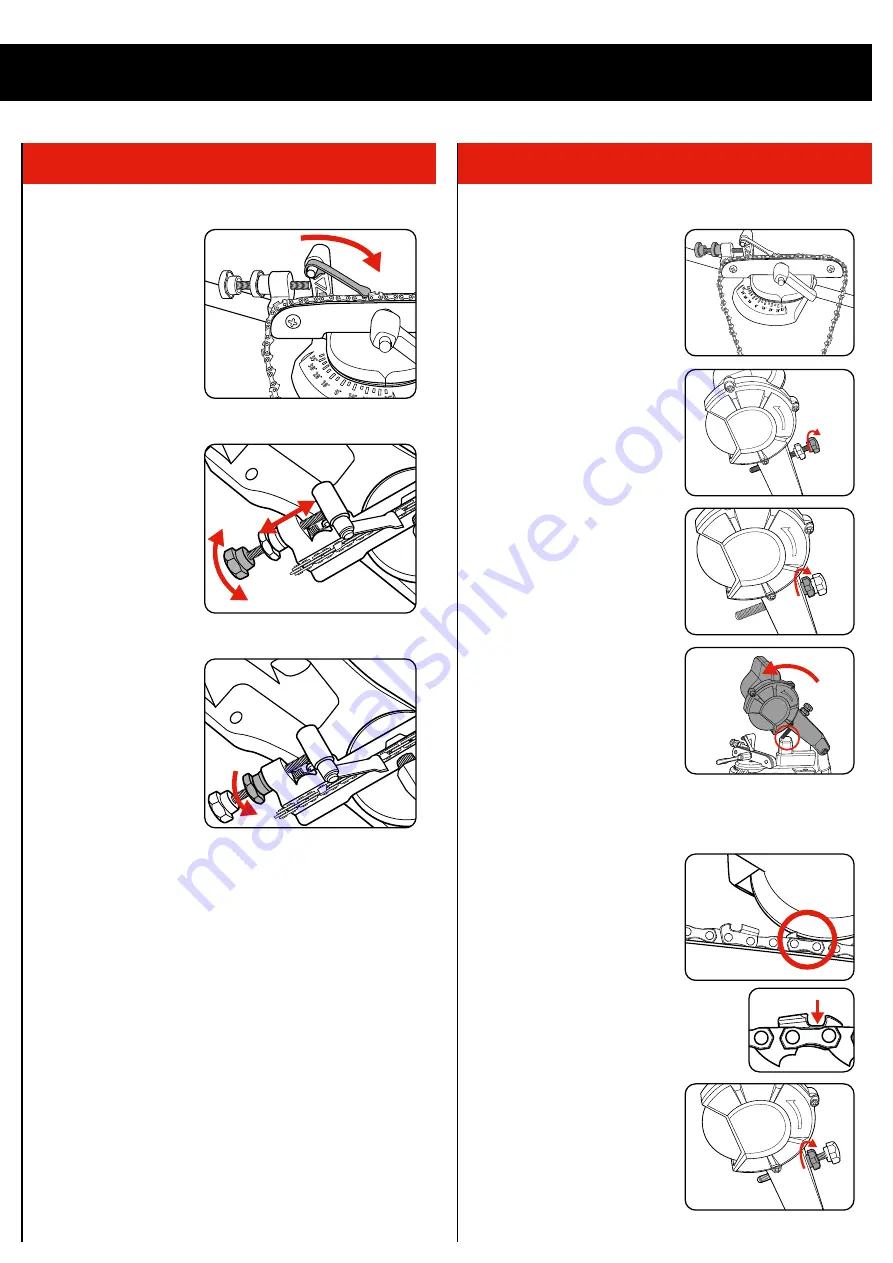
Adjusting the Chain (tooth) Stop

1.  With the chain clamped in 

position, rotate the chain 

stop in behind the chain 

tooth aligned with the 

sharpening wheel from the 

previous setting.

2.  Adjust the chain stop knob 

so that it is firmly behind 

and at the bottom of the 

aligned chain tooth, by 

rotating either clockwise 

to move the chain stop 

forward or anti-clockwise 

to move the chain stop 

backward.

3.  When the chain stop is 

properly adjusted it should 

be directly behind the chain 

tooth as shown. To secure 

in position rotate the chain 

stop lock nut clockwise as 

far as possible.

Adjusting the Depth of Cut

1.  Ensure the chain is still locked in 

place, the chain stop still flipped into 

position and the chain stop knob and 

lock nut are still secured.

2.  Rotate the depth of grind knob 

clockwise as far as it will go (so as 

much of the pin is exposed under 

the head piece as possible).

3.  Rotate the depth of grind lock nut 

towards the housing of the tool.

4.  Lower wheel towards the face of the 

tooth. The depth of grind pin should 

meet the depth stop platform and 

stop the sharpening wheel from 

travelling the full distance to the 

tooth.

5.  Whilst still applying downward pressure on the hand piece 

simultaneously start rotating the depth of grind knob anti-clockwise. 

Slowly continue rotating the knob anti clockwise whilst watching the 

sharpening wheel get closer to the tooth of the chain.

6.  When the wheel enters along the 

face of the tooth, make sure the 

wheel is lowered until it covers 

the full face of the tooth but 

DOES 

NOT

 touch the tooth body below. 

Alternatively, you can lower the 

sharpening wheel until it firmly sits 

on top of the tooth body and then 

rotate the depth of grind knob 1/2 

a turn clockwise to lift it slightly away from the 

body. Lifting the sharpening wheel away from the 

body will prevent cutting into the body or link and 

damaging the chain.

7.  When the depth adjustment is 

correct, hold the depth of grind knob 

in position with one hand, using the 

free hand rotate the grind lock nut 

clockwise locking the depth of grind 

pin in position. 

The initial set up is now complete. 

Fine adjustments may still need 

to be made once first sharpening 

operation is performed.

Summary of Contents for CCS-085

Page 1: ...ia Australia 3175 ozito com au Chainsaw Chain Sharpener Sharpening Wheel 1021 IN ORDER TO MAKE A CLAIM UNDER THIS WARRANTY YOU MUST RETURN THE PRODUCT TO YOUR NEAREST BUNNINGS WAREHOUSE WITH YOUR BUNNINGS REGISTER RECEIPT PRIOR TO RETURNING YOUR PRODUCT FOR WARRANTY PLEASE TELEPHONE OUR CUSTOMER SERVICE HELPLINE Australia 1800 069 486 New Zealand 0508 069 486 The benefits provided under this warra...

Page 2: ...st be fitted to a flat solid secure surface such as a work bench The sharpener base is designed in two halves The rear half is for fitting flat to a stable surface and the front is designed to protrude over the edge of the mounting surface The sharpener base should be fitted to the mounting surface by sliding the rear half back until the two steps on the base align with the edge of the mounting su...

Page 3: ...e the table loosen the table lock knob and rotate the table until the scale indicator lines up with the scale on the base of the sharpener 4 If you do not know the angle of the chain set the table angle to 35 Take hold of the hand piece and bring it down so that the wheel is slowly lowered into the chain along the cutting tooth Slowly move the table so the cutting face of the tooth is parallel wit...

Page 4: ...oth The depth of grind pin should meet the depth stop platform and stop the sharpening wheel from travelling the full distance to the tooth 5 Whilst still applying downward pressure on the hand piece simultaneously start rotating the depth of grind knob anti clockwise Slowly continue rotating the knob anti clockwise whilst watching the sharpening wheel get closer to the tooth of the chain 6 When t...

Page 5: ... always ensure the tooth is correctly located against the chain stop the chain is correctly locked in place the initial set up as previously described has been correctly carried out and the correct safety gear is being worn With the chain correctly aligned against the chain stop and the depth stop set refer to SETTING OF THE SHARPENER instructions prior to the operation start the tool whilst stand...

Page 6: ...e table Sharpening Teeth in Opposite Direction 1 Ensure the sharpener is turned off and the sharpening wheel is not rotating 2 Check the angle of the table of the current setting loosen the table locking knob and rotate the table to the opposite side but to the same corresponding angle 3 Lock the table locking knob firmly 4 Using the same method above release the guide clamp lever and move the cha...

Page 7: ...hich in turn causes the uncontrolled cutting unit to be forced upwards towards the operator For example if a cut off wheel is snagged or pinched by the work piece the edge of the wheel that s entering the pinch point can dig into the surface of the material causing the wheel to climb out or kick out Cut off wheels may also break under these conditions Kickback is the result of power tool misuse an...

Page 8: ... When using an extension lead on a reel always unwind the lead completely Use of an extension lead not suitable for the power input of the tool or which is damaged or defective may result in a risk of fire and electric shock WARNING Read all safety warnings and all instructions Failure to follow the warnings and instructions may result in electric shock fire and or serious injury Save all warnings...

Reviews: