

Ensure your PC is powered off. Ensure anti-static precautions using the
anti-static strap provided. Keep all screws safe.
1. Unplug all cables from the rear of the computer.
2. Open the PC enclosure to gain access to the expansion slots.
3. Locate a suitable PCIe slot for either
fibre optic
or
USB 3.0
cards:
x4, x8 x16
PCIe recommended. Note that x1 slots may be shared with other devices resulting
in reduced system performance. If you are unsure which slot is correct, please
consult the PC user manual.
4. Remove the filler bracket corresponding to the slot you intend to use.
5. Remove the PCIe card carefully from its protective ESD packaging and insert
the card connector fully into the expansion slot.
6. Ensure the card’s mounting bracket is flush with any other mounting or filler
brackets to either side of it, then secure the controller card in place.
7. Fit the computer cover and any accessories that you were using previously.
Installing the Fibre Optic Adapter or USB 3.0 Card
4
Camera Cooling Guidelines
5
1. Attach the camera control cable between the camera and the CCU-500
camera controller.
Use only the supplied cable
-
each CCU-500 is
configured specifically for use with the supplied cable. Also ensure the
power cable is fully inserted into the camera power socket.
2. Connect by either:
• Fibre optic
- connect the cable between the camera and the PC’s
fibre optic adapter port.
• USB 3.0
- connect the cable between the camera’s USB 3.0 port and
a USB 3.0 port on the PC.
3. Switch the power supply on using the on/off switch at the rear of the
camera controller (You should hear a long beep from the CCU-500).
This is followed by a long beep, followed by two short beeps to indicate
the camera has configured successfully.
4. Now turn on the PC.
Note: If this is the first time the camera has been connected, please
install the fibre optic or USB 3.0 card drivers.
5. Start your software.
6. Check the acquisition settings and adjust as required.
7. Start acquiring data.
Troubleshooting
Camera start-up tone does not sound on start-up
• The camera start-up tone (a long beep, followed by two short beeps) should be audible momentarily when the camera
is powered up.
• If this does not occur, ensure that the camera is connected to the CCU-500.
Support Device not recognised when plugged into PC
• Check that the card and driver(s) have been installed correctly ( (Devices and printers) in Windows, Control Panel. The
camera will show under the Devices list. (see also Section 4 for installation procedure).
Water cooled models: Temperature Trip Alarm sounds (continuous tone)
Should the buzzer sound ensure the following:
• Check that the cooling system is operating correctly.
• Always use water that is above the dew point of the ambient environment to prevent condensation from occurring.
Lights not showing on CCU-500
• A button (see Section 6) enables lights to be on for diagnostic purposes or switched off for low-light applications- check if
this is activated.
Connecting your Camera and Switching it on
6
MAN-13127
iKonXLQS 1019 R1
For additional technical information about the iKon-XL series go to:
Please check
MyAndor
for the latest iKon-XL manuals:
Installing the Fibre Optic or USB 3.0 Card Drivers
1. Install the supplied drivers to ensure that the latest supported drivers are used.
2. Fibre optic adapter card drivers need to be installed before the PC is connected to the camera. These are not part
of the Solis/SDK installation and need to be installed manually from the supplied software disc (
Refer to the iKon-
XL Hardware Guide Section 3.10 to 3.12 for further information - this is available from the
Product Manuals CD
or
MyAndor
).
3. Once the drivers are installed, the fibre optic adapter card should be detected automatically.
?
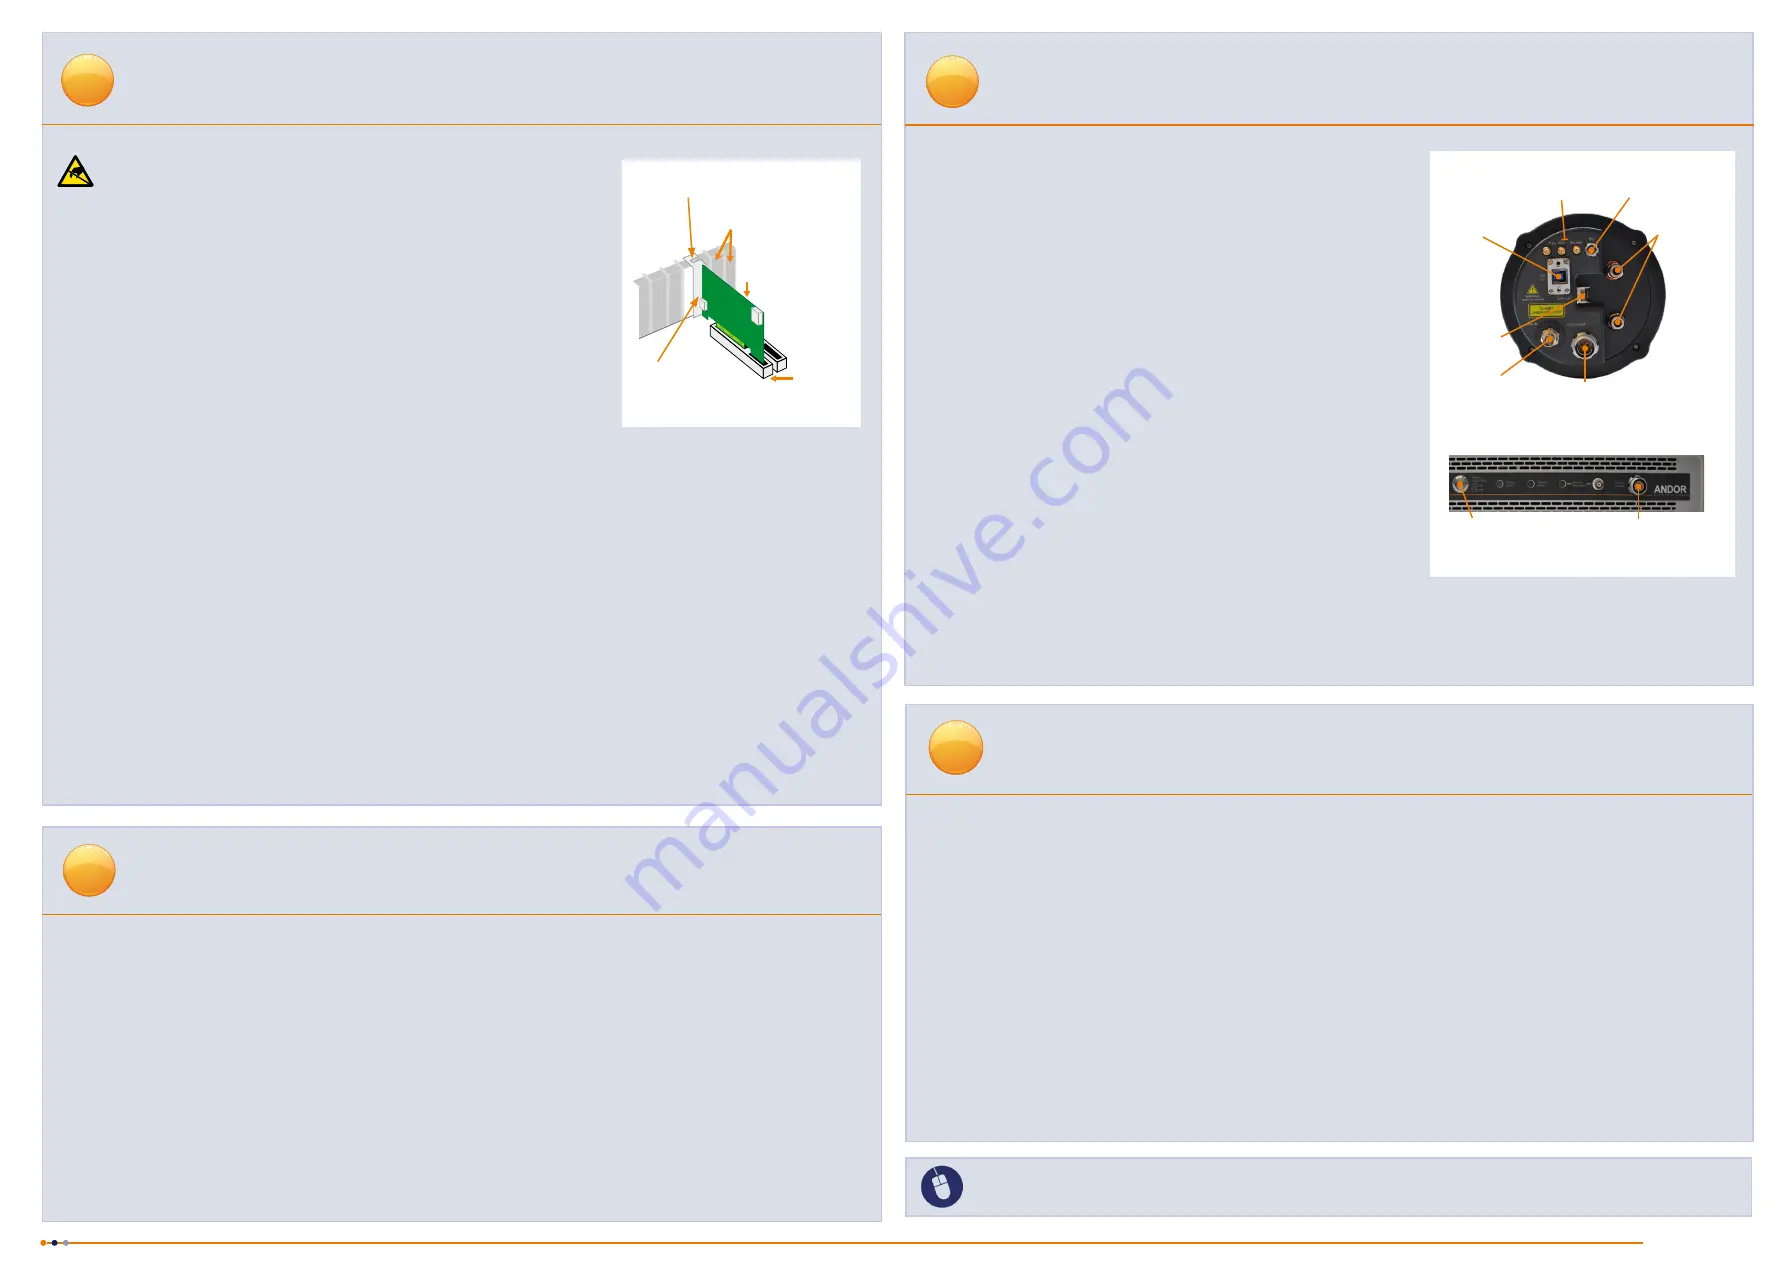
Unused filler brackets
Gently press the
card into the slot
PCIe
Slot
Secure the card to the PC
Fibre Optic or
USB 3.0
Connection
Air Cooling
• Ensure 100 mm clearance around vents.
• For best cooling performance ensure the camera is operating within the environmental conditions stated in the
Technical Specifications of the iKon-XL Hardware Guide.
Liquid Cooling
• The iKon-XL must be connected, via its 2 coolant pipes before operation, to a re-circulating cooler or other liquid
cooling system.
• Always use coolant that is above the dew point of the ambient environment to prevent condensation from
occurring.
• To achieve -75
o
C [-80
o
C] cooling:
• Coolant temperature: should be no greater than 16
o
C [10
o
C].
• Recommended coolant: water or water/glycol mix depending on the ambient environmental temperature
during operation.
• Ensure that all liquid coolant has been expelled from the camera after operation if it is to be stored or shipped.
• Ensure that the iKon-XL is powered on and connected to the PC via the fibre optic cable or USB 3.0 before the
PC is switched on.
• Ensure that all cables have adequate strain relief/support, especially the fibre optic connection.
• Remote power down is activated by applying 5 volt @ 10mA to remote BNC at front of the CCU-500.
iKon-XL Rear Panel
Camera Control
Cable Input
Disable Power Management for the USB 3.0 Host Controller
It is recommended that power management should be disabled to ensure optimum camera response and performance.
Note you will need administrator access to perform these steps
1. Navigate to ‘
USB 3.0 Host Controller
’ properties menu in
Device Manager
(Control Panel>Device Manager>
Universal Serial Bus Controllers).
2. Select the
Advanced
tab.
3. Check the
Disable USB 3.0 power management functions
checkbox.
Please refer to the iKon-XL Hardware Guide for mounting instructions
Ensure that the power to the camera and PC is switched OFF.
Coolant
Connections
I
2
C
USB 3.0
Fibre Optic
IRIG-B
TTL/Logic
Camera Control
Cable output
CCU-500 Front Panel
Display
Diagnostics
button


