19
than the original tubing ID supplied by the manufacturer.
The drain line should slope downward away from the
furnace to ensure proper drainage.
• The placement of the condensate drain lines will depend
on the configuration selected in
drain lines can be routed out the left or right side of the
furnace, but must maintain a downward slope to ensure
proper condensate drainage. The J-trap may need to be
rotated to the side that matches your setup.
. For J951X*D series, see
. To rotate the J-trap, loosen the clamp on the drain
tube, rotate the J-trap to either side, and retighten the
clamp.
• It is permissible to locate the trap away from the
furnace. The condensate drain system (J-trap and drain
tube) should be no more than 30 equivalent feet while
maintaining 1/4” per foot slope, and insulated if located in
an unconditioned space.
THREE GENERAL PRINCIPLES APPLY:
• Each condensate drain must be trapped separately using
a J-Trap or field supplied loop. After individually trapping
the condensate lines, it is acceptable to combine the
drains.
• There must always be a drain attached to the collector at
the outlet of the secondary heat exchanger.
• There must always be a drain at the lowest point of the
venting system.
NOTE:
If using a condensate pump, the
furnace drain line must be installed above the pumps
water line.
EXCEPTIONS & CLARIFICATIONS TO THE
GENERAL RULES:
• If the vent exits the furnace horizontally, the vent may be
turned vertically with a tee.
The drip leg formed by the
tee must include a drain.
(Option 1, Option 3, Option 4,
Option 11, Option 12, & Option 14)
• In certain cases, it is permitted to drain the inducer back
into the top drain of the collector.
This drain must not
sag in the middle.
(Option 1, Option 3, Option 5, Option
7, Option 9, Option 10, Option 12, & Option 13)
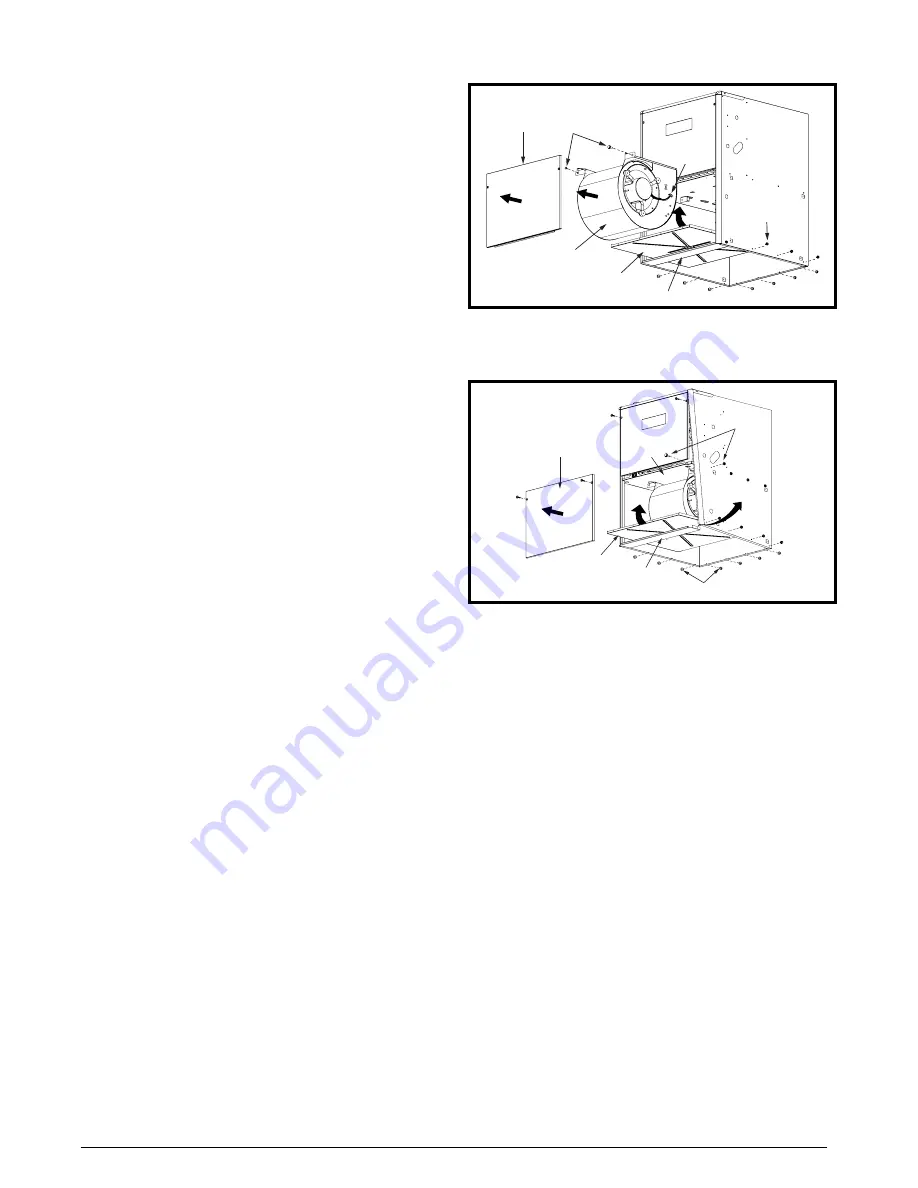
Bottom Panel Removal
The steps listed below describe how to remove the bottom
panel from the furnace. See
1. Remove the door from the blower compartment.
2. Disconnect the wires from the blower motor plug.
3. Remove two screws securing the blower assembly to the
furnace.
4. Carefully pull the blower assembly out thru the front of the
furnace.
5. Remove all screws securing bottom panel to bottom of
furnace and front brace.
6. Lift up and slide bottom panel out through front of furnace.
7. Reinstall the blower assembly in reverse order.
Figure 21. Bottom Panel Removal
Bottom
Panel
Front
Brace
Door
Blower
Plug
Screws
Blower
Assembly
Screws
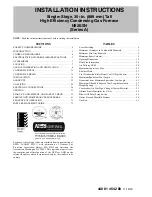
Alternate Bottom Panel Removal
If the bottom panel cannot be removed using the previous
instructions, the steps below are an alternate method for
removing the bottom panel. See
1. Remove the door from the blower compartment .
2. Remove all screws securing the bottom panel to the front
brace.
3. Remove two screws securing the furnace cabinet to the
blower deck.
4. Remove all screws securing the furnace cabinet to the
bottom panel.
5. Remove the screw securing the bottom corner of the
furnace cabinet to the front brace.
6. Carefully spread the bottom corner of the furnace cabinet
outwards while sliding the bottom panel out through the
front of the furnace.
7. Reassemble the furnace in reverse order.
Figure 22. Alternate Removal Method
Screws
Front
Brace
Bottom
Panel
Screws
Blower
Deck
Door


