is to remain flat
against the base, it
is recommended
to allow the sealant
to completely dry
before it comes in
contact with the
panel.
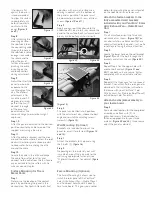
(Figures 8
and 9)
Step 8
After attaching the
mounting base to
the roof deck, feed
the connecting cable
through the hole in
the roof deck. Leave
enough slack under
the solar panel to
allow the panel
full travel to avoid
pinching the cable
or pulling on the
cable connection
during adjustment.
Step 9
Adjust the tilt of the
panel to maximize
exposure to the
sun throughout the
day. The optimal
adjustment is to
have the panel 90
degrees to mid-day
path of the sun. If
desired, the angle
of the panel can
be adjusted as the
seasons change to maximize sunlight
captured.
Step 10
After the panel is adjusted to the desired
position, secure the cable to one of the
support arms using a tie wrap.
Step 11
After the cable is secured, seal the area
around the cable where it enters the roof
deck with exterior grade silicone sealant
to keep water from entering the attic
around the cable.
Step 12
Locate the cable in the attic and drape
the cable from rafter to rafter and
connect to the cable from the fan. Secure
any excess cable to the rafters with tie
wires or coaxial staples.
Surface Mounting for Tile or
Metal Roofs
Step 1
Determine the location of the contact
points by positioning the panel in the
desired area. For Spanish tile roofs, find
a position with as much surface area
coming in contact with the bottom of
the panel as possible. The panel must
be mounted on at least 2 rows of tile as
shown.
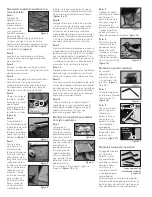
(Figures 10 and 11)
Step 2
Apply enough roof tile adhesive to the
underside of the base to firmly secure the
panel to the surface. Both surfaces should
be dry and free of any dirt or solvents.
(Figure 12)
Step 3
The panel can be tilted into 2 positions
with the adjustment arm, choose the best
angle and reinstall the adjusting screws
(screw A).
(Figure 13)
Wall Mounting (Optional)
Brackets are included to mount the
panel to a wall if preferred.
(Figures 14
and 15)
Step 1
Attach the brackets to the panel using
the 4 bolts (F).
(Figure 16)
Step 2
Depending on the material your wall
is made of, mount the assembly to the
wall using appropriate fasteners (see
“Optional Hardware” for details).
(Figure
17)
Fascia Mounting (Optional)
The Fascia Mounting Kit allows you to
install the solar panel of the VentSure
™
Solar Attic Exhaust Fan—Gable Mount
and Additional Solar Panel Kit directly
to a fascia board. This gives you another
option for mounting the panel instead of
on the roof tiles or an exterior wall.
Attach the fascia brackets to the
fully assembled wall brackets
included with your VentSure
™
Solar
Attic Exhaust Fan—Gable Mount
Unit
Step 1
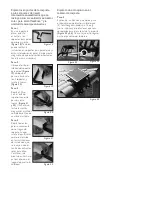
On a flat surface, orient the fascia and
wall brackets as shown.
(Figure 18)
You
can also install on wall brackets that are
already attached to the panel—just make
sure they are facing the same direction.
Step 2
Locate the lower hole on the wall bracket
(Figure 19)
and fit the bolt through the 2
brackets and attach the nut.
(Figure 20)
Step 3
Repeat Step 2 for the upper hole with
another bolt and nut.
(Figure 21 and
22)
Once both nuts are secure, tighten
completely with an adjustable wrench.
Step 4
Repeat all the steps again for the second
bracket. Then attach to the solar panel as
described in the installation instructions
that came with your VentSure
™
Solar
Attic Exhaust Fan (Gable or Roof Mount)
or Additional Solar Panel Kit.
Attach the complete assembly to
your fascia board
Step 5
Find a desired location for the completed
assembly and attach with (4) 1.5”
galvanized screws (not included) or
fasteners appropriate for your fascia
material.
(Figure 23 and 24)
. Once secure,
adjust the panel as desired.
Figure 19
Figure 20
Figure 21
Figure 22
Figure 24
Figure 25
Figure 23


