background image

OWC Multi-Mount

Chapter 1 - Introduction

1 INTRODUCTION

1.1 System Requirements

1.1.1 Computer Requirements

Any 2006 - 2008 Mac Pro system

1.1.2 Hard Drive Requirements

The OWC Multi-Mount is designed to work with any 3.5" or 2.5"

mechanical hard disk drive, or SSD drive.


1.1.3 Tool Requirements

• Phillips #1 or #2 Screwdriver

• Needlenose Pliers or Hemostats

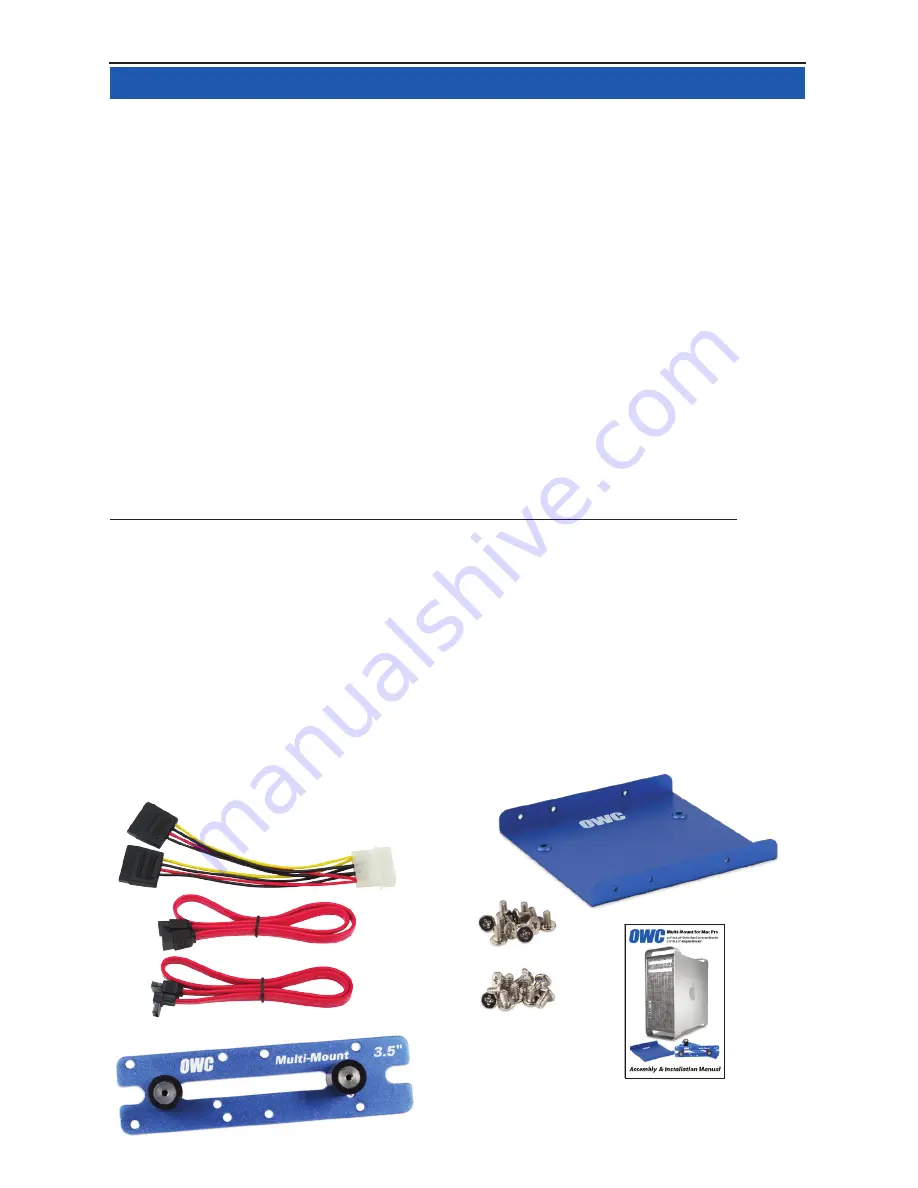
1.2 Package Contents

Item  

_________________________________________ 

➀ 

4 Pin Power to SATA Power Y Cable or single SATA Power Cable*

➁ 

SATA Straight - Straight Cable*

➂ 

SATA "L" - Straight Cable* 

➃ 

OWC Multi-Mount 3.5" Drive Bracket (2 pieces)

➄ 

OWC 2.5"-3.5" Adapter Bracket (1 pieces, 1 required per drive)*

➅ 

Screws for 3.5" Bracket - Coarse Thread (16 pieces)*

➆ 

Screws for 2.5" Bracket - Fine Thread (12 pieces)*

➇ 

Installation Manual

*NOTE: Depending on model purchased, contents may 

differ. Sold as individual units, and as complete sets. 

Please check your invoice for proper contents.

Summary of Contents for Multi-Mount for Mac Pro

Page 1: ...Multi Mount for Mac Pro 3 5 to 5 25 Drive Bay Converter Bracket 2 5 to 3 5 Adapter Bracket Assembly Installation Manual ...

Page 2: ...unt 5 3 Installing 1 or 2 2 5 Hard Disk Drives 5 4 Installing 1 2 5 Hard Disk Drive and 1 3 5 Hard Disk Drive 6 OWC MULTI MOUNT INSTALLATION 6 1 Installing the OWC Multi Mount into a Mac Pro 7 TROUBLESHOOTING TIPS 7 1 Troubleshooting 7 2 Usage Tips 8 APPENDIX 8 1 FAQ 8 2 About Data Protection 9 CUSTOMER SERVICE 9 1 BEFORE CONTACTING CUSTOMER SERVICE 9 2 CONTACT INFORMATION IMPORTANT NOTE The OWC M...

Page 3: ...nd avoid wearing clothing that retains static charges For more information please visit http www macsales com static It s available at http www macsales com tools Thank you for purchasing the OWC Multi Mount system We re con fident that it will provide years of high performance service to you This guide will get you up and running quickly demonstrating how to install your own hard drives into the ...

Page 4: ...stats 1 2 Package Contents Item _________________________________________ 4 Pin Power to SATA Power Y Cable or single SATA Power Cable SATA Straight Straight Cable SATA L Straight Cable OWC Multi Mount 3 5 Drive Bracket 2 pieces OWC 2 5 3 5 Adapter Bracket 1 pieces 1 required per drive Screws for 3 5 Bracket Coarse Thread 16 pieces Screws for 2 5 Bracket Fine Thread 12 pieces Installation Manual N...

Page 5: ...Begin by removing the side door on your Mac Pro On the lower right find the memory bay OWC Multi Mount Chapter 2 Mac Pro 667MHz Disassembly 2 MAC PRO 667MHZ DISASSEMBLY 2 1 Mac Pro 667MHz Disassembly ...

Page 6: ...xposing the 2 Phillips screws shown here Remove the 2 Phillips screws They are long and extend through the logic board and into the back of the computer OWC Multi Mount Chapter 2 Mac Pro 667MHz Disassembly 2 MAC PRO 667MHZ DISASSEMBLY ...

Page 7: ...loctite on the standoffs that thread into the Mac Pro s chassis This means when you try and remove the screws the standoffs them selves that the screws are screwed into turn You may need to use a very thin pair of needlenose pliers hemostats or even a thin flat blade screwdriver to hold the hex shaped standoff tight while you loosen the Phillips screws A photo of this task being made look easy at ...

Page 8: ...e Mac Pro Then remove all 4 of the drive bays and set them aside Look inside the PCI Express bay at the top right of the Mac Pro You ll need to remove items from this location next OWC Multi Mount Chapter 2 Mac Pro 667MHz Disassembly 2 MAC PRO 667MHZ DISASSEMBLY ...

Page 9: ...es into you ll need to unscrew the 2 screws and slide the plate down out of the tab Once the metal retaining plate is removed remove the top PCI Express dead plate cover from the top slot as shown Set the dead plate cover aside you ll be using it in a future step OWC Multi Mount Chapter 2 Mac Pro 667MHz Disassembly 2 MAC PRO 667MHZ DISASSEMBLY ...

Page 10: ...xpress card While doing this pull gently on the card itself toward you and it will come free Set the video card aside Immediately to the left of the PCI slots at the top of the logic board you will see this Phillips screw Using a Phillips P0 screwdriver remove it OWC Multi Mount Chapter 2 Mac Pro 667MHz Disassembly 2 MAC PRO 667MHZ DISASSEMBLY ...

Page 11: ...gap between the processor cover and the memory bay as shown Once the memory bay is moved you can pull out on the bottom of the processor cover on the bottom right and gently remove it from the computer It hinges up and to the right as shown It locks into the fan shroud on the left fairly tight OWC Multi Mount Chapter 2 Mac Pro 667MHz Disassembly 2 MAC PRO 667MHZ DISASSEMBLY ...

Page 12: ...h the cover removed Some later model Mac Pro systems especially 8 Core models have a hidden Phillips screw located a the base of the fan assembly Unscrew it OWC Multi Mount Chapter 2 Mac Pro 667MHz Disassembly 2 MAC PRO 667MHZ DISASSEMBLY ...

Page 13: ...e Mac Pro Place the bracket at the bottom left like shown here Start putting gentle force on the bracket pulling on it Then Using your right hand wiggle tug and pull the entire fan assembly out of the computer It attaches to the logic board via a connector that you don t need to worry about disconnecting it s a pressure fit End of Mac Pro 667MHz Install Please turn to Chapter 4 Cable Installation ...

Page 14: ... Mac Pro Make sure that the locking latch on the back right side of the Mac Pro Then remove all 4 of the drive bays and set them aside OWC Multi Mount Chapter 3 Mac Pro 800MHz Disassembly 3 MAC PRO 800MHZ DISASSEMBLY 3 1 System Requirements ...

Page 15: ... mag nets securing the cover in place Immediately to the left of the PCI slots at the top of the logic board you will see this Phillips screw Using a Phillips P0 screwdriver remove it OWC Multi Mount Chapter 3 Mac Pro 800MHz Disassembly 3 MAC PRO 800MHZ DISASSEMBLY ...

Page 16: ...to the logic board via a connector that you don t need to worry about disconnecting it s a pressure fit Remove the Phillips screw from the base of the fan assembly located at the bottom left of the processor heatsinks OWC Multi Mount Chapter 3 Mac Pro 800MHz Disassembly 3 MAC PRO 800MHZ DISASSEMBLY ...

Page 17: ... exposed the logic board look for the 2 SATA ports circled here Insert the L shaped SATA cable into the top SATA port on the logic board OWC Multi Mount Chapter 4 Cable Installation 4 CABLE INSTALLATION 4 1 Cable Installation ...

Page 18: ...it from it s mounts but it will come right out Disconnect the power and ATA cables from the back of the existing optical drive and set the carrier on a work surface in front of you OWC Multi Mount Chapter 4 Cable Installation 4 CABLE INSTALLATION Insert the straight SATA cable into the bottom SATA port on the logic board ...

Page 19: ...he optical bay following the existing wires Here you see the proper routing of one of the SATA cables behind drive tray 1 s logic board connector Make very sure you have the cables all the way tucked in behind the connector before proceeding OWC Multi Mount Chapter 4 Cable Installation 4 CABLE INSTALLATION ...

Page 20: ...it loose Attach a second screw to one of the outside holes that will make sure that you have the bracket centered on the hard disk drive Then you can insert the third screw and tighten all 3 of them firmly If you are going to install a 2nd 3 5 drive in the OWC Multi Mount continue with installation of that drive now following the same instructions You do not have to install 2 drives into the brack...

Page 21: ...ame method You also can add a 2 5 hard disk drive using the OWC 2 5 Multi Mount See the next chapter if you are wanting to install a mixed environment of drive mechanisms The OWC 3 5 Multi Mount assembly is ready to install into your system OWC Multi Mount Chapter 5 Bracket Assembly 5 OWC MULTI MOUNT ASSEMBLY ...

Page 22: ...echanism on the table in front of you with the interface connection to the right side Take the OWC 2 5 3 5 Adapter Bracket and attach it to the drive mech anism as shown above Firmly tighten the 4 Phillips screws that hold the 2 5 drive mechanism to the OWC 2 5 3 5 Adapter Bracket The OWC 2 5 3 5 Adapter Bracket is now ready to install into a 3 5 drive bay or into the OWC 3 5 Multi Mount ...

Page 23: ...5 OWC Multi Mount bracket The 3 5 OWC Multi Mount bracket that you are attaching the 2 5 3 5 Adapter Bracket bracket to has the white OWC text silkscreening on it as well Use that as your orientation The 2 5 3 5 Adapter Bracket is attached to the 3 5 OWC Multi Mount using 4 of the fine thread Phillips screws included with the mount 2 per side 4 total per drive bracket assembly The picture on the n...

Page 24: ...he 2 5 3 5 Adapter Bracket all assembled into one unit Depending on the installation you choose for your system the 3 5 to 5 25 OWC Multi Mount adapter bracket may not be needed but in many applications such as installation into the Mac Pro this is the best way to add 2 more 2 5 Hard Drives into your system 2 3 Installing 1 or 2 2 5 Hard Disk Drives into the OWC Multi Mount ...

Page 25: ... into the OWC Multi Mount 5 OWC MULTI MOUNT ASSEMBLY This is a completed assembly comprised of one set of 3 5 OWC Multi Mount drive brackets and one set of 2 5 3 5 Adapter Bracket all assembled into one unit Be sure to orient the bracket so that the SATA ports both point towards the rear of the Multi Mount ...

Page 26: ...wever and if you encounter difficulty getting the rubber isolation mounts to slide into the chassis you can also partially unscrew the opti cal drive to allow more flex in the mounting bay Once you have the OWC Multi Mount in place attach the SATA cables and use the SATA power Y cable to split the existing power cable to 2 separate SATA power connections and attach them to the drives OWC Multi Mou...

Page 27: ...bottom of the bay Carefully route the cabling so that it s not pinched or disconnected when fitting the carrier into the optical bay Fully insert it so that it s flush into the computer again The above picture is with 2 optical drives installed the procedure is identical for 1 2 or 3 drives being installed into the optical bay 6 OWC MULTI MOUNT INSTALLATION ...

Page 28: ...er You re all set enjoy your new drive s OWC Multi Mount Chapter 6 Bracket Installation Reinsert the fan module into the computer sliding it on it s base track and then reinserting it s Phillips screw into the logic board Take careful note of the location of the red SATA cable in this picture you will need to make sure that the cable is not behind the mounting bracket when you tighten the screw 6 ...

Page 29: ... want to be sure that the SATA ports are pointing in the right direction for your case installation 7 2 Usage Tips Once you have installed your drives into the OWC Multi Mount bracket system route your cables using the shortest path possible but definitely use any holes or grommets that your case has to offer Don t pinch any cables and make certain to not route your wires over sharp edges or corne...

Page 30: ...uter goes to sleep or into stand by mode A Yes they will spin down to save energy It will take about 30 seconds to access your data after being in sleep or stand by mode 8 2 About Data Protection To ensure that your files are protected and to prevent the loss of your data we strongly suggest that you keep two copies of your data one copy on you primary hard drive and a second copy on either your s...

Page 31: ...umber of the enclosure Your invoice number What operating system you are using Which kind and model of computer you are using All of this will help speed your support contact along 8AM 10PM CT Monday Friday 9AM 4PM CT Saturday By Telephone 800 275 4576 North America only International customers please call 815 338 8685 Live Chat is available 24 hours a day 7 days a week Visit http eshop macsales c...

Page 32: ...the following measures Reorient or relocate the receiving antenna Increase the separation between the equipment and receiver Connect the equipment to an outlet on a circuit different from that to which the receiver is connected Health And Safety Precautions Use proper anti static precautions while performing the installation of your hard drives into this drive enclosure Failure to do so can cause ...

Reviews: