OWC MERCURY HELIOS 3 Assembly Manual & User Manual Download Page 8

OWC Mercury Helios 3

Device Setup

6

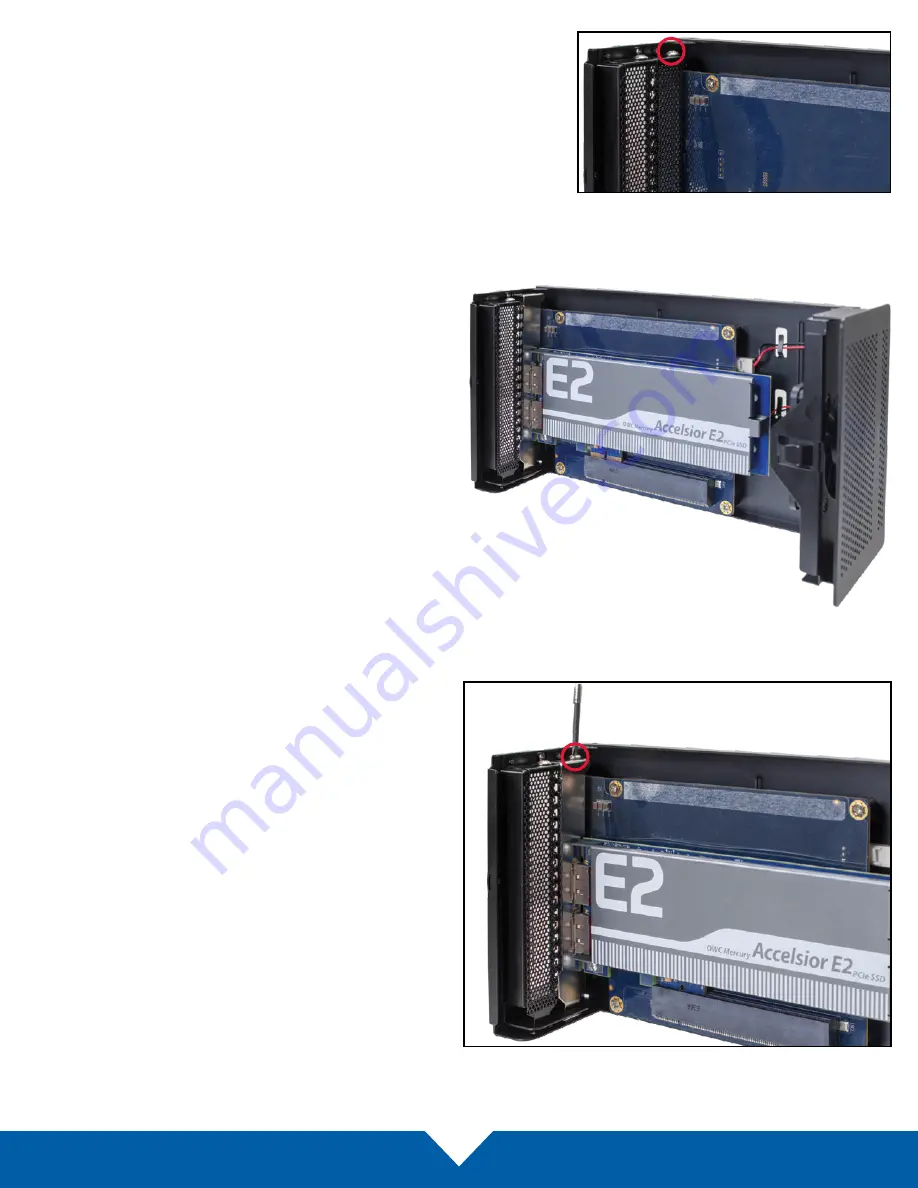
4.  Remove the screw (shown at right) which holds the 

PCIe slot cover in place, then remove the PCIe slot 

cover and set both items aside. Remove both slot 

covers if the PCIe card is a double-width card.

5.  Install the PCIe card. Line up the connectors on 

the card with the PCIe slot (highlighted in red), and 

make sure that the edge of the metal bracket on 

the PCIe card lines up with the slot in the bottom 

of the Helios 3.  The card shown is an example of 

a single-width, half-length, half-height card. Your 

card’s dimensions and appearance may differ.

6.  Once the PCIe card is fully seated, the PCIe 

bracket will sit flush with the opening on the back 

of the inner-chassis. Take the screw you removed 

in Step 4 and secure the PCIe card bracket to the 

Helios 3. 

Summary of Contents for MERCURY HELIOS 3

Page 1: ...M E R C U R Y H E L I O S 3 Assembly Manual User Guide...

Page 2: ...1 1 2 PC Requirements 1 1 3 PCIe Card Drivers 1 2 Package Contents 1 1 3 About This Manual 1 1 4 Front View 3 1 5 Rear View 3 1 6 Usage Notes 4 Device Setup 2 1 Assembly 5 Support Resources 3 1 Troub...

Page 3: ...1 3 PCIe Card Drivers PCIe card must operate without a driver or have a Thunderbolt aware driver Please visit the manufacturer web site for driver information GPUs not supported 1 2 Package Contents...

Page 4: ...lation openings on the device These help to keep the device cool during operation Blocking the ventilation openings may cause damage to the device and cause an increased risk of short circuiting or fi...

Page 5: ...IN connect the included power supply here 2 Mini DisplayPort connect a compatible display to this port including displays with a Mini DisplayPort adapter 3 Thunderbolt 3 ports attach the included Thu...

Page 6: ...rds PCIe card must operate without a driver or have a Thunderbolt aware driver Graphics cards GPUs are not supported The auxiliary power connector mounted on the back of the circuit board right side p...

Page 7: ...strap Work in a clean static free area and avoid wearing clothing that retains static charges Please visit this URL for more information www owcdigital com anti static 1 Loosen the thumbscrews on the...

Page 8: ...d with the PCIe slot highlighted in red and make sure that the edge of the metal bracket on the PCIe card lines up with the slot in the bottom of the Helios 3 The card shown is an example of a single...

Page 9: ...hown above 8 When the inner chassis is fully seated into the outer enclosure tighten the thumbscrews on the rear panel Press each screw in toward the enclosure then twist clockwise while still applyin...

Page 10: ...ower and any connected data or display cables then open the Helios and check the seating of the PCIe card Make sure it sits flush in the PCIe slot If the card is seated properly the issue may be relat...

Page 11: ...the equipment off and on the user is encouraged to try to correct the interference by one or more of the following measures Reorient or relocate the receiving antenna Increase the separation between...

Reviews: