background image

04

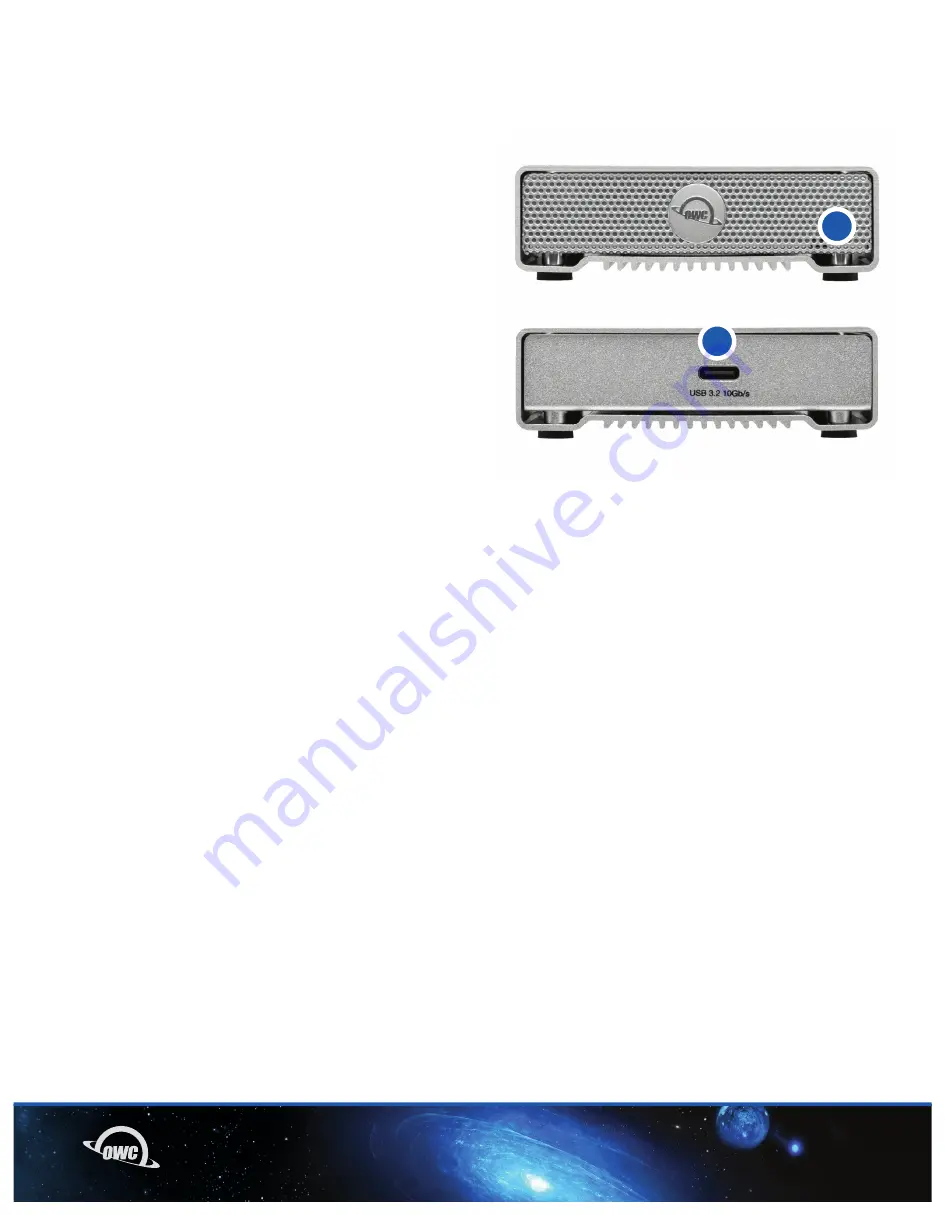
FRONT AND BACK VIEW

1.4 FRONT VIEW
Power and activity LED

- Solid Blue = Power on and link established
- Flashing Blue = Data access (read/write)

1.5 REAR VIEW
Connectivity

- USB 3.2 (10Gb/s) Type-C port - Connect to a USB 

Type-C or Type-A port using the included USB Type-C
cable and Type-C to Type-A adapter.

1.6 USAGE NOTES
For the safe removal of your drive and to ensure that no data is lost, always eject or unmount the corresponding 

disk from your operating system before disconnecting the device. You can use the methods described below to safely 

unmount the disk.

OS X/macOS:

- Drag the icon for the disk you wish to unmount to the trash can; OR

- Right-click the disk icon on the desktop, then click “Eject”; OR

- Highlight the disk on your Desktop and press Command-E.

Windows:

- Go to the System Tray (located in the lower right corner of your screen). Click on the “Eject” icon (a small green arrow 

over a hardware image).

- A message will appear, detailing the devices that the “Eject” icon controls, i.e., “Safely remove...” Click on this prompt.

- You will then see a message that says, “Safe to Remove Hardware.” It is now safe to disconnect the Mercury Elite Pro 

mini from the computer.

- The steps above are applicable to Windows 10 build 1803 and earlier. If you are using Windows 10 build 1809 

(October 2018) or later, you can eject the drive by clicking the ‘Show hidden items’ menu in the Taskbar, then clicking 

‘Safely Remove Hardware and Eject Media’, and last select the ‘Eject’ option for this volume.

1.5

1.4

Summary of Contents for MERCURY ELITE PRO MINI

Page 1: ...s Cooling Cool nearly silent operation EASY BACKUPS Apple Time Machine and Windows File History ready Real World Fast Up to 542MB s test proven performance Universally USB compatible Plug and play with USB Macs and PCs as well as iPadOS Android and Chrome OS devices ...

Page 2: ...s 3 1 2 Package Contents 3 1 3 About This Manual 3 1 4 Front View 4 1 5 Rear View 4 1 6 Usage Notes 4 INSTALLATION 2 1 Assembly 5 2 2 OWC Drive Guide 6 SUPPORT RESOURCES 3 1 Troubleshooting 6 3 2 About Data Backup 6 3 3 Online Resources 6 3 4 Contacting Technical Support 6 ...

Page 3: ...Warranty is not transferable and subject to limitations 1 1 SYSTEM REQUIREMENTS Hardware Any Mac PC Chromebook tablet or phone with a USB or Thunderbolt USB C port Operating System Mac OS X 10 6 8 or later macOS 10 12 6 or later Windows 7 or later iPadOS 13 or later Chrome OS Android 10 or later Linux Supported Drives 2 5 inch SATA drive up to 12 5mm height Booting macOS 10 6 8 or later Booting no...

Page 4: ...n OR Right click the disk icon on the desktop then click Eject OR Highlight the disk on your Desktop and press Command E Windows Go to the System Tray located in the lower right corner of your screen Click on the Eject icon a small green arrow over a hardware image A message will appear detailing the devices that the Eject icon controls i e Safely remove Click on this prompt You will then see a me...

Page 5: ...the outer chassis 2 Push and slide out the inner chassis tray 3 Place the drive into the inner chassis tray and connect the drive into the SATA connector on the circuit board Make sure the drive is fully seated 4 Required tools Phillips PH01 Driver Secure the drive to the inner chassis using the 4 included drive screws 5 Slide the inner chassis and affixed drive back into the outer chassis Secure a...

Page 6: ... or check Section 3 1 for a link to our online formatting tips A Connect the Mercury Elite Pro mini to your computer using the included data cable If you prefer to use a different formatting utility do so at this time and skip the rest of these steps B The disk will mount and your operating system will display it as OWC SETUP Open the disk icon to view its contents C Double click the OWC Drive Gui...

Page 7: ...files are protected and to prevent data loss we strongly suggest that you keep two copies of your data one copy on your Mercury Elite Pro Mini and a second copy on either your internal drive or another storage medi um such as an optical backup or on another external storage unit Any data loss or corruption while using the Mercury Elite Pro Mini is the sole responsibility of the user and under no c...

Page 8: ...no guarantee that interference will not occur in a particular installation If this equipment does cause harmful interference with radio or television reception which can be determined by turning the equipment off and on the user is encouraged to try to correct the interference by one or more of the following measures Reorient or relocate the receiving antenna Increase the separation between the eq...

Reviews: