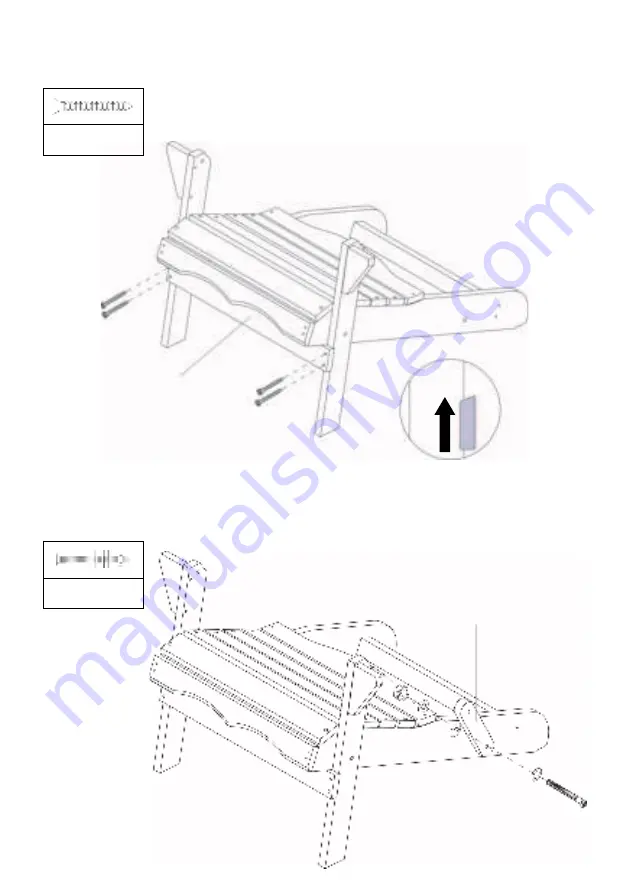
Step 7:
Secure
F2
to the assembly using
a
screws.
Ensure the bevel side of
is facing up.
screws
Step 8:
Take apart and screw x1
c
bolt to secure
E
to the left side of the chair base
assembly.
bolt
Bevel up
Page 1: ...AMY ADIRONDACK CHAIR OVAMYADCHNA OVAMYADCHBA OVAMYADCHWA...
Page 2: ......
Page 3: ...A1L x1 A1R x1 A2L x1 A2R x1 B1L x1 B1R x1 B2 x1 B3 x1 B4 x1 B5 x5 C1 C7 x1 each C8 x1 C9 x1 C10 x1 D x2 COMPONENTS...
Page 4: ...E x2 F1L x1 FLR x1 F2 x1 Wrench x1 a x59 3 spare b x4 1 spare c x6 1 spare...
Page 5: ...This will create the chair back assembly a screws Step 2 Begin the chair base assembly using a screws to connect parts B1L B1R B2 and B3 as shown below Do not fully tighten any screws or bolts until a...
Page 6: ...arts labelled B4 and B5 with a screws onto the chair base assembly a screws Step 4 Secure parts A1R to A2R using the a screws Repeat with A1L and A2L This forms the armrests a screws B4 B5 a a a A1R A...
Page 7: ...D using the a screws Repeat with securing F1L to D a screws Step 6 Take apart and screw the c bolts to secure the assembly made in step 5 to the chair base assembly from step 3 as shown below c bolts...
Page 8: ...cure F2 to the assembly using a screws Ensure the bevel side of F2 is facing up a screws Step 8 Take apart and screw x1 c bolt to secure E to the left side of the chair base assembly c bolt Bevel up c...
Page 9: ...lt to secure the left side of the chair back assembly to the chair base assembly as shown below b bolt Step 10 Repeat steps 8 9 to secure E and the right side of the chair back assembly to the chair b...
Page 10: ...ure the back of the armrests through the holes on part C9 Take apart and screw the c bolts to secure the front of the armrests through the holes on parts F1R and F1L Fully tighten all screws and bolts...
Page 11: ...Assembly complete...
Page 12: ...ion We hope that this user guide has given you the assistance needed for a simple set up For the most up to date guide for your product as well as any additional assistance you may require head online...