ASSEMBLY INSTRUCTIONS FOR NG
Step 4
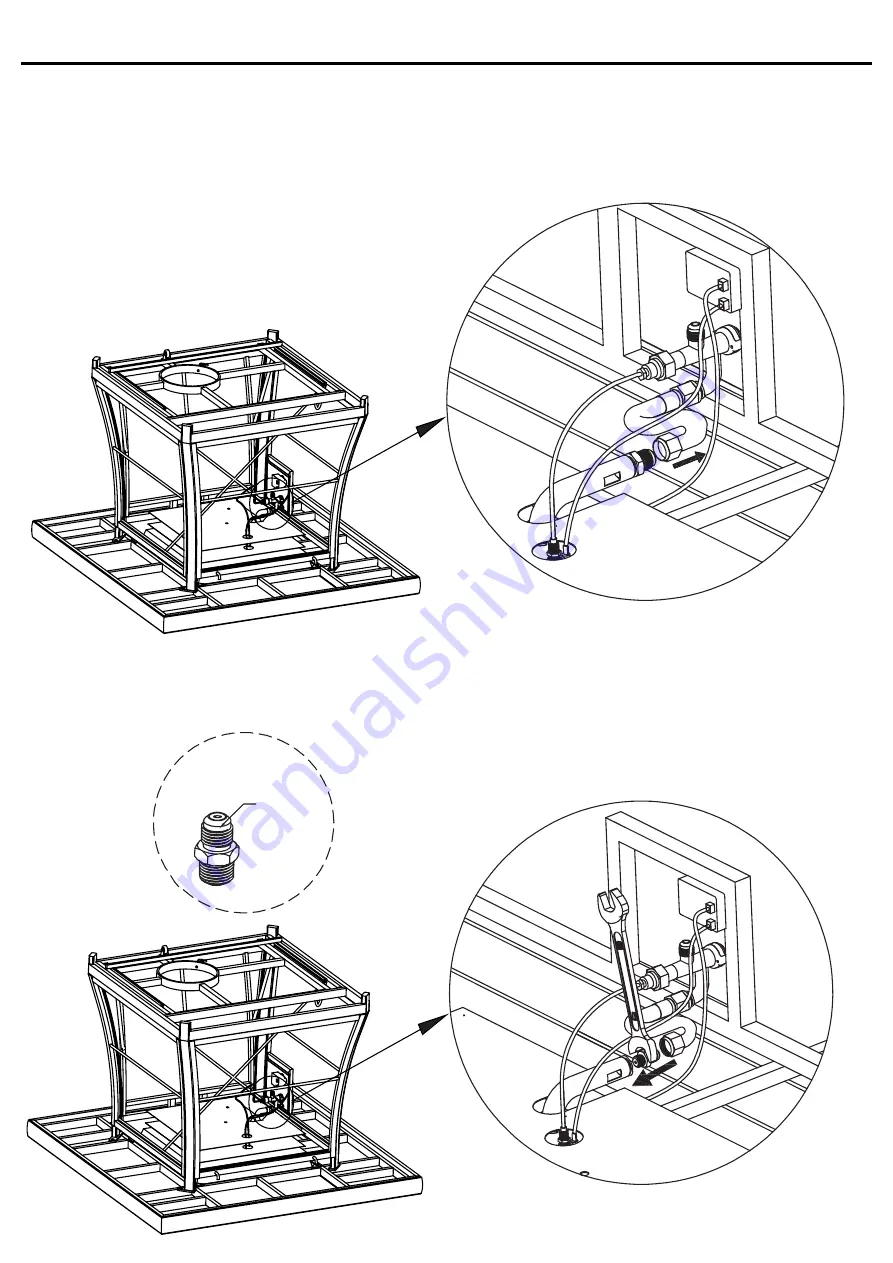
Step 5
Figure 236, Page 12
Disconnect the pipe and the LPG reducer.
Uninstall the LP reducer.
LP reducer
Φ 2.12
Page 1: ...TAIN FOR FUTURE REFERENCE READ CAREFULLY MADE IN CHINA Questions problems missing parts Before returning to your retailer call our customer service department at 1 866 839 2888 8 a m 5 p m EST Monday...
Page 2: ...Figure 236 Page 2 106 7 cm 42 in po 106 7 cm 42 in po 62 5 cm 24 6 in po...
Page 3: ...t and caution demanded will reduce the possibilities of personal injury or property damage The following symbols shown below are used extensively throughout this manual Always heed these precautions a...
Page 4: ...ding matches lighters sparks or open flames of any kind many feet away from the original leak Use only propane gas set up for vapor withdrawal Store or use propane gas in compliance with local ordinan...
Page 5: ...ustment alteration service or maintenance can cause property damage injury or death Read the installation operation a nd m a i nte na nc e i nstructions thoroughly before installing or servicing this...
Page 6: ...re pit is on a hard and level surface 13 There are no signs of spider or insect nests 14 All burner passages are clear 15 All air circulation passages are clear 16 Children and adults should be alerte...
Page 7: ...EXPLODED VIEW Figure 236 Page 7 Glass bead 4kg x 2 box Burner Table top Knob Control panel Ignitor Valve assembly and LP hose LP Reducer NG Reducer NG Hose Table base Top cover...
Page 8: ...ASSEMBLY INSTRUCTIONS FOR LP Step 1 Step 2 Figure 236 Page 8 Hang the top cover on the side of the fire table Put the glass beads onto the burner DO NOT COVER THE WINDGUARD WITH THE BEADS...
Page 9: ...5 Figure 236 Page 9 Secure the gas tank to the fire table at the bottom using the bolts Connect the gas to the fire table using LPG regulator Close the fire table Step 4 Open the fire table and instal...
Page 10: ...Connect the natural gas gray pipe Orifice size NG 3 66mm LPG 2 12 mm LP TRANSFORMATION PART LIST LP reducer with 2 12 mm orifice NG reducer with 3 66 mm orifice LP hose assembly NG hose assembly NG TR...
Page 11: ...ASSEMBLY INSTRUCTIONS FOR NG Step 2 Step 3 Figure 236 Page 11 Remove the LP hose using wrench Keep the LPG reducer steady using a wrench and loose the pipe using another wrench...
Page 12: ...ASSEMBLY INSTRUCTIONS FOR NG Step 4 Step 5 Figure 236 Page 12 Disconnect the pipe and the LPG reducer Uninstall the LP reducer LP reducer 2 12...
Page 13: ...ASSEMBLY INSTRUCTIONS FOR NG Step 6 Step 7 Figure 236 Page 13 Install the NG reducer to the pipe Reinstall the pipe to the reducer using wrench NG reducer 3 66...
Page 14: ...ASSEMBLY INSTRUCTIONS FOR NG Step 8 Step 9 Figure 236 Page 14 Turn over the fire table Fix the NG hose to the fire table...
Page 15: ...ASSEMBLY INSTRUCTIONS FOR NG Step 10 Figure 236 Page 15 Install the NG hose to the NG inlet of fire table using wrench Natural Gas Inlet...
Page 16: ...rmation in these instructions are not followed exactly a fire explosion or production of carbon monoxide may result causing property damage personal injury or loss of life The qualified service agency...
Page 17: ...as tank by turning knob counterclockwise until it is loose Caution LP gas tank must be properly disconnected and removed prior to moving this pit 1 A professionally installed shut off valve between th...
Page 18: ...knob counter clockwise until fully opened If you hear a rushing sound or smell gas turn the gas off Tighten any leaking connections If the leak is detected at connection nut and tightening does not st...
Page 19: ...Always purchase the correct size and grade of battery most suitable for the intended use Clean the battery contacts and also those of the device prior to battery installation Remove batteries from eq...
Page 20: ...STORAGE FOR TABLE COVER Step 1 Step 2 Step 2 Figure 236 Page 20...
Page 21: ...and turn control knob counter clockwise to LOW Hold the knob until just before the flames go out 5 Press the IGNITION button and hold for up to 5 seconds to light burner 6 Release control knob after 4...
Page 22: ...and orifices for blockage Remove blockage and clean burner inside and outside Turn cylinder valve OFF and fill the cylinder Blockage in orifice Control knob is not in ON position Gas pressure is low...
Page 23: ...nt is detected do NOT operate until repairs are executed 1 Wipe surfaces clean with mild dishwashing detergent or baking soda mixed with water 2 For stubborn surfaces use a citrus based degreaser and...
Page 24: ...e doux GLASS TABLE TOPS CLEANING Use mild soap and water or glass cleansers Do not use abrasive materials or cleansers STONE OR CERAMIC TOPS Don t use harsh abrasive cleansers on any of these products...