
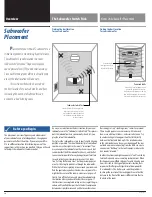


Variable Tuning Ultra-X12 Subwoofer
13
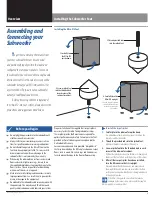
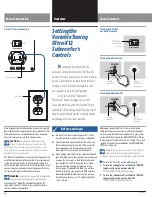
Setting the Port Mode switch
Port Mode Switch
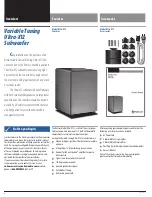
Depending on your bass preference, your Variable Tuning
Ultra-X12 subwoofer has two available “tuning” modes.
When the PORT MODE switch is set to MAX OUTPUT, your
subwoofer will provide the greatest level of overall bass
in regards to SPL (sound pressure level). Setting the PORT
MODE switch to MAX EXTENSION produces the deepest
bass (low frequency) levels from your subwoofer.
When using the MAX EXTENSION mode, make sure to
tightly insert the provided Port Plug into one of the ports
located on the bottom of the subwoofer. In MAX
OUTPUT
mode, both ports must remain open.
CAUTION:
Do not leave both ports open when the PORT
MODE switch is in the MAX EXTENSION position as your
subwoofer's performance will be compromised. If neither of the
ports are blocked with the supplied Port Plug, the PORT MODE
switch must remain in MAX OUTPUT mode. Failure to adhere to
these requirements can lead to poor performance and damage to
your subwoofer.
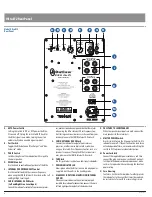
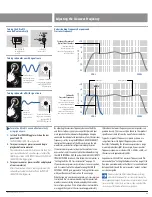
Volume Control
Use the VOLUME control on the rear panel of the subwoofer
to match the output of the Ultra-X12 with the rest of your
speakers. While it’s possible to “rough in” the channel lev-
els by ear, you’ll get much better results by using a sound
pressure level (SPL) meter. You can use either a dedicated
meter like those sold under the RadioShack and Galaxy
brands, or if you have a smartphone, use an SPL meter app.
Search the iPhone App Store or Android Play Store for “SPL
meter.” Most are available for free or at low cost. The SPL
meter app does not need to be calibrated for this adjust-
ment—only the comparitive dB level between channels
matters, not the absolute dB level of each channel.
Setting the VOLUME knob to the 12 o’clock position should
provide enough gain to properly match the sub level to
your speakers.
PORT
MODE
MAX OUTPUT
MAX EXTENSION
PORT
MODE
MAX OUTPUT
MAX EXTENSION
PORT
MODE
MAX OUTPUT
MAX EXTENSION
PORT
MODE
MAX OUTPUT
MAX EXTENSION
¼
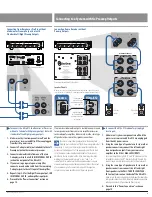
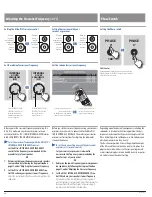
To measure and set the speaker channel levels:
1.
Sitting in your favorite listening seat, turn on the SPL
meter (or start the SPL meter app on your phone).
Hold the device at ear level facing the front of the room.
2.
Set the range (if necessary) to 80dB.
3.
Refer to your receiver or processor’s instructions to
activate the test-tone signal.
In most cases, you will want to set your receiver or proces-
sor to -20dBFS; with necessary gain adjustments, this
should correlate to approximately 75dB for your speakers.
Adjust speaker channel levels to match.
4.
For the Ultra, set the SPL meter to C-Weighting
Slow and the level to 85dB.
The dB level is not critical–but 85dB is the level most com-
monly used in home theater sub calibrations.
Note that the Radio Shack SPL meter is down about 12 dB
at 16 Hz, 7 dB at 20 Hz, and 4 dB at 25 Hz. Add these
numbers to the readout to compensate for these errors if necessary.
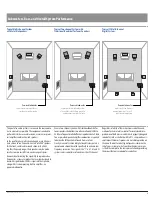
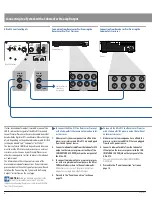
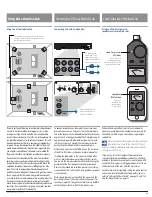
Setting the Volume level
Using an SPL meter to match
speaker levels with the Ultra-X12
VOLUME
MIN MAX
Make sure both
ports are open
Make sure to
block one of the
ports with the
supplied Port Plug
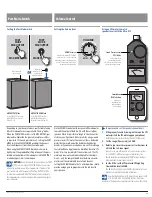
VOLUME control
Start with the Ultra-X12’s VOLUME
control set to the 12 o’clock position
while using your receiver or processor’s
test-tones to match the levels of your
speakers with the subwoofer.
MAX OUTPUT Mode
Set the PORT MODE switch to
MAX OUTPUT to increase the
Ultra-X12’s SPL.
MAX EXTENSION Mode
Set the PORT MODE switch to
MAX EXTENSION to produce
deeper bass from the Ultra-X12.
Sound Pressure Level
(SPL) Meter
Use an SPL meter to
accurately measure the
difference in sound levels from
each speaker in your system.
Smartphone
SPL Meter App
If you have a
smartphone, you
can download an
SPL meter app.