background image


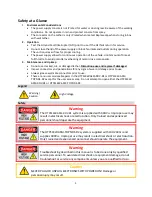
Caution: Once the power cord is connected to an outlet, AC voltage is 
present in the console and at the Laptop charging outlet.  
 

Note: Voltage applied to power supply is also present at the laptop 
port. Example: 220V input will result in 220V at laptop charging port. 


Quick Start Guide 

1.


Ensure the power connection has a good ground. 

2.


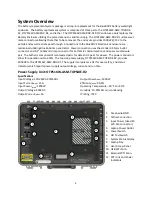
Connect supplied Green Wire to earth ground for added protection. Refer to OTPS1KW-ASM-
TOPSIDE-R2 image above for mounting location. 

3.


Inspect tether and bottle connectors for damage and lubricate with waterproof silicone grease. 
Grease procedure: 

Subconn Handling Instructions


4.


Connect tether to OTPS1KW-ASM-ROV-R1 and OTPS1KW-ASM-TOPSIDE-R2. Be mindful of the of 
the connector mating position when connecting. 

5.


Test GFI 

a.


Disconnect tether from power supply. 

b.


Turn on Power.  

Caution: Once the power is switched on, High Voltage is present on the 
tether output.


c.


Move GFI Test switch to HV+. Power supply will shut off. Fans will stop and LCD will 
indicate fault to HV+ side, if not see subsection 6F. 

d.


Cycle power to unit by turning main power switch to Off and then back On. 

e.


Move GFI Test switch to HV-. Power supply will shut off. Fans will stop and LCD will 
indicate fault to HV- side, if not see subsection 6F. 

f.


If either test fails, stop all operation and disconnect main power, see troubleshooting 
guide. 

6.


Turn off power  

7.


Connect tether to power supply 

8.


Connect USB data connection to computer. Follow the 

Blue Robotics Network Setup instructions


for proper setup. 

9.


Power unit and run standard preflight checks. 

Caution: Once the power is switched on, High Voltage is present on the 
tether output.


If vehicle is connected to tether it will also be powered 

at this time, stay clear of all propellers. Do not connect or disconnect 
tether with the power supply turned on.


10.


Commence mission. 

Troubleshooting 

1.


HV bias > ±2% indicated on System Status Display, Vehicle still operational. 


The Vehicle will continue to operate but the High Voltage leak needs investigated. 

Summary of Contents for OTPS1KW-ASM-ROV-R1

Page 1: ...Manual OTPS1KW ASM ROV R1 OTPS1KW ASM TOPSIDE R2 Outland Technology Inc 38190 Commercial Court Slidell LA 70458 985 847 1104 sales outlandtech com www outlandtech com Document Number 46 0013 Rev 2 Jul...

Page 2: ...3 System Overview 4 Power Supply Unit OTPS1KW ASM TOPSIDE R2 4 ROV Power Supply Enclosure OTPS1KW ASM ROV R1 5 System Status Display 5 User Access Area 5 Installation 5 Quick Start Guide 6 Troubleshoo...

Page 3: ...signs of wear or damage prior to use Always grease wet mate connectors prior to use There are no user serviceable parts in the OTPS1KW ASM ROV R1 or OTPS1KW ASM TOPSIDE R2 except for the user access...

Page 4: ...isted wire pair The tether is comprised of two twisted pairs for data and 3 pairs for power The power conductors allow for operation out to 300m The top side power supply OTPS1KW ASM TOPSIDE R2 provid...

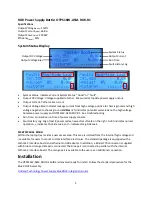
Page 5: ...st results are on the right A dot indicates normal operation indicates Pos Side Leak and indicates Neg Side Leak User Access Area Within the laptop tray resides a user access area This area is isolate...

Page 6: ...Move GFI Test switch to HV Power supply will shut off Fans will stop and LCD will indicate fault to HV side if not see subsection 6F d Cycle power to unit by turning main power switch to Off and then...

Page 7: ...tep down power supply can add additional noise into the system due to high voltage switching In addition the nature of I2C communications make it susceptible to this noise The solution is to implement...

Page 8: ...r 3 4 Spare Spare Green Green White Spare twisted pair2 5 6 Spare Spare Brown Brown White Spare twisted pair2 7 8 Fathom X Fathom X Blue Blue White Fathom X pair Note All 4 pairs are wired up to the 8...

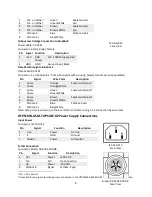
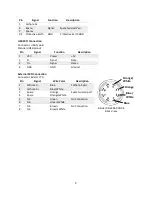
Page 9: ...cription 1 VCC Power 5V 2 D Signal Data 3 D Signal Data 4 GND GND Ground External FXTI Connection Connector Binder 770 Pin Signal Wire Color Description 1 2 Fathom X Fathom X Blue Blue White Fathom X...

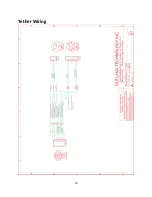
Page 10: ...10 Tether Wiring...
Reviews: