


RCPR96
Installation preparation:
Connect wiring extension supplied to console
wiring loom; connect
red
to
red
,
white
to
white
and
yellow
to
yellow
.
Tape up all connections.
Comfortable work position:
Slide seats all way back, if right handed
sit in passenger seat; if left handed, sit in driver seat.
Use ‘Blu-Tack’ in fit kit to adhere one of the 6mm x 25mm round head bolts to Phillips head screw driver and
store in convenient location, eg: on seat of vehicle or in/on centre console.
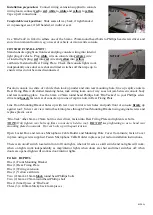
CONSOLE INSTALLATION:
Stand console upright on front seat and plug console wiring into interior
light plug of vehicle. Plug
white
wire on console into
red/grey
wire
of interior light plug,
red
into
red
wire and
yellow
into
yellow
earth wire fastened to Rear Fixing Plate. Check that console lights work
independently once doors are shut and timer switches off then tape up to
ensure wires do not become disconnected.
Position console in centre of vehicle then look up under and into rear mounting hole; line up captive nuts in
Rear Fixing Plate with slotted fastening holes, tuck wiring loom out of way so as not jam between console body
and rear mounting plate. Use the 6mm x 25mm round head Phillips bolt ‘Blu Tacked’ to your Phillips screw
driver
and
loosely
fasten rear of console up to one of captive nuts in Rear Fixing Plate.
Line Front Mounting Bracket holes up with rear view mirror screw holes and push front of console
firmly
up
against roof. Screw rear view mirror back into place through Front Mounting Bracket using original screws and
replace plastic cover.
‘Blu-Tack’ other 6mm x 25mm bolt to screw driver, fasten into Rear Fixing Plate and tighten rear bolts.
NOTE:
Only tighten rear bolts up firm so console is held to roof.
DO NOT
keep tightening so as to bend rear
mounting plate downwards. Do rear bolts up with equal tension.
Open Locker Box and remove Microphone Cable Holder and Mounting Hole Cover from inside; fasten Cover
in place using screws supplied. Fasten Microphone Cable Holder in place as per radio installation instructions.
There is an on/off switch located in front of front lights, when off it acts as a kill switch and no lights will work;
when on lights work independently as map/interior lights when doors are shut and timer switches off; when
doors are opened lights will work as door/interior lights.
Fit Kit: RCPR96
One (1) Front Mounting Bracket
One (1) Rear Fixing Plate
One (1) Wiring extension
One (1) Yellow earth wire
Two (2) 6mm x 16mm
black
round head Phillips bolts
Two (2) 6mm x 25mm round head Phillips bolt
One (1) Small piece of ‘Blu-Tack’
Three (3) x 100mm Sticky back foam pieces
TAPE UP
TAPE UP


