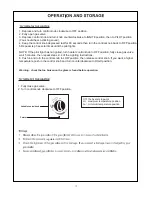
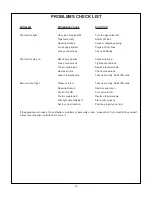
Outback OUT370663/PH500 Assembly And Operating Instructions Manual Download Page 7

regulator

Off:  the heater stop work
Hi:   maximum temperature position
Lo:   minimum temperature position

1. Fully close gas valve.
2. Turn control knob clockwise to OFF position.

Variable control knob

Pointer

Warning

˖

check that no broken on the glass is found before operation.

1. Depress and turn control knob clockwise to OFF position.
2. Fully open gas valve.
3. Depress control knob and turn knob counterclockwise to IGNITE position, then to PILOT position
(You should hear a clicking sound).
4. Keep the control knob depressed last for 60 seconds,then turn the control knob back to ‘OFF’position.
5.Repeat step 3 several times until the pilot lights.

NOTE: If the pilot light has not ignited, turn heater control knob to OFF position, fully close gas valve,
wait 5 minutes, then repeat steps 2–4 of the Lighting Instructions.
6. Push in and turn the control knob to LOW position, then release control knob. If you want a higher 
temperature,push in the control knob and turn counterclockwise to HIGH position.

LOW

HIGH

PILOT

 OFF

IG

N

IT


P

us

to 

tur

n

Summary of Contents for OUT370663/PH500

Page 1: ...as 1 Shut off gas to the appliance 2 Extinguish any open flame 3 If odor continues immediately call your gas supplier or your fire Department FOR YOUR SAFETY 1 Do not store or use gasoline or other fl...

Page 2: ...icinity of this or any other appliance 2 An LP cylinder not connected for use shall not be stored in the vicinity of this or any other appliance WARNlNG 1 For use outdoors or in amply ventilated areas...

Page 3: ...st meet the following requirements Purchase LP tanks only with these required measurements 31 8cm diameter x 58 cm tall with 15kg capacity maximum In case of violent wind particular attention must be...

Page 4: ...F CONTENTS Caution 1 Heater Stand and Location 2 Gas Requirements 2 Leakage Test 2 Operation and Storage 3 Cleaning and Care 4 Parts and Specifications 4 Assembly Parts and Procedures 6 Problems Check...

Page 5: ...tive device removed for servicing the heater must be replaced before operating the heater Adults and children should stay away from high temperature surface to avoid burns or clothing ignition Childre...

Page 6: ...of liquid petroleum gases A dented rusted or damaged tank may be hazardous and should be checked by your tank supplier Never use a tank with a damaged valve connection The tank must be arranged to pr...

Page 7: ...sition then to PILOT position You should hear a clicking sound 4 Keep the control knob depressed last for 60 seconds then turn the control knob back to OFF position 5 Repeat step 3 several times until...

Page 8: ...le or corrosive Remove debris from the burner to keep it clean and safe for use Cover the burner unit with the optional protective cover when the heater is not in use PARTS AND SPECIFICATIONS 4 1830 m...

Page 9: ...ove C Table of injector APPLIANCE CATEGORY TYPES OF GAS Butane Propane GAS PRESSURE 28 30mbar 37 mbar 30 mbar 50mbar 37mbar TOTAL HEAT INPUT Hs Qn 11kW G30 800g h G31 786g h INJECTOR SIZE The marking...

Page 10: ...ion for leakage test Parts List Upper Protective Mesh N O I T P I R C S E D T R A P QUANTITY A Reflector 1 B 1 Mesh C 1 D Heating Body E Gas Hose F 1 1 G H 1 Base Cylinder Housing Wheel 1 1 Reflector...

Page 11: ...HARDWARE CONTENTS shown actual size AA BB DD CC Wing nut Qty 3 Washer 6 Qty 15 Screw M5 X 10 Qty 11 Stud Qty 3 Philips screwdriver Qty 1 Wrench Qty 1 II EE Ground Fixer Qty 3 FF Bolt M6 x 10 Qty 6 GG...

Page 12: ...sed 1 To protect heater from strong wind anchor the base securely to the ground with screws Reverse the base fix the ground fixer to the base with bolt M6X10 and washer 6 like picture shows Secure the...

Page 13: ...the Heating Body using 3pcs screw M5X10 DD HH x 3 x 1 Philips screwdriver Screw M5X10 Hardware Used 3 Assemble the heating body Secue the heating body to the tank housing using 4pcs screw M5X10 DD HH...

Page 14: ...ng 3pcs wing nut and 3pcs washer x 3 x 3 x 9 AA BB Wing nut Washer 6 CC Stud 5 Assemble the upper protective mesh to the heating body directly CAUTION Do not hang clothing or any other flammable mater...

Page 15: ...rfaces or it may melt and leak causing a fire After the cylinder is placed inside the heater secure the cylinder with block belt tightly 8 Leak Check 7 Regulator Cylinder Hose Regulator WARNING of the...

Page 16: ...s Thermocouple bad Replace thermocouple Gas leak in line Check connections Lack of fuel pressure Tank near empty Refill LPG tank B If the appliance is in case of any defaults or problems of assembly o...

Page 17: ...lector Fat fires are not covered under warranty Any warrany guarantee claims shall be rendered void in the event of improper use of the heater or the use of non approved fuels discolouration rusting o...

Reviews: