


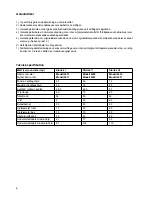


11
Note: There is an extension stop that limits the maximum height setting; you must not attempt to
extend it past this point.
•
Finally, please loosen the stud screws (1/B) and adjust the grab rail in such a way that the front edge of the grab
rail ends approximately 7.5 cms behind an imaginary vertical line starting at the point where the front wheels
touch the ground on an even surface. See illustration (5).
Note: This setting of the grab rail depth must be checked and, if necessary, reset after each height
adjustment, as otherwise there may be a danger of tipping forward.
Possible adjustments and adaptations
Height and depth of grab rail
As described in ”Unpacking and setting up”.
Folding for transport
Before folding, please loosen the folding locks (3/A) by pushing them from a stretched into a slightly buckled position.
Please proceed by carrying out the steps described in ”Unpacking and setting up” in reverse order.
Caution - Danger of pinching:
While folding the walker, do not hold on to other parts than the ones described, especially not the folding
mechanism.
Accessories
Any accessories that have not been installed by the manufacturer must be installed by trained staff.
Carrying basket
There is a carrying basket available fit each of the NURMI models.
Model 2413 =(7/A), Model 2420-31 =(7/B)
Apart from its practical function, its therapeutic use is to provide a stimulus for the patient to collect objects.
The basket has two hooks welded on and can simply be hinged onto the grab rail.
Hip pads
The hip pad (8/A) provides lateral support for the patient from the thigh to the pelvis area.
By tightening the retaining screws the hip pad width can be adjusted; thus it is also safe from unwanted twisting.
A hose part has been inserted for additional frictional drag. For this reason, the inner diameter of the plastic
clamps is slightly larger than that of the grab rail tube.
Wheel-lock system
The wheel-lock system enables the patient both to regulate braking and to prevent the NURMI walker from rolling
away.
To activate the wheel-lock system, squeeze the brake lever (13/A) until you hear the locking jaw (13/B) snap into
place. To release the wheel-lock system, squeeze the brake lever slightly and open the locking jaw with your index
finger.
Should the braking power be insufficient, adjust the relevant brake cable with the adjusting screw (13/C).
As with the hand plates, the original grip is replaced by a profiled sponge rubber grip.
Posterior pad
By means of the posterior pad (9) the user can be positioned within the grab rail frame in the best possible way.
Since many users tend to lean backwards, this pad keeps the user at the front of the grab rail frame, in an upright
position.
The posterior pad can be adjusted in three dimensions.
•
depth adjustment with clamping lever at the clamping support holder (9/A)
•
height adjustment by turning the clamping support holder (9/B)
•
angular adjustment of the posterior shell after opening the conical clamp (9/C)
Extra-high grab rail with padded forearm rests and hand grips
The extra-high grab rail with padded forearm rests and hand grips was developed for users who find it easier and
safer to support themselves on their forearms rather than on their hands, with arms straightened.
The grab rail is mounted and adjusted to suit the patient as described in the introduction. After that, the grips with
the padded arm rests mounted on them are inserted into the ends of the grab rail. The two stud screws (10/A)
prevent the grips from getting out of place or turning. After loosening the retaining screws (10/B) and the plastic
clamps the padded forearm rests (10/C) can be moved along the rail grip; due to the asymmetric screwing, the
forearm rests can be mounted in a twisted position, too.
The distance between forearm rest and grip should be adjusted to avoid pressure areas and cramped postures.
The patient’s forearms are fixed by two Velcro straps (10/D) each.


