Water Traps
755E6
Ottobock | 13
Connect the vacuum machine to the power mains. Take the enclosed 10 m long PVC hose and cut it off to the neces-
sary length. Then connect it to the connecting sleeve.
Make sure that all six vacuum controllers (1) are completely closed or else pump performance can be compromised
and have negative effect on the quality of casting and deep-draw operations.
7 Water Traps
(Fig. 2)
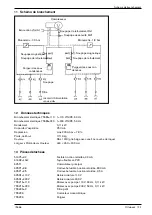
The water traps (11) serve simultaneously as vacuum containers.
The glass bottles must be air-tight and sealed with rubber plugs. The water traps are provided with an electric safety
circuit: When the water container reaches about 2/3 full, then an accoustic warning signal will sound along with an
optical LED (4) warning signal on the front.
When you empty and replace the water traps, make sure the plug contacts (12) are not loose and have made good
contact.
The plugs where the contacts are located should be dry and clean or they can also set off the warning signals - even
when only a little moisture is present.
If the water traps are not emptied before the water level has reached 2/3 of the jar volume, or if the plug contact is
defective, the pump will take in water and be damaged!
8 Contact Pressure Gauge
(Fig.1)
Both vacuum circuits are provided with a contact pressure gauge (3) which allows continous adjustment of vacuum
pressure.
By pressing the set screw (2) and turning to the left, you will increase the vacuum. By pressing the set screw (2) and
turning to the right you will reduce the vacuum.
9 Filter Replacement
(Fig. 3, 4)
The suction performance of the vacuum machine (and consequently the quality of your casting and deep-draw work)
will be strongly compromised by clogged filters. Therefore the filters (7) must be completely replaced every 6 to 12
months according to the load of the vacuum machine. Cleaning of the individual filters is not permitted.
The following steps are to be performed during the 755Z20=2 filter replacement:
• Loosen the three flat head screws (9) and remove filter holder (14) and filters.
• Loosen the axle nuts (8) of the filter with the enclosed 17-mm fork wrench.
• Remove the filter (7) from PVC hose and replace the new one in the reverse order.
10 Water Traps Evacuation
(11)
The water traps must be emptied when they reach 2/3 volume. To do this remove the water trap from the holder and
remove the seals. Empty and clean the water trap and reassemble it in the reverse procedure again.


